
This is part five of a nine-part series that explores how to create a Unity application for a mobile device, using Augmented Reality and Azure Spatial Anchors
- In Part 1 we introduce the project, requirements, technologies and various AR concepts.
- In Part 2 we follow the steps in the project QuickStart guide.
- In Part 3 we create a basic Unity ARFoundation application.
- In Part 4 we look at one of the building blocks of AR - the “Placement Cursor”.
- In Part 5 we explore how the UI for the project works.
- In Part 6 we learn how Azure Spatial Anchors can be used in our project.
- In Part 7 we step up our game by looking at how we can add and move virtual scenery.
- In Part 8 we develop functionality that saves and restores virtual scenery to the cloud.
- In Part 9 we learn about the Azure Functions backend for the solution.
The entire project sourcecode that accompanies this series can be found at:
In this article and for the remaining parts of this series, we’ll be reviewing the code and composition of the finished project.
Therefore, in order to follow along properly we will need to have:
- cloned the project from GitHub : SiliconOrchid : Unity-AR-AzureSpatialAnchor-Demo
- followed the setup instructions found in Part Two - Project QuickStart
Note: In the previous two articles of this series, Part Three - A basic AR stack and Part Four - An AR Cursor we had been creating a project “from the ground up”. However, as the project becomes increasingly more complex, that approach of “step-by-step instructions” would rapidly become impractical to document.

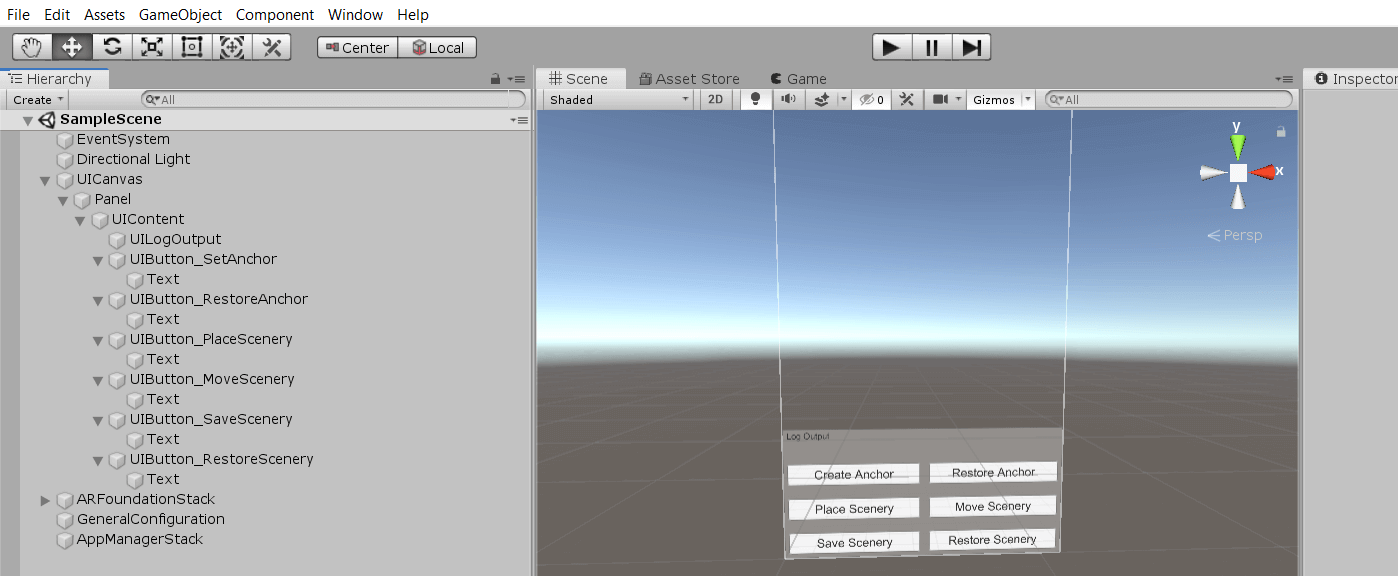
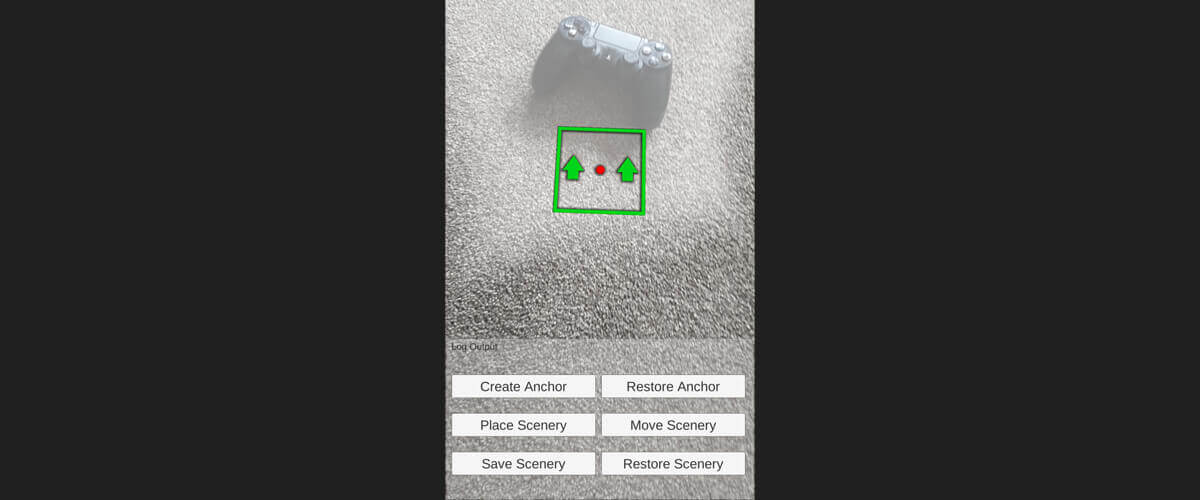
UI Buttons
Applicable resources in this section:
/UICanvasGameObject in Unity editor
Our application is going to require that we have some buttons in order to provide part of the UI that we can interact with. The UI is primarily a selection of six buttons, along with a textbox that is used to display messages.
There are a few additional elements (panels, containers etc) used for layout.
Go ahead and take a few moments to have a look at the composition of the “UICanvas” GameObject and its various child objects, in the Unity editor. Note how it uses features such as “Canvas Scaler” in order to accommodate different size device displays.
The UI buttons will provide the following functionality:
- Create Anchor - Used to place an anchor at a spot targeted by the Placement Cursor.
- Pressing this button a first time will create a native anchor and a visualisation (a simple sphere) to show us where the anchor exists in the 3D space.
- Pressing the button a second time will initiate the process of saving the anchor to the cloud.
- Pressing this button a first time will create a native anchor and a visualisation (a simple sphere) to show us where the anchor exists in the 3D space.
- Restore Anchor - this button is intended to be used when an anchor has already been previously created.
- Tapping this button will request the current anchor from the cloud and start attempting to match the sparse-point-cloud data against the feature-points in the current camera view.
- Place Scenery - this button is used to spawn a new “Scenery” object in the virtual world.
- This will only work if the “Placement Cursor” is currently targeting a valid plane.
- Save Scenery - this button is used to save all of the current “Scenery” objects to the cloud.
- This works by iterating over every “Scenery” object currently set and extracting their poses into simple data types. It’s important to note that we only use “local” Pose data that is relative only to the parent anchor.
- The data is serialised into a JSON formatted string and transmitted to a cloud service using a REST API.
- Restore Scenery - finally, we have a button that restores serialised data from the cloud and “rehydrates” GameObjects back into the scene.
- We would use this button to demonstrate how we could view a scene created either previously - or using another device.
Note: This demo works by working with only the single “latest” anchor to the cloud. If we create and save an anchor, the previous version is replaced.
UI state management
Applicable code in this section:
Assets/Scripts/Managers/AppStateManager.csAssets/Scripts/Utility/Enum/UIStateEnum.cs
In the previous article, we were introduced to the Component AppStateManager, which has the purpose of being a centralised place for persisting application state.
In that previous article, we only used AppStateManager for the sole purpose of tracking the Pose of the “Placement Cursor”.
- In the context of the finished project,
AppStateManageralso has additional uses that are applicable to the UI:- currentUIState - a mechanism to control whether various buttons should be displayed or hidden.
- currentCloudAnchorState - this is mainly intended to control the process of creating or looking-for cloud anchor, but it is also used to feed into the
currentUIStateselection. - currentOutputMessage - this is used for application messages intended for the user to read.
Note: There are other fields in
AppStateManagerbut these aren’t really applicable to the UI, so we won’t cover them here.
By using this approach, we can avoid having the various separate subsystems (e.g. the Scenery Placement Manager) from attempting to directly show or hide the buttons in the UI. That approach could lead to an unmanageable spaghetti-tangle and duplication of code.
- Our application works by having the various subsystems set the intended state of the UI
- this works by using the field
currentUIStatewhich has an enumeration typeUIStateEnum.- an example enumeration would be
AllButtonsDisabledorAnchorButtonsOnly_CreateAndRestore
- an example enumeration would be
- this leaves only the
UIManager(which we’ll look at in the next section) with the responsibility of actually updating the UI components:- for example, setting the appropriate combination of button visibility.
- updating the UI message box with the current message
- this works by using the field
UIManager code
Applicable code in this section:
Assets/Scripts/Managers/UIManager.cs
Broadly speaking, there are three main parts to this component:
- setting up references to various resources
- setting up button click handlers
- showing/hiding buttons as appropriate to the current state of
currentUIState
Let’s review the code in this Component a little more closely:
In the
awakemethod, references to the ComponentsappAnchorManager,sceneryPlacementManagerandsceneryPersistenceManagerare added to this code. These Components need to be available to the UI, because we need to wire-up functionality that they provide, to UI button click-handlers.appStateManager = FindObjectOfType<AppStateManager>(); appAnchorManager = FindObjectOfType<CloudAnchorSessionManager>(); sceneryPlacementManager = FindObjectOfType<SceneryPlacementManager>(); sceneryPersistenceManager = FindObjectOfType<SceneryPersistenceManager>();We use various combinations of
GameObject.Find()to locate GameObjects at runtime.uiContentObject = GameObject.Find("/UICanvas/Panel/UIContent"); uiButtonSetAnchorObject = uiContentObject.transform.Find("UIButton_SetAnchor").gameObject;Note: This may contrast with many other Unity sample projects that you may have seen, which instead define references using drag+drop configuration in the Unity Editor. The approach used in this demo instead attempts to minimise that effort and keeps the configuration “in-code”.
Also in the
awakemethod, we can see that we set up all of the click-handlers in code.- We use delegates as a way to target what happens when a button is clicked.
csharp
uiButtonSetAnchorObject.GetComponent<Button>().onClick.AddListener(delegate { UIButton_SetAnchor_Click(); });
- We use delegates as a way to target what happens when a button is clicked.
In the
#region click handlers, we have used a selection of intermediary methods, such asUIButton_SetAnchor_Click(), as the function delegated by the click handler.- Although we could have entered the code directly into the various
.onClick.AddListenerlines, the approach we have used here arguably makes things more clearly separated, making them easier to see and understand.
private void UIButton_SetAnchor_Click() { appAnchorManager.SaveAnchor(); }- Although we could have entered the code directly into the various
The methods
UpdateUIButtonsVisibilityAccordingToState()andUpdateUIButtonVisibility()are jointly responsible for showing/hiding the correct combination of button visibility - along with any revisions to the button text.- The code works by looking at the current UI state setting from
appStateManager.currentUIStateand using a simpleswitchstatement to determine which combination of buttons should and shouldn’t display.
private void UpdateUIButtonsVisibilityAccordingToState() { switch (appStateManager.currentUIState) { case UIStateEnum.AllButtonsDisabled: UpdateUIButtonVisibility(false, false, false, false, false, false); break; . . . . private void UpdateUIButtonVisibility( bool SetAnchor_IsVisible, bool RestoreAnchor_IsVisible, bool PlaceScenery_IsVisible, bool MoveScenery_IsVisible, bool SaveScenery_IsVisible, bool RestoreScenery_IsVisible ) { uiButtonSetAnchorObject.SetActive(SetAnchor_IsVisible); uiButtonRestoreAnchorObject.SetActive(RestoreAnchor_IsVisible); uiButtonPlaceSceneryObject.SetActive(PlaceScenery_IsVisible); uiButtonMoveSceneryObject.SetActive(MoveScenery_IsVisible); uiButtonSaveSceneryObject.SetActive(SaveScenery_IsVisible); uiButtonRestoreSceneryObject.SetActive(RestoreScenery_IsVisible); }- The code works by looking at the current UI state setting from
Next, in part six, we learn how Azure Spatial Anchors can be used in our project.