
We all get stung with technical problems when it comes to streaming; wouldn’t it be nice if there was a way to test things out privately, without having to go live with our streaming service? Fortunately, there is!
Introduction
Streaming has quite the learning curve!
For most of us, the first hurdle to overcome is simply getting our head around how the various tools-of-the-trade work.
Typically, we find ourselves faced with things to learn such as:
- how do we set up our computer? (do we need multiple computers with video capture devices, etc)
- how do we set up OBS? (what stream settings should we use, etc)
Note: This article is not a guide about how to set up streaming systems or how to use OBS - there are plenty of other resources out there for that.
We get to that big moment where we think that we’re got the technology figured out and that we’re ready to go live!
We tentatively press the “start stream” button, already nervous about our first time streaming and …
Everything goes Pete Tong
.. then, the fans on our computer spin up to full speed and people in chat are telling us “we can’t see you!” or “the framerate has dropped to a slideshow!”.
When it comes to streaming, things that seemed to be ok when you were designing your scenes can easily start to go wrong when you actually go live.
- The main issue to consider is that OBS combined with real-time video encoding is extremely resource-intensive and will make some computers, especially non-gaming laptops, work harder than they can manage.
The problem with “going live” is that you suddenly start encoding high-resolution video, which is computationally extremely hard work.
When a processor works hard, it produces more heat.
If the processor cooling system (i.e. heat-sinks and fans) can’t get rid of that heat quickly enough, the processor will overheat.
When a processor detects that it is overheating, it responds by throttling itself down to keep heat under the limits.
When that happens, we literally start to lose computing performance.
This will typically manifest with a stream that, although it may have started out by working all ok, ends up breaking several minutes into the broadcast.
Laptops, in particular, can be a problem, because although many new models come with enough processing power to technically “do the job”, in reality, they often don’t really have the thermal-management hardware needed to keep heat under control, when working under high-load for prolonged periods (i.e. big heatsinks and fans).
Hardware encoding may help
Using the hardware-encoding functionality of a GPU can often be the lifeline that we need. By offloading the work away from the CPU, onto silicon that is designed for this kind of workload, we can often see significant improvements.
However, sometimes this isn’t enough either.
For example, the GPU integrated with Intel CPUs, is often barely able to keep up. AMD processors typically don’t even have an integrated GPU available, meaning that you would need a computer with a discrete graphics card in any case.
Note: For younger or international readers, the phrase “it’s gone Pete Tong” is rhyming slang for “it’s gone wrong”, which was a popular thing to say in the UK in the nineties and early noughties. Check out Wikipedia: Pete Tong if you’re curious.

Is it possible to use OBS to stream to someplace other than a streaming service such as Twitch?
Fortunately there is a way to test everything out, without being in the glare of public scrutiny.
What happens when we stream normally?
When we use OBS under normal circumstances, we use the Real-Time Message Protocol (RMPT) to send a stream from our computer to an Ingest Service.
RTMP is another protocol in a family of TCP-based protocols. It is used in places where we need to make persistent, low-latency, point-to-point connections across the internet.
- We can recognise that we are using RTMP, as the URL will contain the protocol marker “rtmp://” (instead of a more familiar “http://“).
An Ingest server is a service run by a streaming provider, such as Twitch, to which we upload our stream from our own computer.
- According to dev.twitch.tv, “The Twitch ingesting system is the first stop for a broadcast stream. An ingest server receives your stream, and the ingesting system authorizes and registers streams, then prepares them for viewers.”
- According to dev.twitch.tv, “The Twitch ingesting system is the first stop for a broadcast stream. An ingest server receives your stream, and the ingesting system authorizes and registers streams, then prepares them for viewers.”
What are we going to do that’s different?
We’re still going to stream - but instead of using the built-in functionality of OBS to uplink to an ingest server of a service like Twitch, we’ll broadcast either:
- directly back to our computer
- across our local network to a second computer (which is probably a better option)
The “receiving” computer will be running a Media Player that is capable of receiving network streams.
To pull this off, we’re going to configure OBS to transmit a stream to a local network address using another TCP protocol: the User Datagram Protocol (UDP).
- The UDP protocol is typically used for real-time transmission of data, often simultaneously to many clients. For things like streaming video, this is ideal because it is lightweight and doesn’t have any of the overhead that we associate with other protocols such as HTTP.
- For example, there is no packet handshaking; this does, however, mean that it doesn’t guarantee data delivery. For a streamed video, we probably don’t care too much about this and it’s acceptable for breakups in the video to happen.
- If you are curious, you can learn more about UDP here at wikipedia : User Datagram Protocol
Note: Typically UDP is used to transmit data to many machines on a network, but in this article, we will use it to target only a single computer on the network.
Step by step instructions about how to stream directly to the same computer - or another computer on your local network.
- First of all, we need to decide on whether we will be:
- looping our stream back to the same computer, or
- watching the stream by using a second computer, on the same local network.
Note: If you’re running into the upper limits of our “streaming-systems’” performance, it may be a good idea to use a spare computer to receive and watch our test stream - otherwise we’re asking it to both encode and decode the video stream.
For the rest of this article, we’ll refer to this secondary computer as the “viewing computer”.
- If you’re using the same computer to receive the stream, we’ll still refer to this as the “viewing computer” to avoid confusion.
- If we are using a second computer, it really doesn’t need to be anything special. Perhaps you have a really old laptop which is gathering dust in a cupboard. If it is powerful enough to watch YouTube or Twitch, then it’ll be fine for what we need it to do here.
- If you’re using the same computer to receive the stream, we’ll still refer to this as the “viewing computer” to avoid confusion.
For the rest of this article, we’ll refer to our main computer that runs OBS as the “streaming system”.
- To clarify, this may represent a combined setup, consisting of two computers with a video capture card, or a computer and a gaming console etc.
Get VLC Media Player
- We need a copy of VLC Media Player.
- VLC Media Player supports the playing of Network Streams, not just file-based media.
- VLC Media player is terrific and is something that you may like to have installed anyway!
- VLC Media player is free and open-source. It is backed by the VideoLAN organisation which is a non-profit who also provide various libraries and codecs related to compressed video.
- You can get VLC Media Player from their website https://www.videolan.org/vlc/ .
- Go ahead and install VLC Media player onto our viewing computer. It’s a reputable organisation and download, so you’ll be ok to add it to your system.
Get IP information
In preparation for subsequent steps, we need to know what IP addresses we can use:
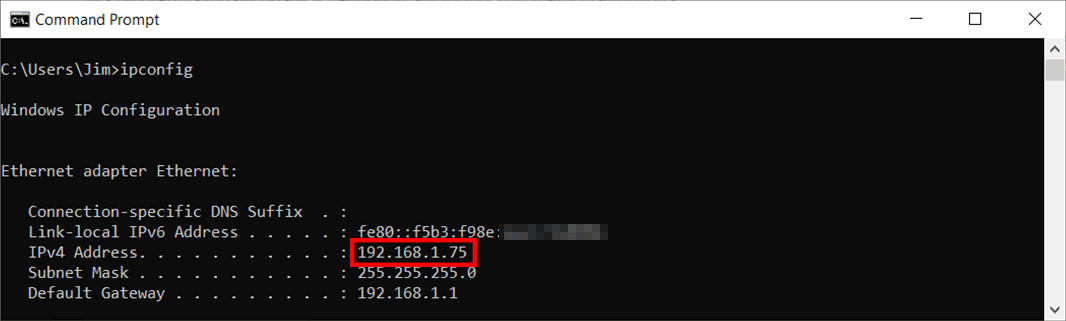
- On Windows systems, at the command prompt, we can use the command
ipconfigto list our network adapters.- On our “viewing computer”, run the command and make a note of the local IP address of our computer
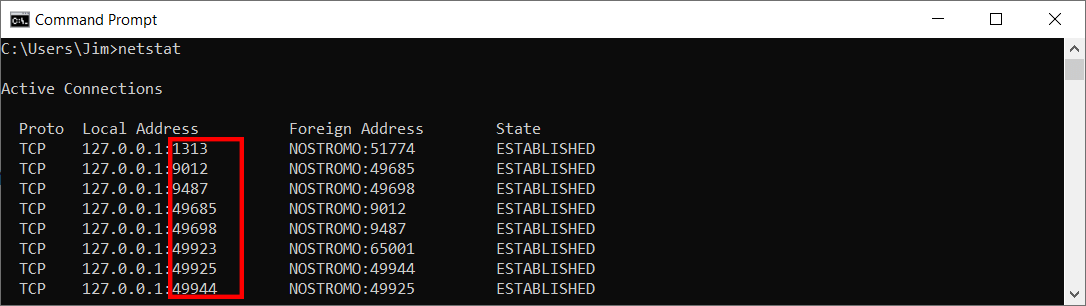
In this article, we’re going to use TCP port 6000. This is a fairly arbitrary selection and you can use whatever port you like, provided that it is not already in use.
- To check that a port number is free, we can use the command
netstatto view a list of services already in use.
- If you can see the port number you want to use, already in use, just use a different number.

OBS Settings
The following instructions are quite specific, so if things don’t work, go back and check that you have done everything!
- Open up the “Settings” dialogue.
- Select the “Output” tab.
- At the top of the window, change the “Output Mode” to “Advanced”.
- Select the “Recording” tab (note: do not use the “streaming” tab … although we are going to be test streaming, we really do mean to be looking at the “recording” tab here!)
Work through these settings:
- “Type” → “Custom Output (FFmpeg)”
- “FFmpeg Output Type” → “Output to URL”
- “File path or URL” → “udp://192.168.1.75:6000?pkt_size=1316”
- you will need to substitute the above example IP address with the address of your own “viewing computer” that we discovered a moment ago. As a reminder, if we are looping back to the same system that we are streaming from, it’s ok to enter the same IP address!
- if you are going to use a different port number, you will again have to substitute the “6000” that is used above.
- VLC requires us to specify a packet size, so don’t forget to include the url query item “?pkt_size=1316” in the URL.
- “Container Format” → “mpegts”
- “Video Bitrate” select a value that works for you and the bandwidth you have available to you. Please note that the Twitch ingest servers have a maximum of 6000Kbps, so don’t set it higher than that.
- Check out another of my articles which talks about bitrate selection for ideas : Impact of stream quality for live coders.
- “Audio Bitrate” just stick with the default 160 Kbps.
- Select the “Show all codecs” checkbox.
- “Video Encoder” → “libx264” for CPU encoding.
- If you have an NVidia GPU, you can select “h264_nvenc” to take advantage of hardware encoding.
- “Audio Encoder” → “AAC”
- Hit “OK” to save the changes.
Note: In TCP networking, there is something called Maximum Transmission Unit (MTU) which is the maximum size that a data packet is allowed to be.
According to this VideoLan forum post from 2018, VLC Media Player 3.0 has an MTU limit of 1316. This is a setting that needs to be defined on the computer sending the stream, not the system receiving it.
Another Note: In this article, we are using UDP to transmit to a single machine. Alternatively, we could do something called a “multicast” to transmit our stream to every system on the network. If this is something you want to experiment with, we just need to substitute the IP number for something in the multicast IP address range - for example “224.0.0.0”. To learn more, check out wikipedia : multicast address

Start your test “stream”
- In OBS, click the “Start Recording” button. DO NOT click the “Start Streaming” button!!!
- We’re effectively “recording” to a network stream, rather than a file on the disk.
Note: It’s at this point that we actually start stress-testing our streaming system. Make a point of leaving your computer to test-stream for a while. If it’s going to have problems with heat, now is the time we want to find out about it!
VLC Player Settings
Finally, head over to VLC Media Player that we installed earlier.
- Select “Media”
- Select “Open Network Stream…” (ctrl-n)
- Enter this URL: “udp://@:6000”
- If we used a different port number, we would need to swap this over here too.
- Because the “streaming system” is targeting our “viewing computer, directly by an IP address, we don’t need to specify an IP to listen to.
Note: Alternatively, if we configured OBS to broadcasting the stream to our local network (using a multicast, that we mentioned earlier, then we would need to specify the IP of the “streaming system” here instead).

Note: I’ve read online that some folks following this guide have had difficulty getting VLC to play the stream: Try stopping and starting the stream as I’ve heard this may get it working.
Wrapping up
Being able to watch a test stream locally, only helps us shake out problems of computer performance and visualise what the quality of our stream will be. For example, if you want to try different bitrate settings in order to see what effect they have on image quality, this could be a really useful way to experiment and learn.
However, this type of testing does nothing to help us get a handle on problems caused by poor network or ISP bandwidth, or simple bad internet connections.
- I strongly recommend using some performance-monitor software to keep an eye on the utilisation and temperature of your CPU and GPU.
- My recommendation is to use HWMonitor by CPUID software
Have fun! :-)
Disclosure
I always disclose my position, association or bias at the time of writing; No third party compensate me or otherwise endorse me for my promotion of their services. I have no bias to recommend any of the services mentioned in this article.