
In this article, we fix a problem getting Unity Licencing working on a VM. We also address the problem of connecting to a mobile device using USB, from a VM.
Introduction
Recently I have been intending to get back into Twitch livecoding. I wanted to use a Virtual Machine (VM) as part of my process.
Although using a VM absolutely isn’t a necessary - and many would say that it’s completely overkill - if you have a powerful enough computer, using a VM is a convenient way to:
- manage windows (i.e. only streaming from the VM window)
- more easily demonstrate an entire end-to-end process (e.g. installing a program from scratch)
- sandboxing your demonstration environment (e.g. making it less likely to unintentionally display something you don’t want people to see or to be distracted by - e.g. your personal email, etc)
Some of the content I wanted to livestream included some of my recent Unity projects - so I specifically wanted to be able to run Unity from within a VM.
When I first tried this, I was tripped up by two problems:-
- Unity was unable to create a new valid licence file - I kept getting a “Machine Identification Is Invalid For Current License” error, from Unity Hub.
- When attempting to deploy a mobile-device app over USB, I couldn’t connect and deploy my application to my Android device.
In this article, we present a:
- working fix for the licence problem
- a somewhat bodgy, but workable, solution for the USB problem.
Requirements
We’ll be using the following software:
- Windows 10 - on both host and VM (10.0.18363 ~May 2020)
- Hyper-V along with Hyper-V Manager
- Unity Hub 2.3.1
- Unity 2019.2.17
This article is not intended to be a guide to creating VMs - so we’ll assume that you have existing familiarity installing applications and creating Virtual Machines using Hyper-V.
Fix Unity Licence problem
When you request a licence for Unity, the process attempts to create a fingerprint of your computer - the intent is that the licensed software will only work on a specific computer.
One of the identifying features of your computer, is the MAC address of your network adapter. Historically, this used to be baked into the hardware by the manufacturer. Nowadays, it’s common for many devices to dynamically-generate changing addresses, often for security reasons.
Note: For example, if your mobile device has a fixed and unique identifier, that could be used to track you.
- Read how to change your MAC here at howtogeek : How (and Why) to Change Your MAC Address on Windows, Linux, and Mac
The problem that seems to be manifesting in Unity Hub, is that the automatic licence-installer cannot detect the MAC of a VM.
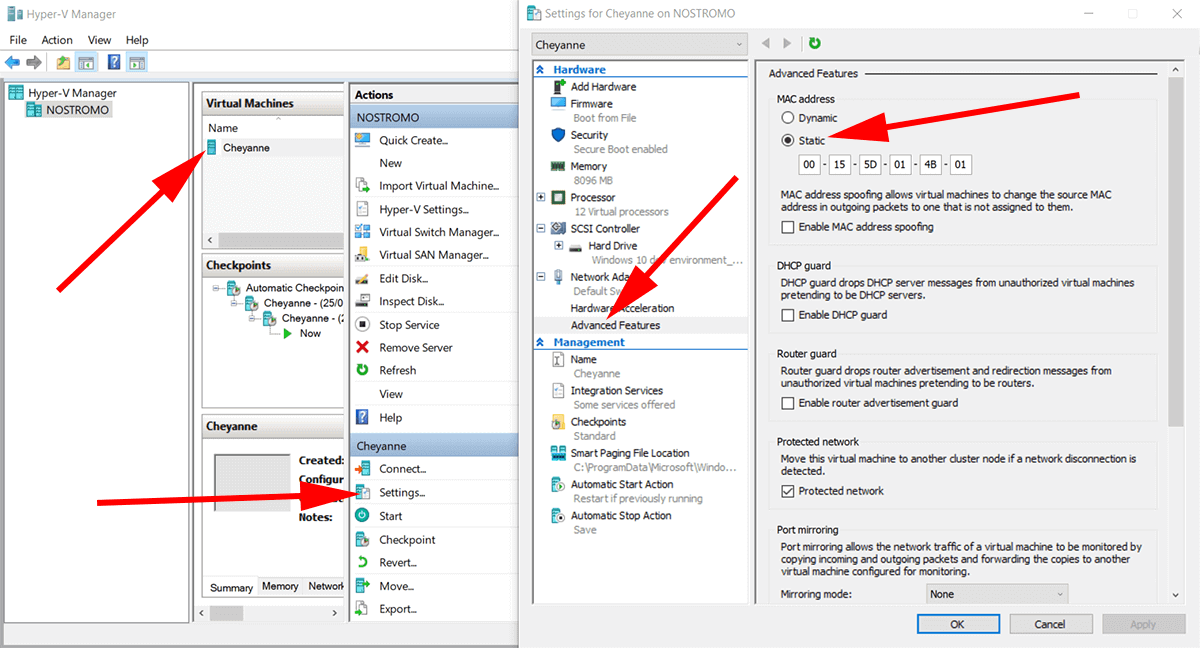
Make the MAC of the VM static
The first thing we need to do, to prevent a recurring problem, is make sure that the VM is sticking with a fixed MAC. Out of the box, Hyper-V defaults to using “Dynamic” addresses - that setting needs to be changed..
- In Hyper-V manager, right click on the VM and select “Settings”
- In the “Settings” dialogue, locate the “Network Adapter” feature and click on the “Advanced Features” option.
- On the right-hand panel, change the MAC address option from “Dynamic” to “Static”
- Make a note of the actual address (e.g. “00-15-3E-05-1A-01”, as we’ll need that shortly.
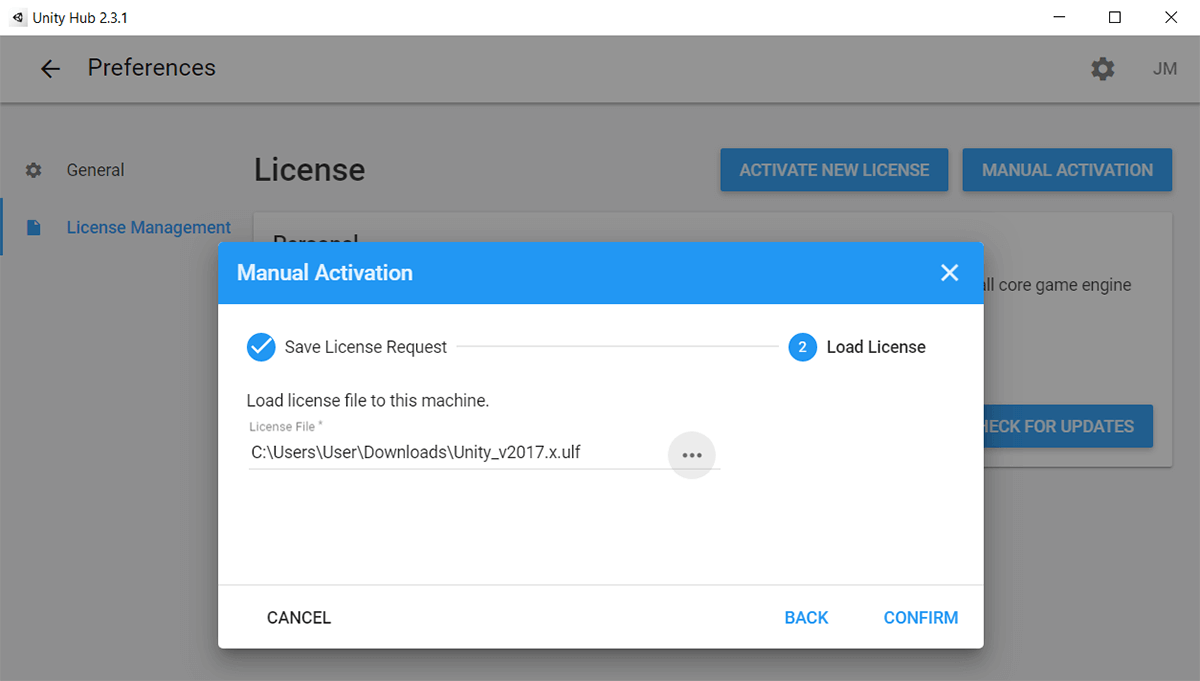
Manually Manage Unity Licence
In Unity Hub:
- Log into your Unity account, if you haven’t already done so.
- In the user menu (top-right), select “Manage Licence”
- Select “Manual Activation”
- Select “Save Licence Request” and save it somewhere easy to find, such as your desktop.
The “Licence Request” file that gets saved is Unity_lic.alf - it’s an XML file with information about your computer.
- Open up
Unity_lic.alfin a basic text editor such as notepad. - Locate the XML node
Binding Key="5"
The problem is that, where we expect to find the MAC address of our VM’s virtual network adapter, the entry is instead blank. We need to manually supply the appropriate address to the file:
- add the MAC address that we made a note of earlier
- the letters need to be lowercase.
- the separators need to be colons and not dashes.
- make sure you save the edited file.
Tip: If you didn’t make a note of the MAC address earlier, a quick way to view it is to open up a console window and use the command
ipconfig /all
When we’ve finished editing, the node should look something like this:
<Binding Key="5" Value="00:15:3e:05:1a:01" />
Back in Unity Hub, progress the process, following the onscreen instructions:
- Using https://license.unity3d.com/manual, select your newly-edited “licence request” file and upload it to Unity website.
- Provide any licence information needed (e.g. “I’m only a personal user” etc)
- Download the actual licence file that is generated by Unity website.
- Use Unity Hub to activate using the manually-generated licence file.
This should get you going again!
Use Unity to deploy to mobile device, using USB on Hyper-V
Let’s move onto the second problem that we faced;
If we’re using Unity to create an app for our mobile device, we want to be able to deploy to the hardware and perhaps connect a debugger.
To cut to the chase, I haven’t found a full solution to this problem … but I have found a reasonably useful workaround, which shouldn’t leave you feeling too cheated for a solution ;-)
What can we do with USB devices and Hyper-V?
Let’s just explore what USB options we do actually have available to us.
Tantalisingly, there is actually an option for the VM to share the USB port of the host machine.
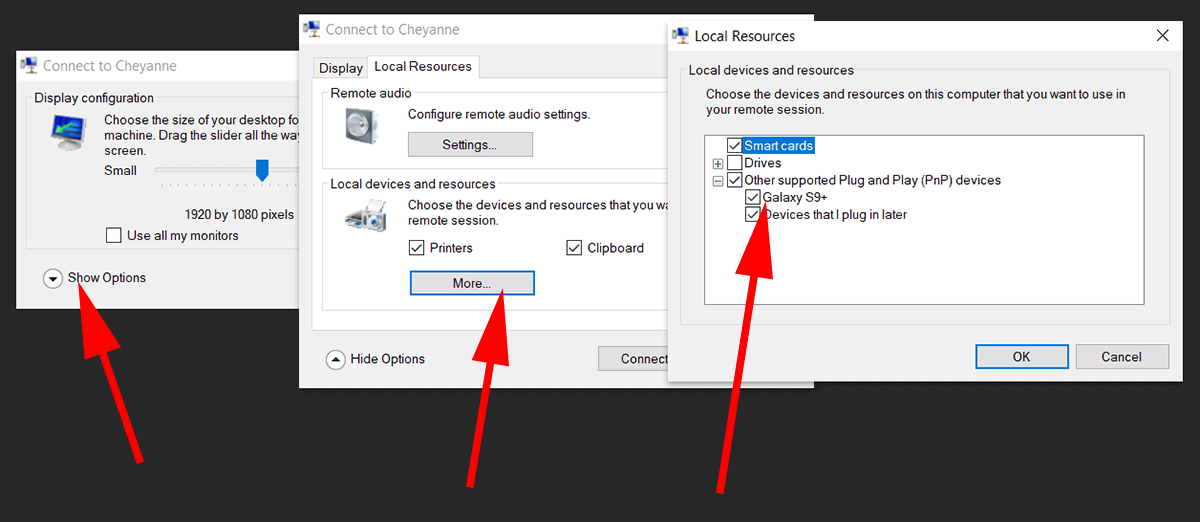
To use this option, you need to enable it when connecting to the VM using a new RDP session:
- first connect your mobile device using USB
- select “Show Options”
- select “Local Resources” tab
- click the “More…” button
- expand the “other supported PnP” option
- add your specific mobile device (if it comes up as an option)
Whilst the above is still a useful feature to know about, the functionality is limited to:
- only USB file transfer (i.e. we can copy files back and forth to the mobile device storage, as if it were a USB disk)
- we cannot use a debugging tool - such as ADB on Android - to sideload install apps or debug.
What’s the build and deploy workaround?
As caveated, this is not a great solution - but it works for me in the context of livestreaming on Twitch:
- From the VM: I’m using Unity to build the project as usual - except I set the file destination of the
.APKpackage to use a network share of the host machine. - From the host machine (off camera), I then use ADB to manually publish the application package to the device, using
adb install example.apk