
This is part seven of a nine-part series that explores how to create a Unity application for a mobile device, using Augmented Reality and Azure Spatial Anchors
- In Part 1 we introduce the project, requirements, technologies and various AR concepts.
- In Part 2 we follow the steps in the project QuickStart guide.
- In Part 3 we create a basic Unity ARFoundation application.
- In Part 4 we look at one of the building blocks of AR - the “Placement Cursor”.
- In Part 5 we explore how the UI for the project works.
- In Part 6 we learn how Azure Spatial Anchors can be used in our project.
- In Part 7 we step up our game by looking at how we can add and move virtual scenery.
- In Part 8 we develop functionality that saves and restores virtual scenery to the cloud.
- In Part 9 we learn about the Azure Functions backend for the solution.
The entire project sourcecode that accompanies this series can be found at:
In this article, we’ll be looking at how the application is brought to life, with the addition of placeable “scenery” objects in the virtual world.
We’re going to explore how we can:
- place scenery objects in the AR scene.
- how we can select them for editing.
- how we can reposition them.
Note: For this article, we need to be familiar with the AR coordinate system, so if you haven’t already read the first article in this series, it’s worthwhile heading back to read Introduction : AR Coordinates first.
Registration of 3D models
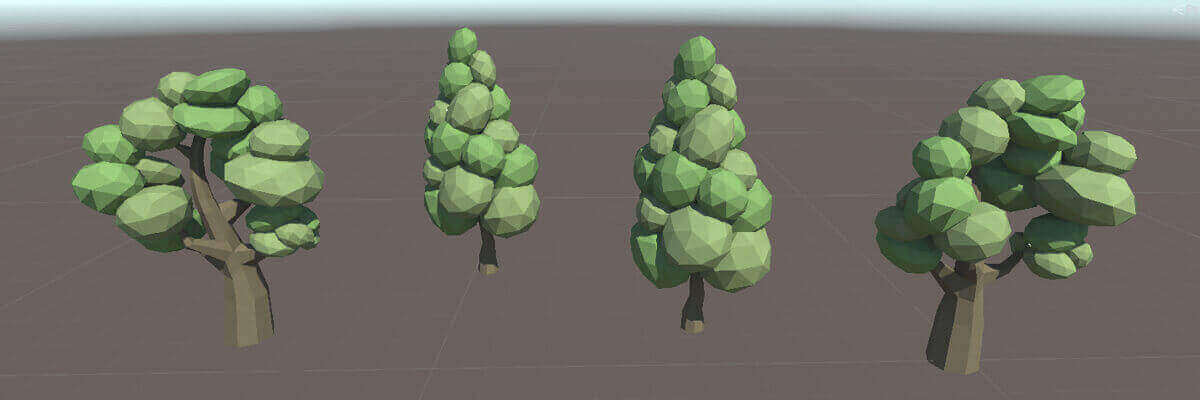
In the sample code and screenshots, we’ve opted to use just two low-poly models of trees.
There is no reason at all why you shouldn’t use any 3D model that you like - as long as it is not so complex so as to perform poorly on a mobile device. Remember, our mobile devices will already be processing a busy workload managing the AR tracking!
We wire up the 3D models with the codebase in the following places. If you wanted to modify the demo, so that it had a greater variety of models - you should update the code in these three places:
- an Enumeration that corresponds to the model:
Scripts/Utility/Enum/SceneryTypeEnum.cs- View in GitHub
- a GameObject property in the centralised configuration manager (this is where we should drag+drop the Prefabs)
Scripts/Components/GeneralConfiguration.cs- View in GitHub
- a utility class, used when spawning new objects, which correlates the enumeration to the prefab:
Scripts/Utility/SceneryUtil.cs- View in GitHub
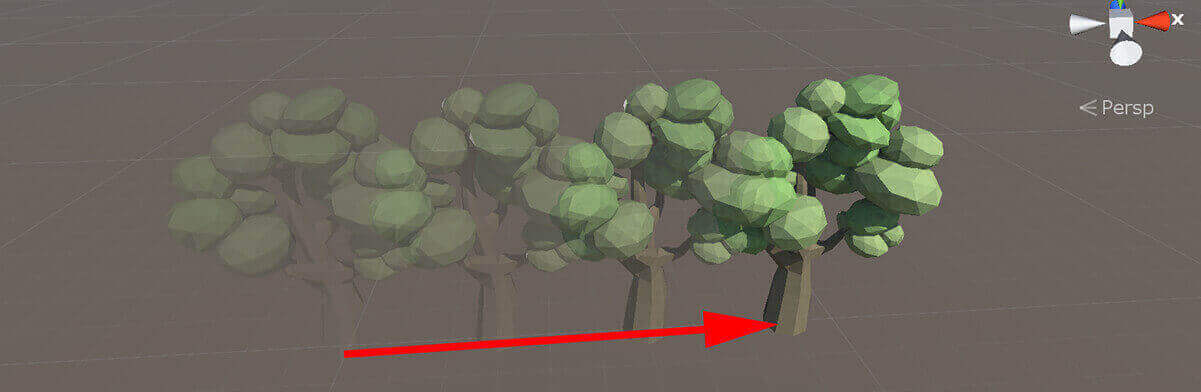
Placing scenery
Applicable code in this section:
Assets/Scripts/Managers/SceneryPlacementManager.csAssets/Scripts/Utility/SceneryUtil.csAssets/Scripts/Managers/AppStateManager.cs
Tapping the “Place Scenery” button
- The entry point to this part of the code is through the method
PlaceScenery()in theSceneryPlacementMangerComponent.- This method is called by the UI “Place Scenery” button - we can find the code for that the
UIManagerComponent, inUIButton_PlaceScenery_Click().
- This method is called by the UI “Place Scenery” button - we can find the code for that the
Note: The “Place Scenery” button will only be visible if the “Placement Cursor” is currently positioned on a valid plane (a real-world surface detected by AR Foundation). In other words, we cannot place “scenery” objects on anything other than a detected surface.
- Code in
PlaceScenery()makes a random choice of scenery - based upon the range of values registered inSceneryTypeEnum(the demonstration code has just two items, which correlate to the two types of “tree”). - Code in
AddSceneryToContainer():- calls the utility component
SceneryUtil, which is used to spawn an appropriate GameObject and associate it with the necessary parent object (which we will talk about in the next section). - positions the new GameObject using the current pose from the “placement cursor”. This pose information is made available from
AppStateManager.placementCursorPose
- calls the utility component
The Scenery Container
- When we spawn a new “scenery object”, the utility Component
SceneryUtilwill set thetransform.parentto be thecurrentSceneryContainer.
- In other words, we have a single container object that will have many “scenery objects” as children.
Note: Fundamentally, the reason we do this is so that we have access to the position of the “scenery object” relative to the anchor. Ultimately, this data is used to persist the scenery layout between sessions, using the cloud.
An important detail to be aware of, is that the “SpatialAnchorGroup” GameObject could be null asit is not created at application startup. It is only spawned when:
- an “anchor” is newly-added by the user (using “Create Anchor” button), or
- an “anchor” is restored from the cloud (using “Restore Anchor” button).
In this context, an “anchor” is defined as Prefabs/SpatialAnchorGroup. This Prefab is a composite of:
- an AR/ASA anchor - the Component
CloudNativeAnchoris added in code, when it is spawned byCloudAnchorSessionManager - a visualisation (arbitrarily, a simple sphere)
- a child GameObject called
SceneryContainer, which serves the purpose of being the “container” for scenery objects.

In addition to various other public fields, the application-state management Component AppStateManager contains:
- a reference to the
SceneryContainerGameObject namedcurrentSceneryContainer, providing a way for us to add child-objects to it in code. - the
SetAnchorAndContainerIfNull()method, used for finding and setting thecurrentAnchorGroupif it is currently null.
- This is called from numerous places to ensure that it is actually available before attempting to interact with it.
- the
DestroyAllSceneryInCollection()method, which is used to remove any existing scenery.
- We would do this if using the “Restore Scenery” button to avoid spawning duplicate objects.
Repositioning scenery
A nice piece of application interactivity in this demo is the ability to reposition a “scenery object” after we have added it to the scene.
Applicable code in this section:
Assets/Scripts/Managers/SceneryPlacementManager.csAssets/Scripts/Utility/TouchExtensions.csAssets/Scripts/Component/Scenery.cs
Selecting scenery
In order to move a piece of scenery, we first need to select it. An intuitive UI interaction is simply to just “tap” on it.
This is facilitated by:
- detecting the screen coordinates that have been tapped by the user
- projecting a raycast which is part of the Unity’s physics engine.
- the Ray is projected into the virtual world - if it collides with a “scenery” object, we can obtain information about that object.
- each “scenery” GameObject has a
SceneryComponent which is used for simple state-management data such as “am I selected?”
Gotcha: As part of the quickstart instructions, we needed to add a “physics collider” Component to the Prefab of the scenery. We suggested adding a simple “box collider”.
It’s a step that could be easily missed … and if you are modifying the project with your own assets, you need to remember to add this Component into your own “Scenery” Prefabs
- The entry point into this part of the code is the method
TouchSceneryItem()- it is run on every frame and is called from the
Update()loop:
- it is run on every frame and is called from the
There are a couple of things in this code that are worth explaining:
- The code is only run during the application-state
NothingHappening.
- This prevents unintended selections during, for example, when the application is looking for an anchor.
- The code is only run if:
- there is a single screen-tap and
- that tap has only just started (i.e. don’t keep doing this, if the user is holding their finger on the screen).
- The test
if (!touch.position.IsTouchUIObject())is worth exploring as although just a few lines of code, it represents a significant part of making the UI work as intended;
- In the class
TouchExtension, we have an extension methodIsTouchUIObjectwhich is used to detect whether the user is touching the UI part of the display. - This is really important, because without this test, if a user were to tap a UI button, they would also trigger the raycast-detection mechanism.
- This would result in confusing behaviour because they would unexpectedly select another object or deselect their current selection!
- In the class
- The test
(Physics.Raycast(ray, out raycastHit))is used to determine whether an object has been detected.- If an object is detected, we progress the process by calling
SelectTouchedScenery()method. - If no object is detected, we call
DeselectAllScenery()to deselect any currently selected scenery object.
- If an object is detected, we progress the process by calling
The method SelectTouchedScenery() is used to:
- update the application-state of the selected object.
- reset the state of any other objects (that may previously have been selected).
Note: The
isSelectedstate is used to drive the cosmetic “object outlining effect”. This is covered later in this article.
Actually moving the scenery object
When we select a piece of scenery, it then becomes available to be moved.
- This selection is reflected in the UI, with a cosmetic outlining effect and by the button “Move Scenery” becoming visible.
- The
ToggleMoveScenery()method, is connected to the “Move Scenery” UI Button (in theUIButton_MoveScenery_Click()method ofUIManager). - The purpose of
ToggleMoveScenery()is primarily to switch the application-state of the selected object fromisSelectedtoisMoving. - The
isMovingstate is used to drive the mechanism that updates the coordinates of the object within the scene.
When a “scenery” object has its state set to isMoving:
- the UI reflects this by changing the colour of the cosmetic outline effect.
- the method
UpdateRepositionMovingScenery()is responsible for actually changing the coordinates of the selected object. UpdateRepositionMovingScenery()is called by theUpdate()loop, every frame.- the current Pose of the “Placement Cursor” is used as a target destination, to which the “scenery” object should be moved towards.
- rather than instantly snapping the object directly to the “Placement Cursor”, we add a delayed “inertia” effect, by moving the object at a fixed speed.
- this movement speed is defined (and editable) in
GeneralConfiguration.sceneryMoveSpeed
- this movement speed is defined (and editable) in
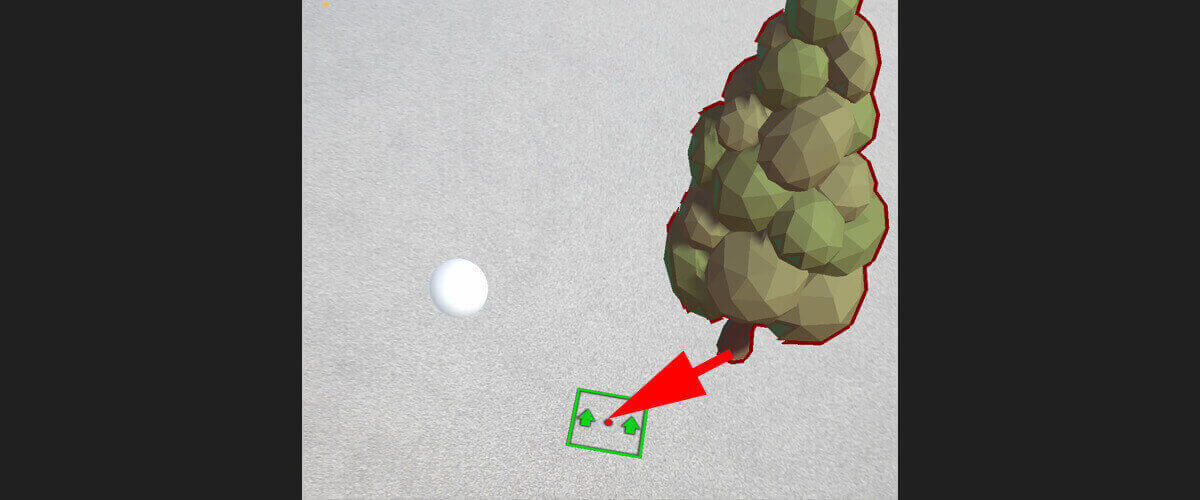
Visually highlighting selected or moving scenery
Our demo uses a visual outlining effect to indicate:
- a green outline to show a “scenery” object has been selected.
- a red outline to show a “scenery” object is currently being moved.
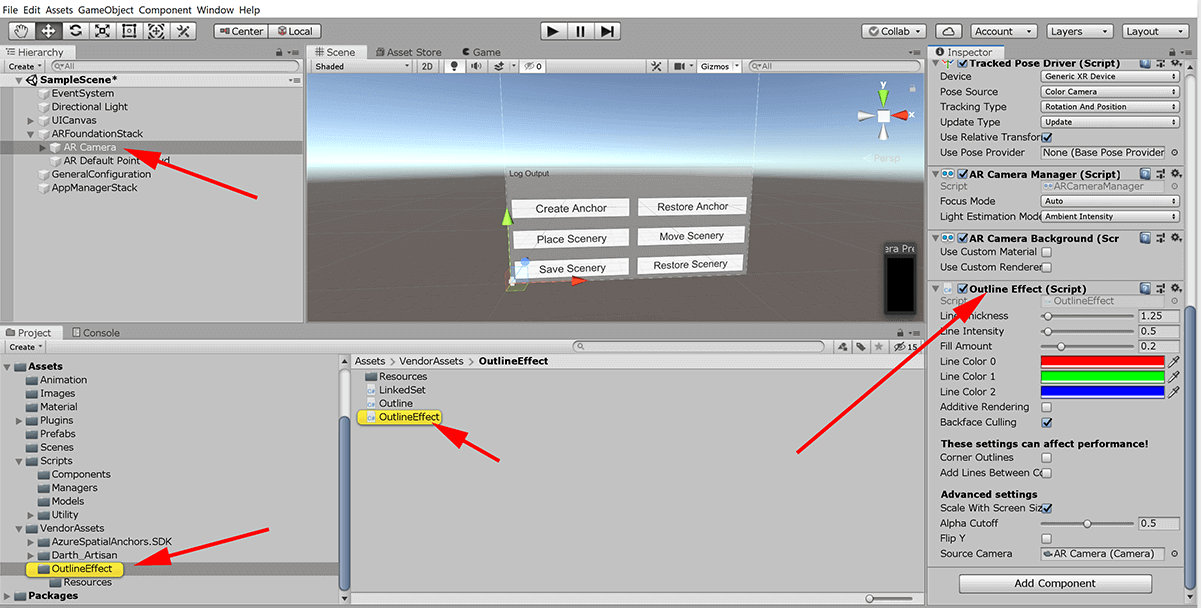
We use the 3rd-party asset “Cakesplice - Outline Effects” to provide the outlining effect on our “scenery” objects.
- If you haven’t already, you will need to follow the guidance in quickstart instructions to obtain and install this asset.
To use this asset, we need to add components in two places:
- The
OutlineEffectComponent must be added to “ARFoundationStack/AR Camera” - When an outline effect is required, the method
UpdateShowScenerySelectionColour()is used to add the Componentcakesplice.Outlineto the “scenery” object.
Tip: When working with
cakesplice.Outline, take care to be specific with C# namespacing, becauseOutlineis also a member of theUnity.UInamespace.Tip:
outline.coloris somewhat ambiguous; it correlates to the settings exposed in the Inspector view ofOutlineEffectComponent attached to the camera - it lets us choose red, green, blue etc.
private void UpdateShowScenerySelectionColour()
{
    appStateManager.SetAnchorAndContainerIfNull();

    foreach (Transform item in appStateManager.currentSceneryContainer.transform)
    {
        GameObject currentSceneryItemObject = item.gameObject;
        Scenery currentSceneryItem = currentSceneryItemObject.GetComponent();

        cakeslice.Outline outline = currentSceneryItemObject.GetComponent(); // the outline component that makes the 3D model highlighted

        if ((currentSceneryItem.isSelected || currentSceneryItem.isMoving))
        {
            if (outline == null)
                outline = currentSceneryItemObject.AddComponent(typeof(cakeslice.Outline)) as cakeslice.Outline;

            if (currentSceneryItem.isSelected)
                outline.color = 1; //green  (defined on "Outline Effect" script attached to Camera)

            if (currentSceneryItem.isMoving)
                outline.color = 0; //red

            continue;
        }

        if (!(currentSceneryItem.isSelected || currentSceneryItem.isMoving) && (outline != null))
        {
            Destroy(outline);
            continue;
        }
    }
}
Next, in part eight, we develop functionality that saves and restores virtual scenery to the cloud.