
This is part three of a nine-part series that explores how to create a Unity application for a mobile device, using Augmented Reality and Azure Spatial Anchors
- In Part 1 we introduce the project, requirements, technologies and various AR concepts.
- In Part 2 we follow the steps in the project QuickStart guide.
- In Part 3 we create a basic Unity ARFoundation application.
- In Part 4 we look at one of the building blocks of AR - the “Placement Cursor”.
- In Part 5 we explore how the UI for the project works.
- In Part 6 we learn how Azure Spatial Anchors can be used in our project.
- In Part 7 we step up our game by looking at how we can add and move virtual scenery.
- In Part 8 we develop functionality that saves and restores virtual scenery to the cloud.
- In Part 9 we learn about the Azure Functions backend for the solution.
The entire project sourcecode that accompanies this series can be found at:
In this article, we’ll make a start on creating a new AR demo from the ground up and specifically, we’ll be looking at setting up the basics of a Unity AR Foundation application.
If you would like to read further on the subject of AR Foundation, the official Unity documentation is a great place to learn:
- Unity : AR Foundation Getting Started
- Unity : AR Foundation Getting Started
- Unity GitHub : AR Foundation Samples
Make a basic start on the project
- First of all, use Unity Hub to create a brand new 2019.2 Unity project.
When ready, go ahead and make these changes:
- In the Hierarchy view, remove any preexisting GameObjects that are in the scene, with exception of “DirectionalLight” that can be left. … yes, it’s ok to remove the “Camera” too - we’ll be sorting that out in a moment.
- In the Project view, add in the following new folders inside “Assets”:
- Animations
- Images
- Materials
- Shaders
- Prefabs
- Scripts
- Scripts/Components
- Scripts/Managers
Add in Unity AR Foundation packages
Head over the Unity package manager (Window -> Package Manager) and add in the following packages. Because of version sensitivity (at time of writing), don’t head straight for the latest versions - to ensure tested compatibility I recommend that we stick with the versions I suggest:
- ARFoundation - v2.1.4
- ARCore XR Plugin preview2 - v2.2.0
- XR Legacy Input Helpers - v2.0.2
If developing for iOS, substitute the ARCore XR plugin for ARKit XR. v2.0.2 is the nearest verified version at the time of writing.

Configure build settings and the player
We need to tell Unity that we want to deploy to Android or iOS and we need to configure some player settings for this to all work properly.
- Follow the instructions as detailed in the previous article QuickStart : Configure Build Settings and Android Player
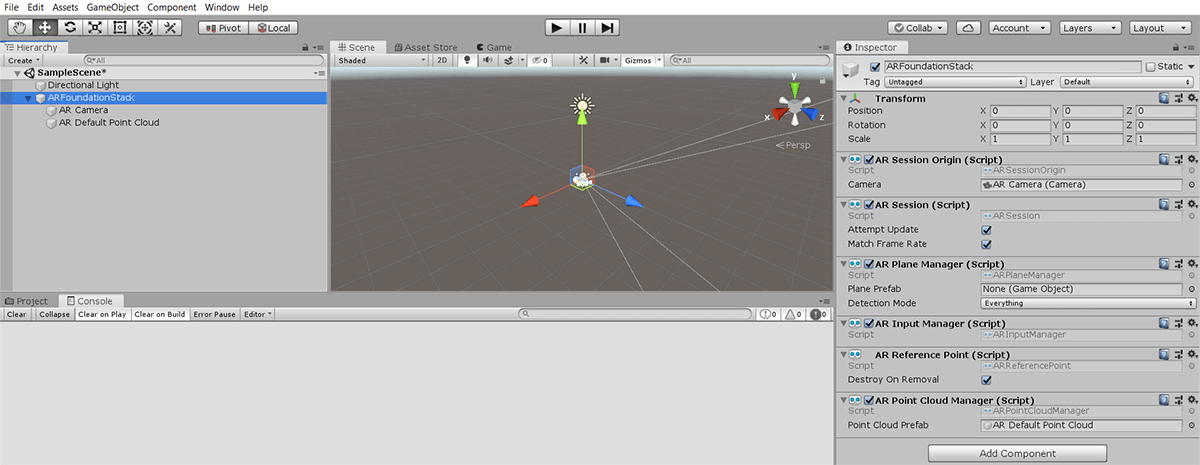
Create the basic AR Foundation “Stack” GameObject
This demo requires us to have a selection of separate AR Foundation-related components, some of which are interdependent.
There are a number of ways that we could approach this, but in an attempt to organise things so as to keep them grouped together, we’re going to opt to use a single main GameObject that has lots of Components (as opposed to having lots of separate GameObjects, each with a single Component).
- From the Hierarchy start by right-clicking and selecting “XR -> AR Session Origin”
- Rename the new GameObject which is currently called “AR Session Origin” so that it is instead called “ARFoundationStack”
- In the previous step, we also created a child-object, “AR Camera”. Don’t change the name - but do click on it to select it. In the Inspector locate the “Tag” and change this from “Untagged” and change it to “MainCamera”.
We’ll want to visualise the feature-points in the camera, so next, we’ll add in an object that we’ll be needed in just a moment…
- Return back to the Hierarchy and right-click to create a new object: select “XR -> AR Default Point Cloud”.
- Having created the new GameObject, move it so that it is also a child of “AR Default Point Cloud” (and a sibling of the “ARCamera” GameObject). We’re doing this to keep related-items grouped together.
Next, we’re going to layer-in a selection of AR Foundation components.
- Highlight the “ARFoundationStack” GameObject and manually add in the following Components, using the “Add Component” button and dialogue:
- AR Session - (note, this is not the same as “AR Session Origin” - which should already be present)
- AR Raycast Manager
- AR Plane Manager
- AR Input Manager
- AR Reference Point Manager
- AR Point Cloud Manager
Finally, we need to:
- Drag+Drop a reference from the “ARFoundationStack/AR Default Point Cloud” GameObject across to the “Point Cloud Prefab” property of the “AR Point Cloud Manager” Component
That really is pretty much all of the work needed to see a working result.
Deploy and test
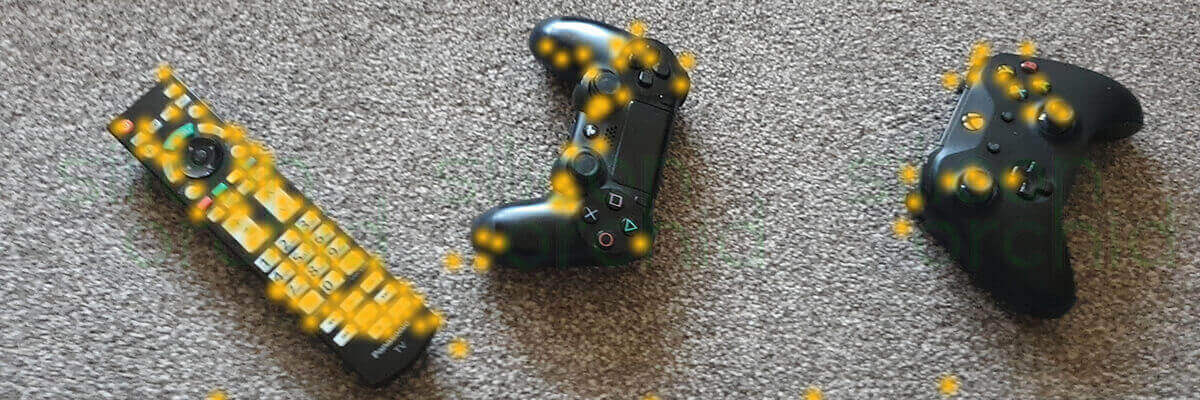
We can now go ahead and deploy the project to our mobile device and test the results.
If we move the camera about, we should see that reference-points are recognised. Because we have included a “Point Cloud Particle Visualiser” component in the project, we can see those reference-points highlighted in the image.
Note: It’s not essential to include this visualisation, but it may help when developing the project, as it lets us see the world as the platform is seeing it.
Add plane visualisation
Amongst the AR Foundation components that we just added is a “Plane Manager”. Our demo will be detecting horizontal and vertical planes … we just can’t see them yet.
Let’s add in something to visualise that, next…
We need to add some additional assets - fortunately, Unity has included suitable resources that we can add to our project: Unity Github : AR Foundation Samples Repo
- In our “Animations” folder, download the following file:
AR Feathered Plane Fade.controllerfrom arfoundation-samples/Assets/Animation/AR Feathered Plane Fade.controller
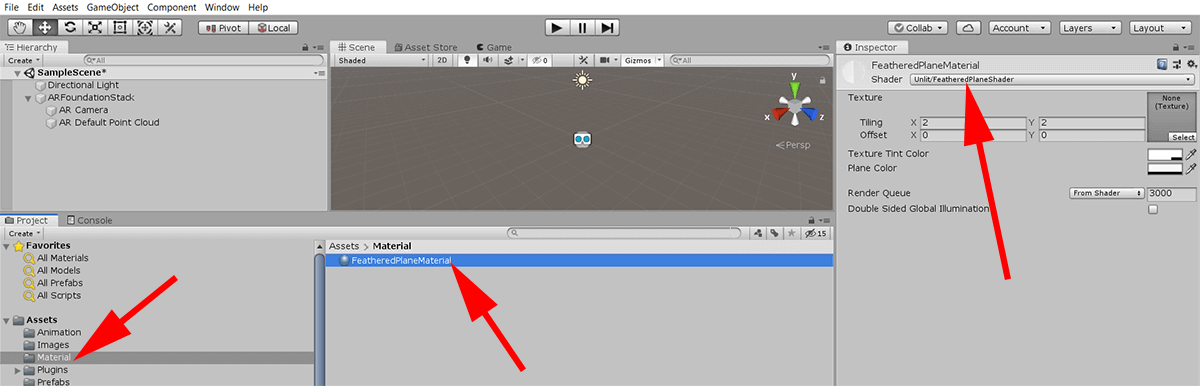
- In our “Materials” folder, download the following file:
FeatheredPlaneMaterial.matfrom arfoundation-samples/Assets/Materials/FeatheredPlaneMaterial.mat
- In our “Shaders” folder, download the following file:
FeatheredPlaneShader.shaderfrom arfoundation-samples/Assets/Shaders/FeatheredPlaneShader.shader
In our “Scripts/Components” folder, download the following file:
ARFeatheredPlaneMeshVisualizer.csfrom arfoundation-samples/Assets/Scripts/ARFeatheredPlaneMeshVisualizer.csFadePlaneOnBoundaryChange.csfrom arfoundation-samples/Assets/Scripts/UX/FadePlaneOnBoundaryChange.cs
In our “Prefabs” folder, download the following file:
AR Feathered Plane Fade.prefabfrom arfoundation-samples/Assets/Prefabs/AR Feathered Plane Fade.prefab
We need to configure (wire together) the following resources:
- FeatheredPlaneMaterial : In the project view, select “Materials/FeatheredPlaneMaterial”. In the Inspector view, change the dropdown setting for “Shader” from the current “Default/InternalErrorShader” to instead be “Unlit -> FeatheredPlaneShader”.
- FeatheredPlanePrefab : In the project view, select “Prefabs/FeatheredPlanePrefab”. In the Inspector view, change the following Component configuration settings:
- MeshRenderer Component** : Drag+Drop a reference from “Materials/FeatheredPlaneMaterial” across onto “Materials -> Element 0”
- Animator Component : Drag+Drop a reference from “Animations/FeatheredPlaneFade” across onto “Animator -> Controller” (replacing the default “None (Runtime Animation Controller)” option).
- FeatherPlane Script : Because of how we’ve been cherry-picking assets from another project, we’ll have broken script/component references. To fix this, delete the two broken references and recreate them:
- Drag+Drop a reference from “Scripts/Components/FeatheredPlaneFade.cs” across to the Inspector view of “FeatheredPlanePrefab”.
- Drag+Drop a reference from “Scripts/Components/FadePlaneOnBoundaryChange.cs” across to the Inspector view of “FeatheredPlanePrefab”.
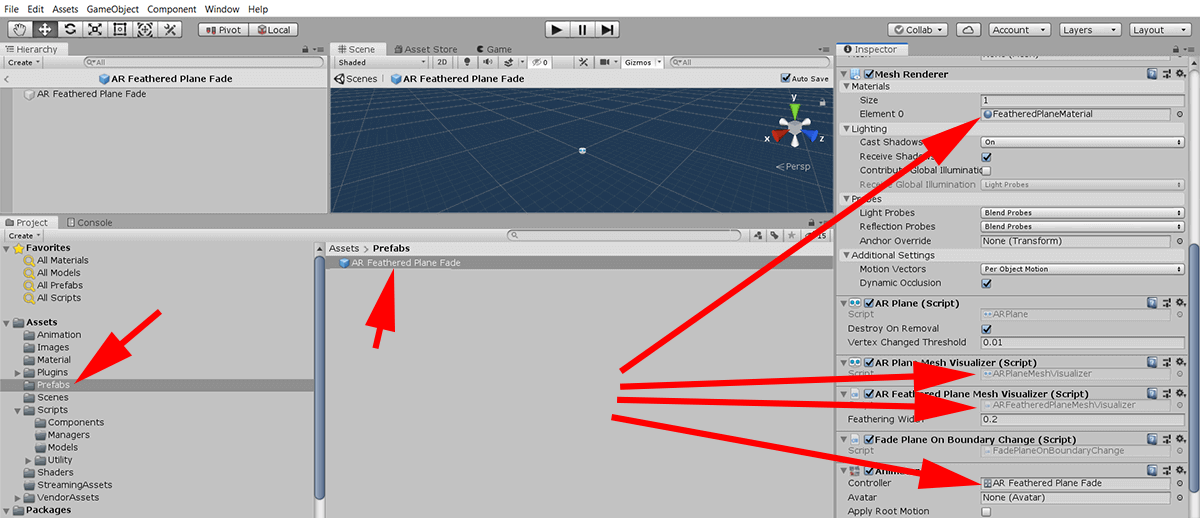
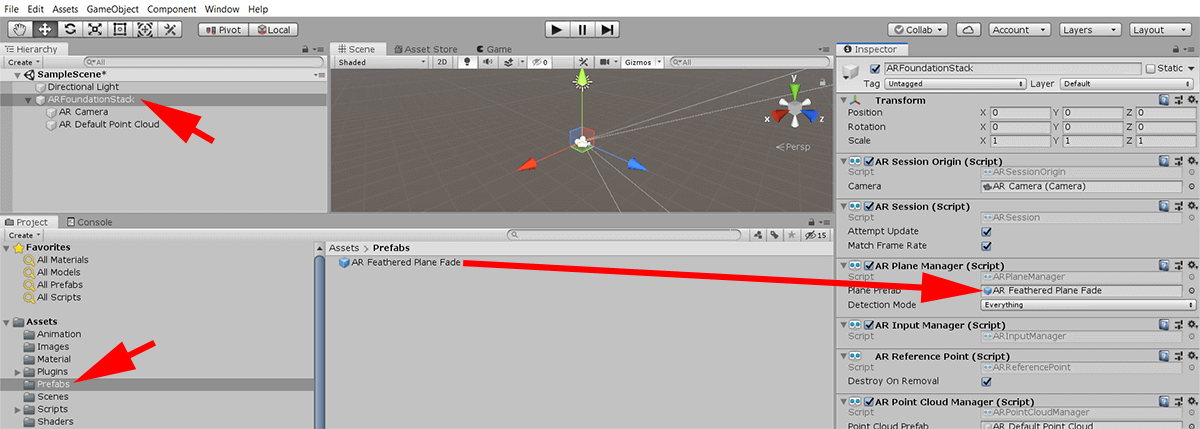
- AR Plane Manager : The final piece of configuration for this section is to return to the “ARFoundationStack” object that we created earlier, and in the Hierarchy view, select “ARFoundationStack”. In the Inspector view, drag+drop a reference from “Prefabs/AR Feathered Plane Fade” across to the “AR Plane Manager -> Plane Prefab” value.
Note: Later in this series, we’ll be looking at a finished project, rather than building up our own version from scratch. The GitHub sourcecode for that project already includes copies of all of the necessary AR Foundation libraries, but to respect appropriate accreditation, we can find the originals here:
Deploy and test the application again
That’s all we need to do to get the basic AR Foundation stack up and running. Rebuild and deploy the project to our mobile device and check out the newly-added plane-detection feature!
Next, in part four, we look at one of the building blocks of AR - the “Placement Cursor”.