
This is part one of a beginner-level series about Unity, aimed at existing .NET business developers, who are interested in dipping a toe into something different.
In Part 1 - Getting started, we explore how a business developer could make a start using Unity, look at the Editor and overview some of the common words that you’ll encounter.
In Part 2 - Scripting, we learn about some coding concepts that are applicable to Unity.
In Part 3 - A prototype mobile app, we work through the steps needed to make a super-simple application and deploy it to a mobile device.
In Part 4 -Logging and debugging with Android , we look at how we can attach the debugger and use logging - basic tools for any developer.
In Part 5 - Unity UI 101 , we take a first look at Unity UI and interact with a basic button control.
In Part 6 - Unity UI Scrolling List - Creating the Scene , we take on a slightly more complex project, by creating a scrolling list of items using Unity UI.
In Part 7 - Unity UI Scrolling List - Adding the Code , we finish the project started in Part 6, by writing a script to call a REST service and populate items in our UI.
Overview
Welcome to this series of seven articles where we’ll be broadly introducing the topic of Unity (game engine).
- This series is aimed at existing .NET developers interested in learning a little about Unity
- We’ll assume that you already have experience with developing software, the C# language and development tools such as Visual Studio.
- This series is absolutely not intended to be a full-blown tutorial on how to learn Unity - that scope represents many full-sized books and tutorial courses.
- The intent for this introductory-level series, is to provide a birds-eye view of various topics of interest - to help us better orientate ourselves.
- We’ll learn some of the semantics used.
- We’ll look at some of the nuances related to the code that we need to write.
- Later in the series, we’ll look at some small demo projects which should help to explain how Unity projects fit together.
Often when faced with learning something entirely new, we don’t feel inclined to wade through an entire book aimed at beginners. Instead, this series of articles is meant to be a curated list of ideas - hopefully they may provide a useful steer when learning a bunch of new concepts.
Unity - what is it?
- Unity is a game engine used to create 2D, 3D, VR and AR graphic applications.
- Unity is available on both Mac and PC, with support for a Linux version planned for 2020.
- Applications can be deployed to a large number of platforms and devices, including the desktop, gaming consoles and mobile device.
- Unity is not just used to create games, but is also used in industries such as engineering and architecture. For many years Unity has had a strong partnership with Microsoft, which is why we find Unity associated with Microsoft AR research and other projects using technology such HoloLens.
This article was published in early 2020. At the time of writing, it was applicable to the current latest version : Unity 2019.3.xxxx
Unity - how best to install it?
Before we start, we will need to register a user account with Unity.
- Unity is free for personal use.
- We can learn about Unity licensing options and costs at Unity : Compare Plans
If we’re familiar with using Visual Studio on Windows, there’s a good chance that we also use the Visual Studio Installer to get updates and install additional components or workloads.
In that tool, we may have seen Unity listed as a workload (see screenshot below)
This advice is only applicable for Visual Studio For Windows installer. Visual Studio For Mac installer does not present an option to install the Unity Editor - just the tooling.
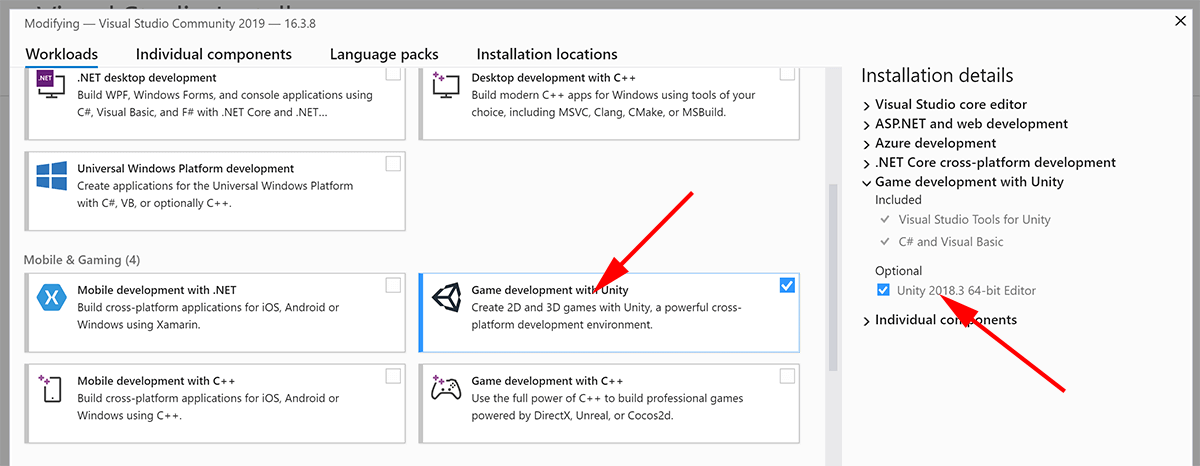
We could use the VS Installer to get the latest version of Unity - but I would steer people away from using this approach.
Instead, my recommendation is that we should download and use Unity Hub from the Unity Download Page.
The reason for this advice is that Unity Hub makes it trivial to install and manage multiple concurrent versions of Unity and to associate different projects with these different versions.
For users of VS for Mac, Rider, VSCode or any other code editor, Unity Hub should be your default choice.
Unity has a frequent release cadence:
- New versions become available every few weeks.
- With most .NET projects, minor updates to the IDE have no impact on our codebase. However, Unity projects need to be upgraded with each version update. The upshot is that we need to take care to manage our versions, particularly if we are working in a team. Be mindful not to get caught up in unnecessary updates.
- New versions become available every few weeks.
Unity has a large installation:
- At time of writing, Unity 2019.3.xxx is about 6Gb without extras
- The various Build Support options can add a couple of Gb each, as they comprise entire SDKs for their respective platform.
- With this in mind, if we have a computer with multiple disks (e.g. an SSD system disk and a HDD storage disk) we may want to consider our installation destination thoughtfully.
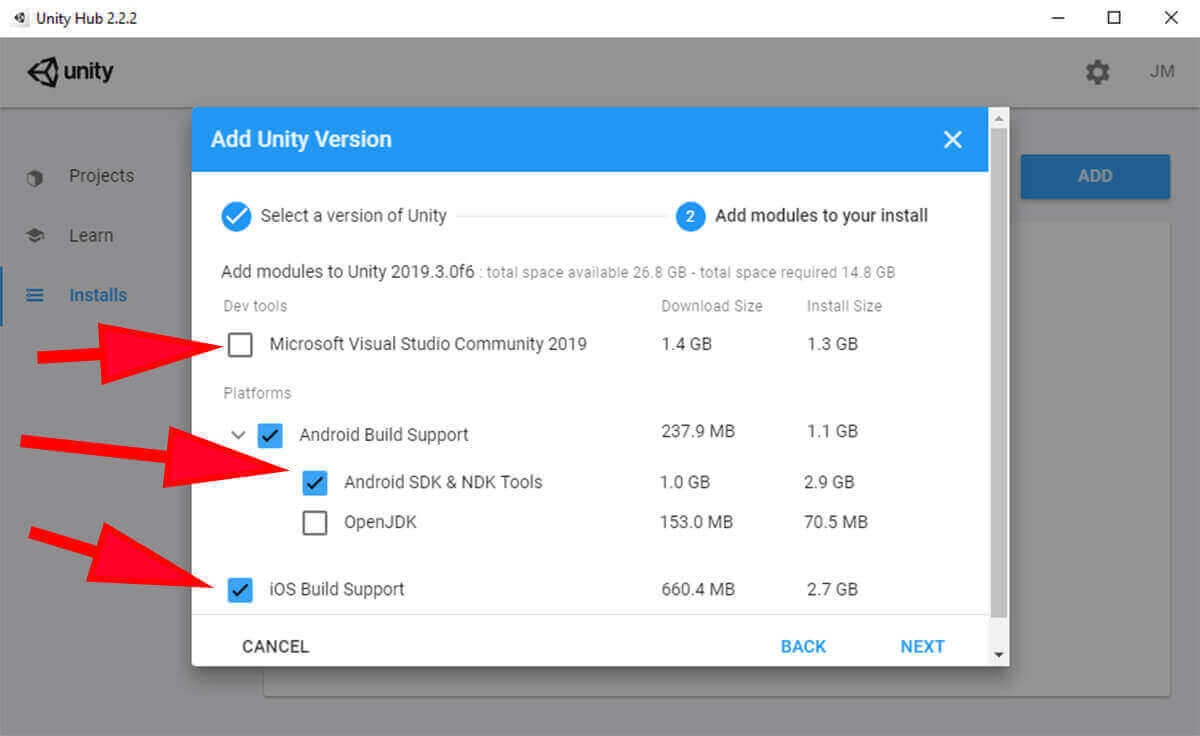
By default Unity Hub also attempts to install Visual Studio. As an existing developer, we may already have this installed already, so make sure to deselect this option to avoid wasting time and/or installing duplicate instances.
Planning to follow along with the tutorials?
In the following articles, we’re going to be building a basic mobile app - so if you’re planning to follow along with the examples, then preemptively, we should go ahead and kick-off the installation process now.
You should choose Android and/or IOS Build Support as well. Specifically to Android, we should ensure the JDK & SDK options are also selected by expanding the option. IOS support installs everything needed by default.
Unity - Basic terminology.
Scene.
- Think of a Scene as being a game-level - it comprises multiple objects that are typically (but not always) 3D models of some description.
- In the editor, we define what is going to be included in the scene when it is first started.
- In larger projects, a game/app will most likely be divided across multiple scenes.
- If you have a background in web-development, it may help to think of a Scene as being a little bit like the DOM. It has an initial state defined in the editor and can be changed during runtime by code.
- We can read more at Unity Manual - Scenes
GameObject.
- A GameObject is the most fundamental basic object that represents “something” in the gameworld.
- An instance of a GameObject always “exists” in the gameworld - it always has coordinates and a rotation.
- A GameObject will normally have something called Components associated with it.
- Without any Components a GameObject doesn’t do anything. In this respect it would be a bit like having an instance of a C# class without any methods or attributes.
- One use for a GameObject without any components, could be a way to group other GameObjects together by representing a “parent container”.
- A group of GameObjects could be moved as one entity, by moving the parent, for example.
- We can read more at Unity Manual - GameObject
Component.
- A Component encapsulates a set of properties and/or behaviour that can be assigned to a GameObject
- By adding a Component to a GameObject, we can make that GameObject be or do something.
- For example, it could become a camera, a light-source, a 3D shape, a UI button, or something that plays sounds. It could be something that interacts with the physics engine, or perhaps used to emit a shower of particles.
- There is a huge catalogue of Components available to us.
- A GameObject can have multiple components assigned to it (for example, one Component could contain the definition of a Cube, whilst a second Component could add properties that enables the GameObject to interact with the physics engine.
- We can associate other resources with the attributes of a component, by using drag+drop from within the Unity editor.
- We can read more at Unity Documentation : Introduction to components Unity Manual - Components
- A Component encapsulates a set of properties and/or behaviour that can be assigned to a GameObject
Scripts.
- A script is a type of Component and provides a way for us to add properties and behaviour to a GameObject
- Scripts are written using C#.
- A .NET solution (.sln) is created by Unity and forms part of the overall Unity project.
- Scripts are recompiled by Unity every time we save changes - we can still rebuild our code independently within our IDE of choice, to provide compile-time information.
- Unity uses the cross-platform Mono implementation of .NET.
- We can read a beginner-friendly FAQ about Mono here.
- We cannot use .NET Framework libraries as these are not compatible with Mono, but we can use .NET Standard v2.x libraries.
- We can read a beginner-friendly FAQ about Mono here.
- To support being a Component, a C# class must inherit from the
MonoBehaviourbase class (which itself sits atop a stack of otherUnityEngineclasses). - We’ll look at scripting more closely in the next article of this series Part 2 - Scripting
- We can read more at Unity Manual - Scripts
Transform.
- A Transform is a type of Component.
- At its simplest, a Transform component exposes information about a GameObject’s position and rotation.
- It is unique within Unity, in that absolutely every GameObject will always have a Transform Component - so therefore, the two are intrinsically associated.
- When scripting, we usually use the Transform when interacting with a GameObject, rather than the GameObject directly as you might expect.
- We can read more at Unity Manual - Transform
- A Transform is a type of Component.
Prefab.
- A Prefab is a GameObject - or more commonly, a completed assembly of various GameObjects - that is intended to be reused.
- For the business developer, there are some parallels to be made by thinking of a prefab as a class or model ready to be instantiated repeatedly.
- For example, a video game may have an alien-character defined as an enemy - we would instantiate multiple copies of that Prefab in our game.
- A prefab could be added to our Scene (thereby making an instanced copy) using the editor at design-time (dragging+dropping). We can also create new instances of a prefab at runtime by using code in a script.
- Any design-time instanced Prefabs in our Scene will appear with blue text and a blue icon by default. Any one-off GameObjects in our Scene default to grey text).
- We can read more at Unity Manual - Prefab
Asset
- An Asset is anything that can be used by a Unity project. It could be a 3D model, an image to be used as a texture or an audio file.
- If we don’t have the experience or time to create Assets ourself, Unity provides an online marketplace - the Unity Asset Store - where we can purchase things like 3D models. We can then quickly include these in our own project.
- Within the “Assets” folder of the project it is common practice to create subfolders with descriptive names to group together the different types of Asset - e.g. “scripts”, “scenes”, “prefabs”, “materials” etc.
- We can read more at Unity Manual - Prefab
Material
- If you play video games, you most likely have some appreciation about how 3D graphics work.
- A Unity Material is a way to define how something should be rendered visually by the game engine.
- At its simplest, this could be just a flat color.
- More commonly we could use an image as a texture which is mapped onto a 3D object.
- A material can be a layered combination of several other effects - such as “how reflective”, “how shiny”, “does it have a bump-map for additional 3D effects” etc.
- At its simplest, this could be just a flat color.
- We can read more at Unity Manual - Creating and Using Materials
- If you play video games, you most likely have some appreciation about how 3D graphics work.
Packages
- We can extend the functionality of Unity by including additional Packages. A package comprises a collection of Assets, typically including Scripts and any other resources needed to serve a purpose.
- As a .NET developer there are parallels with NuGet packages - notably in that packages are versioned - but here the package contains more than just code (it is normally a collection of Assets
- We can manage the range of Unity-curated packages by using the top menu: Window → Package Manager.
First look at the Unity Editor
As with any complicated software, the Unity Editor can seem daunting on first acquaintance.
The editor can be broken down into a handful of main panels, so let’s break things down with a really high-level explanation.
Throughout this series, we will be referring to these sections by their name, time-after-time - so refer back here if you lose your way.
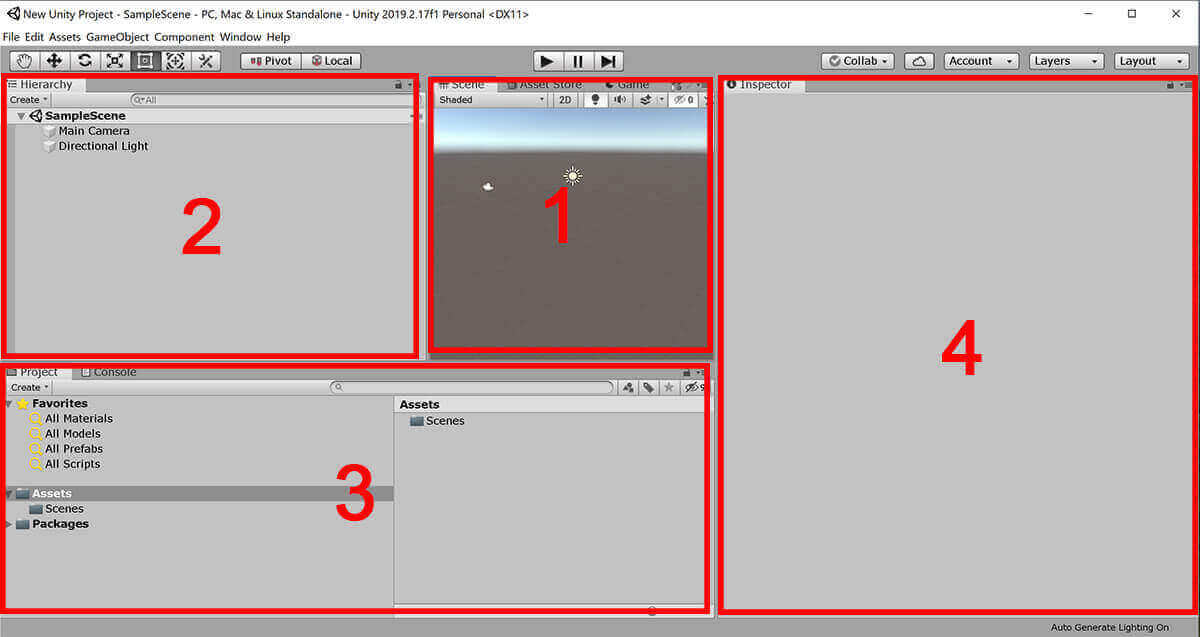
Scene View
- This is our visual portal into the game world.
- We can manipulate our view of the game world using the mouse (or trackpad):
- hold down the right-button to rotate our view
- use the scroll-wheel (or trackpad pinch) to zoom in and out.
- Ideally we want to use a mouse with three buttons, as the middle-button is used to pan the view about.
- We can switch between 3D and 2D - there is a small button along the top of the panel to toggle.
- Even in a 3D app, the 2D view is useful if we are working with things such as UI controls.
- Read more at Unity Manual - Scene View Navigation
- This is our visual portal into the game world.
Hierarchy View
- Earlier, we established that a scene is comprised of GameObjects. The hierarchy panel displays a tree-structure of design-time objects, showing us the parent-child relationship.
- We can create new assets by:
- using the Unity Editor’s context-menus (e.g. right-click → 3D Object → Cube), or by,
- dragging and dropping an existing asset, from the project files and into the hierarchy.
- We can highlight a GameObject to select it for “Inspection” in the Inspection View
- We can do things such as dragging+dropping objects around the Hierarchy if we need to.
- Read more at Unity Manual - Hierarchy View
Project View
- The Project View is a type of file-explorer and is used to display the various files and folders that make up our project.
- By default we can expect to see a folder for “Assets” showing here.
- If we have additional Packages installed, we’ll see them showing in the “Packages” folder.
- By default we can expect to see a folder for “Assets” showing here.
- The view includes a panel for previewing Assets (if possible - i.e. this works for a texture, but not an audio file).
- A useful tip is that we can change the size of the preview items by adjusting the smaller slider-control in the bottom-right of the panel.
- Read more at Unity Manual - Project View
- The Project View is a type of file-explorer and is used to display the various files and folders that make up our project.
Inspector View (Component Inspector)
- When we select a GameObject in the Hierarchy View, the corresponding Components, along with all of their details, are listed.
- Using the “Add Component” button, we can search for additional components, that can be added to the GameObject.
- Many Components have attributes that are visible in the Unity Editor. Different types of attributes can be edited in different ways. For example:
- An attribute that was expecting a number, could display a text box for you to enter a number.
- An attribute that was expecting a colour, could display an option for selecting a colour from a color-picker tool.
- An attribute that is a reference to a Prefab, lets us drag+drop a Prefab directly onto the attribute box .
- Read more at Unity Manual - The Inspector View
Miscellaneous things that are worth knowing about
The Unity Editor does not periodically autosave
You need to get in the habit of remembering to manually save frequently.
- A crash can lose our work, which is super-frustrating.
- It’s a subject that has been discussed in forums. Apparently there are 3rd party plugins to address this, but I have not experimented with them.
- A crash can lose our work, which is super-frustrating.
In the “File” menu, Unity has two separate save options: “Save” and “Save Project”. It’s not immediately obvious what the distinction is, so briefly:
- “Save” saves both the Scene and the Project together. Changes to a scene include adding/removing GameObjects and the details of any Component in the Inspector. I would just always use the vanilla “Save” option (Ctrl+S).
- “Save Project” saves changes to only the project-specific settings (e.g. things in the Edit → Edit Project Settings dialogue, and things like the “Build Settings” (File → Build Settings)
Read more at Unity Manual - Saving
IDE / Code-Editor Integration
- Some code-editing environments need an extension to fully integrate with Unity.
- We’ll look at this subject more closely later in this series Part 4 Logging and debugging
Changes we make in “Play mode” are not retained.
- To test and run our project, we use play mode (the prominent play/stop icon in the top centre of the screen).
- Play mode still lets us edit settings and parameters. This is by design, so we can experiment with settings whilst our game/app is running.
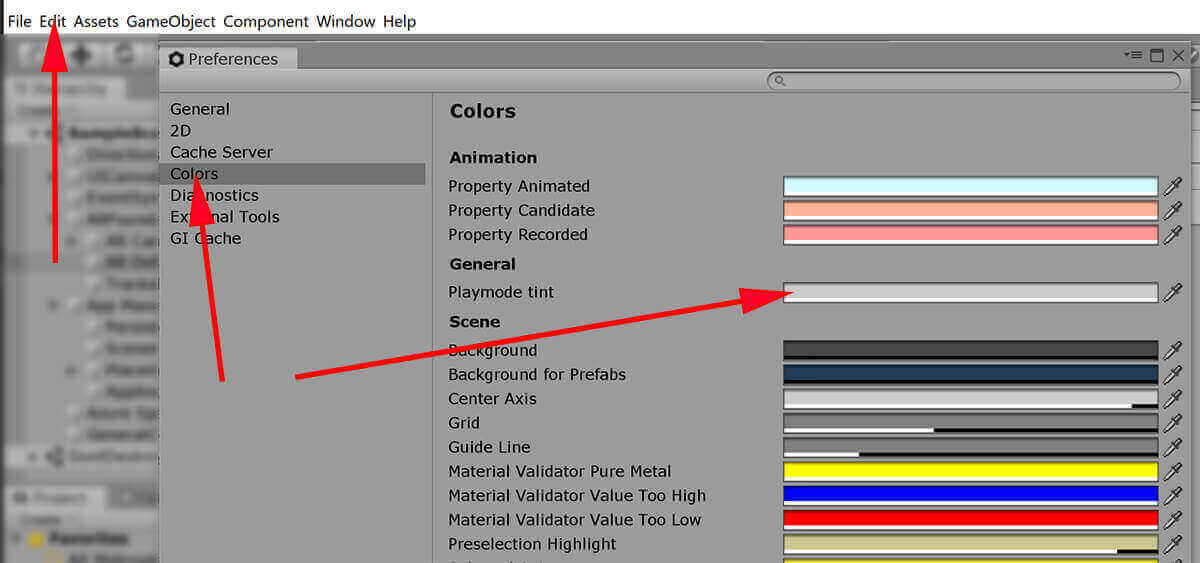
- It is not always obvious that we are actually currently in play mode, meaning that we can inadvertently be making changes that will end up being wasted.
- We can edit a preference in the Unity Editor, so that it changes colour so as to more dramatically obvious that we are currently in play mode. We can do this by changing: Edit → Preferences → Colors → Playmode Tint, I would recommend doing this!
- Read more at Unity Manual - Play mode
Unity uses something called “Quaternions” for angles/rotations
It won’t take long for us to come across the word “Quaternion” … and being left wondering what on earth this is all about!
- Most of us are familiar with the idea of the 360 degree angle:
- If we combine three of these angles together, we can describe the rotation of an object in 3D space.
- The technical name for this is “Euler Angles”.
- A problem with using Euler Angles is that they can be subject to something called “Gimbal Lock”.
- A very, very crude explanation is that in certain circumstances, we could try to modify an angle and nothing would appear to happen.
- I would recommend watching this video YouTube: Euler (gimbal lock) Explained that explains it properly - it’s something we need to visualise, rather than read about!
- A very, very crude explanation is that in certain circumstances, we could try to modify an angle and nothing would appear to happen.
- Because of the limitation of using Euler Angles, instead, Unity internally uses a system called “Quaternions” to describe angles and rotations.
- These happen to be comprised of four values (x, y, z, w), but these don’t equate to our regular concept of axis.
- For the purpose of this article, we don’t need to get embroiled in the topic. Suffice to say:
- we should not attempt to modify the values of a quaternion angle manually by reading or modifying its properties.
- instead, we should use Unity classes and methods to work with them. For example
Quaternion.LookRotation.
- Read more at Unity Documentation - Rotation and Orientation in Unity
In the next part of this series, we look at scripting in Unity.