Are you new to Coding? This series of articles is a beginners’ overview of version-control, Git and GitHub.
In this article we’ll introduce you to some of the basics of saving changes to your work and saving it to the repository.
In part 1 of this series, we learn that GitHub is an online service for hosting your Git repositories.
In part 2 of this series, we learn some of the key concepts and terminology related to Git.
In part 3 of this series, we learn how to use GitHub to create a new empty repo.
In part 4 of this series, we install Git on our local machine and clone our new GitHub repo.
In part 5 of this series, we learn how to begin working with Git - how to commit files, how to push them to GitHub and more.
In part 6 of this series, we learn how to work with Git branches - how to create them, move between them and merge changes.
To keep things a bit faster paced and hopefully more interesting, we’re going to step through some instructions really quickly so you can see some instant results. Afterwards, we’ll go back over things in more detail, to explain what we were doing and any reasons behind them.
Please note that in this article, the screenshots of the console include coloured words such as
[master ↑]or[master ≡ +1 ~1 -0 ~].This is not something that is part of a regular command prompt. I am using Windows Powershell with an extension called “PoshGit” which gives you additional Git-related information. I recommend using it because it makes it clearer when files have been modified).
If you want to learn more, you can get PoshGit here. Very quickly, on a Windows system, using Powershell in Administrator mode, install PoshGit by entering
PowerShellGet\Install-Module posh-git -Scope CurrentUser -Force, followed byImport-Module posh-gitto enable it.
First, add your GitHub credentials
Before we move on any further, let’s register your GitHub credentials.
If we’re just cloning a repo (either your own or anyone else’s), we don’t need to provide any details, because cloning a public repo can be anonymous.
However, if we’re planning to push any changes that are made to your repository, back up to GitHub, we need a way to tell the system who you are.
This is a one-off process, we won’t need to repeat this step every time.
- Open a new terminal/console on your computer and enter these commands. We need to insert your own name and email address of course! (and press enter):
git config --global user.name "John Doe"
git config --global user.email johndoe@example.com
- You don’t need to provide a password just yet - you’ll automatically be prompted to enter this, the first time you try and push your changes up to GitHub. Once you’ve done this, Git will remember this information, so it won’t keep prompting you for a password.
When you enter the password, the command line may be a bit confusing because it doesn’t give feedback that you have entered anything - for example, an asterisk for each character you type. Just be aware that it is actually working even if it doesn’t look like it!
Step by step instructions to save changes back into your repository.
First we need to make some changes to the code in your project. We’ll keep this super simple:
- Create a new file called
some_text.txt - Open up the
readme.mdfile in a text editor and add in a new line of text. It really doesn’t matter what the text is, so perhaps enter something silly like “hello, I have made a change”. Make sure you save the changes!
- Create a new file called
Open a new terminal/console on your computer and navigate to the root of the folder where your new project is.
Enter the following command. Note that there is a space and a period character at the end:
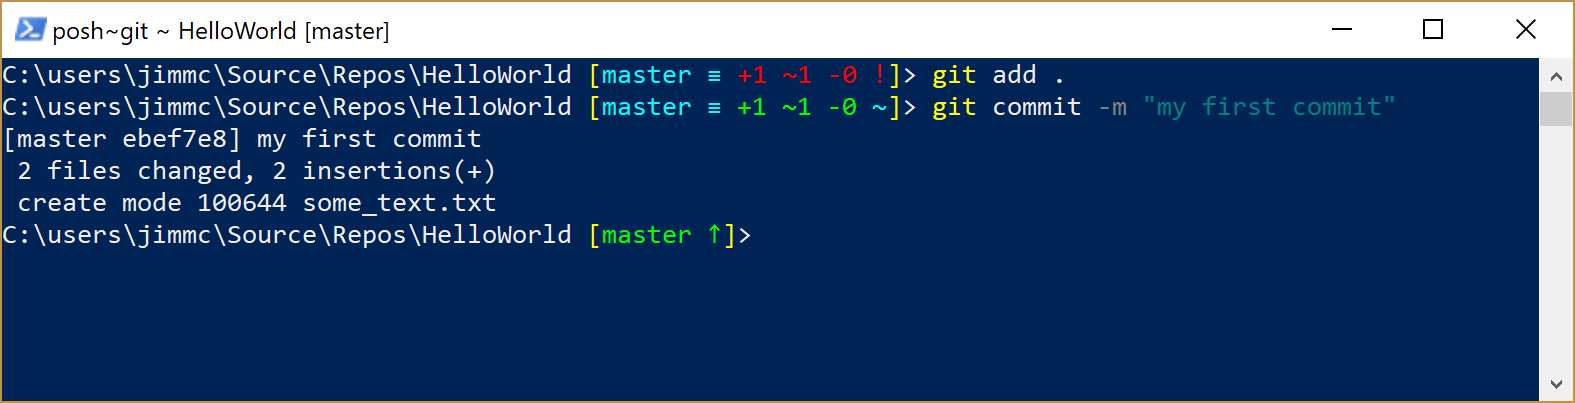
git add .
- Then, enter this command (and press enter):
git commit -m "my first commit"
Your console should respond with a message a bit like this:
- Now, enter this command (and press enter):
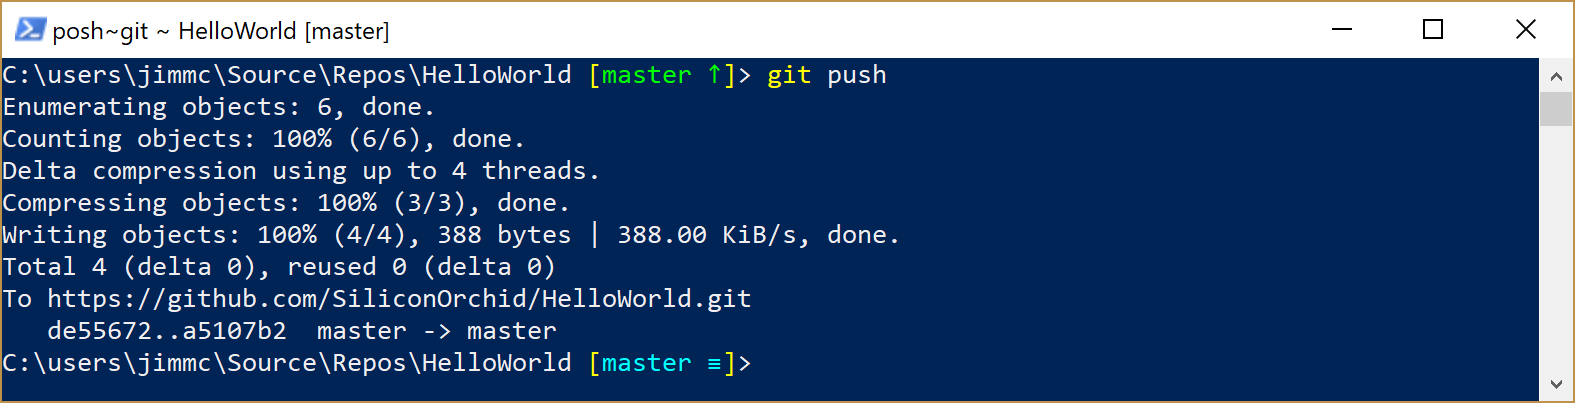
git push
You may be prompted for your GitHub password at this point - go ahead and enter it.
Your console should respond with a message a bit like this:
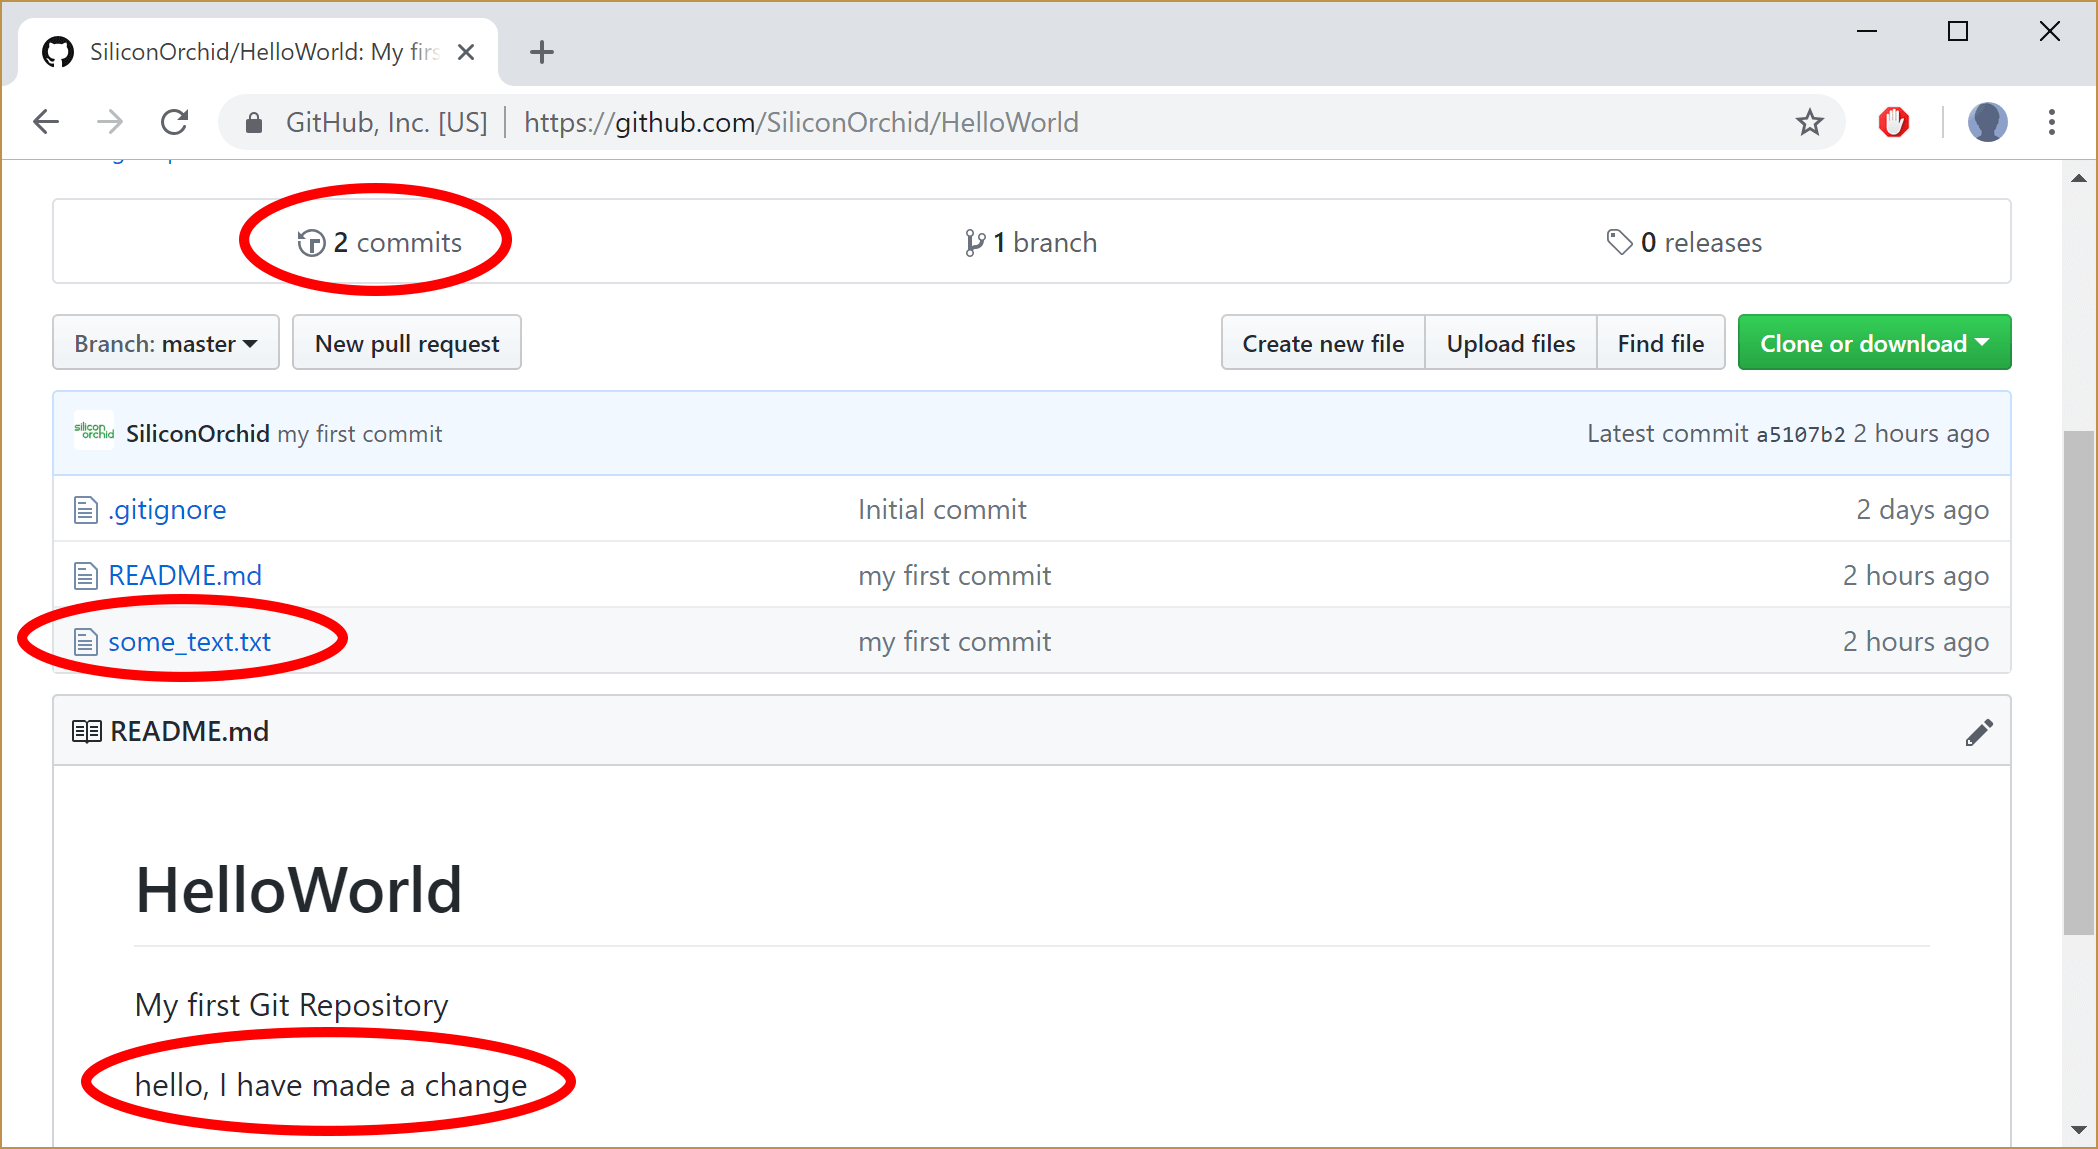
Finally, return to the GitHub and refresh the main page for your repo. GitHub should now show a change, verifying that you’ve now successfully pushed the files up to the repository. In particular:
- you should see that the count of commits has increased from 1 to 2.
- that your repository now includes the new file.
- that your readme file is showing the change that you made to it.
Introducing the ‘Git Status’ command.
Now would be the perfect moment to introduce another Git console command. The command is simply:
git status
By using git status, we can get information such as “what files have been added or edited” or “what files need to be staged or committed”, etc.
We’ll show you some examples of the information that git status returns, in the next section.
Let’s go back over those steps again.
Earlier, we introduced you to a whole bunch of commands, but we deliberately rushed through things, without explaining what was actually happening.
Now, let’s go back over what we did and talk about what was actually happening.
Firstly, we made some modifications to the files in our project.
In the first step, we had created a new file and edited another.
Behind the scenes, because Git was tracking your working folder, it then knew that two modifications had been made. * If you wanted to, you could have kept modifying any of the files as you saw fit. This could include the adding of files, deleting them, or editing a file to change its content.
It doesn’t matter how many separate edits (and saves) that you make to a file, only the fact that it has been modified counts.
If you create a new folder and put a file inside of it, that new folder will be included with the changes.
The only nuance you should be aware of is that if you create a folder, without adding a file inside of that folder, then Git won’t track the fact that just the folder was added.
A folder needs to have at least one file inside, for the folder to be included in the commit.
The key thing here, is that Git is tracking the project folder and it recognises that files have been modified. Only files that are modified can be staged and subsequently committed.
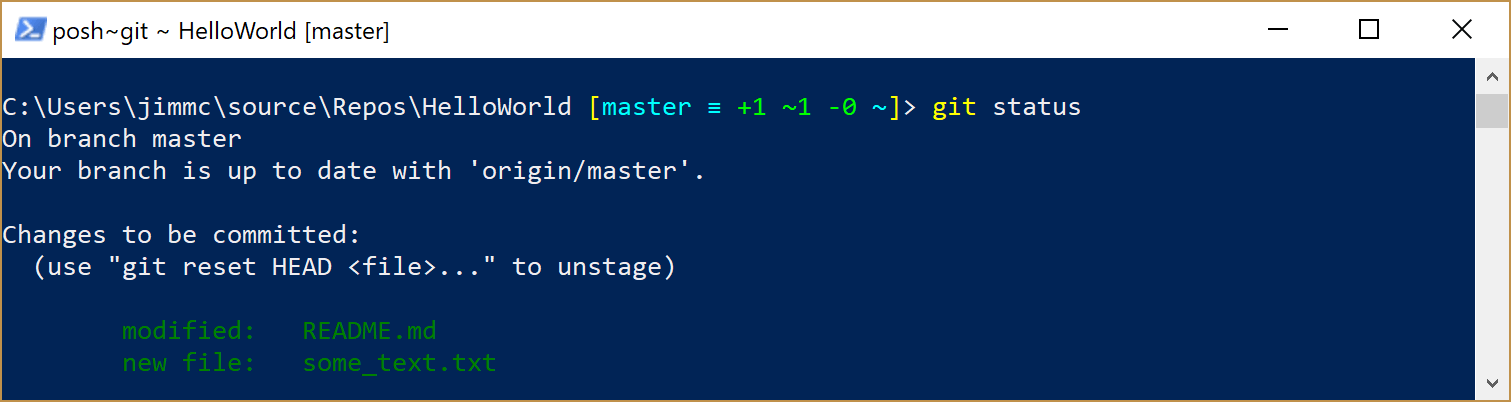
The following screenshot shows us what we would have seen if we had run the git status command, at the point where we had added both new file some_text.txt and edited readme.md (but had not run any other Git commands):
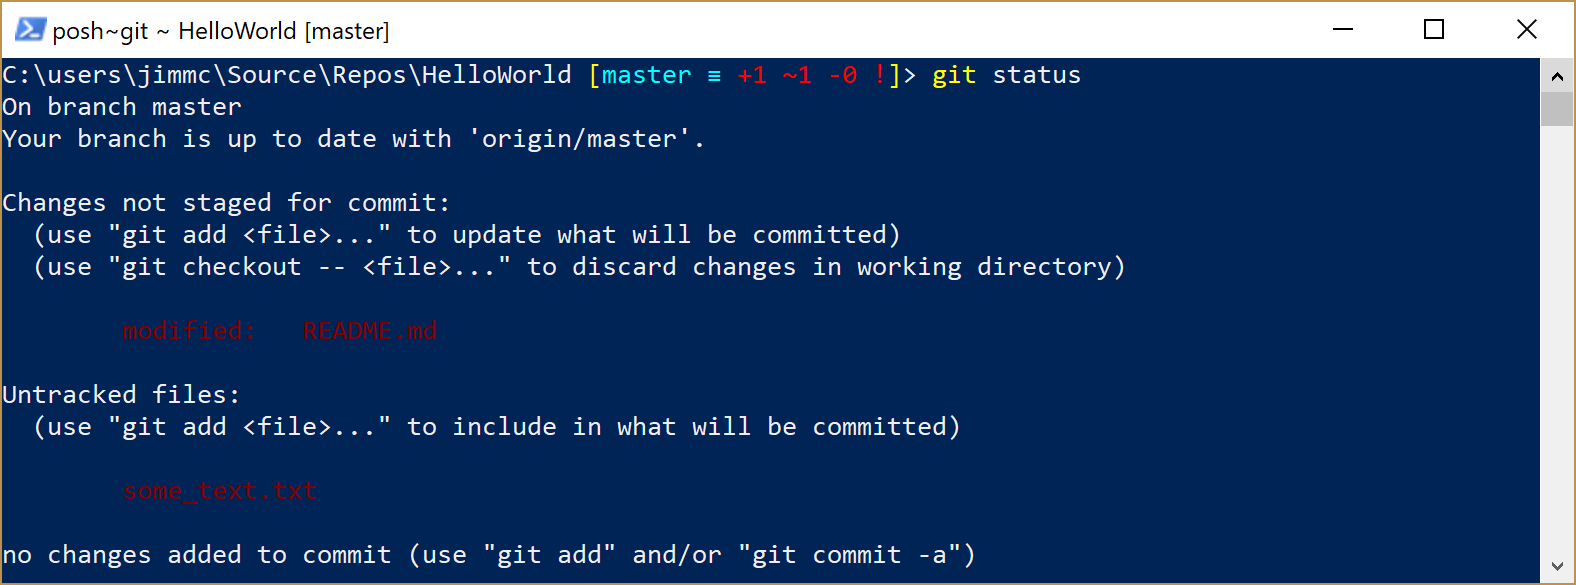
At this point in the process, the git summary would tell us that:-
there are unstaged changes. This means that we’ve edited some files that Git already knows about. In this example, Git knows about the
readme.mdfile because that already existed in the repository (that particular file was created when we first created the repository)there is an untracked file. This means that Git is aware that a new file has been added to your folder, but this file has not been added to the repository.
We’ll use the git status command a few more times in this post-review of what we’ve been doing, as it will help flesh out some of the processes that are happening with Git.
Next, we then staged some files using git add
Do you remember back at the beginning of this series, in the Overview article? We talked about something called “Staging”?
As a brief recap, the idea with staging is that you select which files, amongst those you have modified, that you want to include in the “commit”.
The
git addcommand selects which files you want to stage.Use a period character as a “wildcard”. In other words, by using the command
git add .we are saying “I want to stage all of the modified files”.You could specify individual files if that is intended. e.g.
git add some_text.txtRegardless, you do need to stage at least one file, before attempting to commit.
If we were to stage both of the two files that we have modified and then call the git status command a second time, we would see a message like this:
TIP: What if you stage something and then change your mind and no longer want it staged?
You can use the
git resetcommand to undo all of the staged files, or name a specific file, e.g.git reset some_text.txt
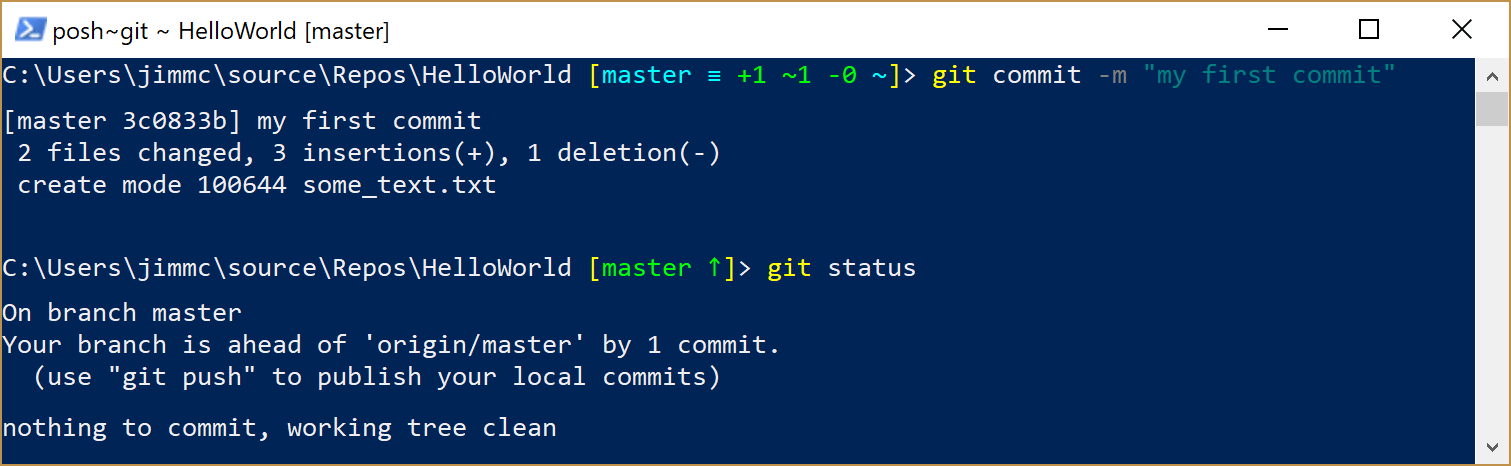
We then committed the change to the repository using git commit
In the example, we used the command
git commit -m "my first commit".git commitis the command used to save a record to the repository.Initially, the change is only “committed” to your local copy of the repository. If at this point, you were to go and compare the version currently showing in GitHub, you would not yet see your changes.
Use the
-mswitch to add a message to the commit. You can then provide the text of your commit message in quotes. You can provide any message you like, but it makes sense to keep it meaningful to the change that you’re checking in.
This time, if we were to use the git status command, we would see the following information returned:
TIP: What if you commit something and then change your mind and no longer want it committed?
There are a number of ways to revert back to a specific commit, but for simplicity, if all you want to do is go back to the last committed version (acknowledging that this action will remove all traces of the commit that you want to revert back from), you can use the somewhat cryptic-looking command
git reset --hard HEAD~1.
Finally, we pushed our local commit up to GitHub using git push
This is the concept of “distributed version control” that causes confusion with beginners. The question of “I’ve just committed my change, why can’t I see it in the repo?” is often asked.
The distinction is that:
- you
commitlocally - you need to
pushthat commit back up to the server (GitHub), at which point it will be integrated with the version there.
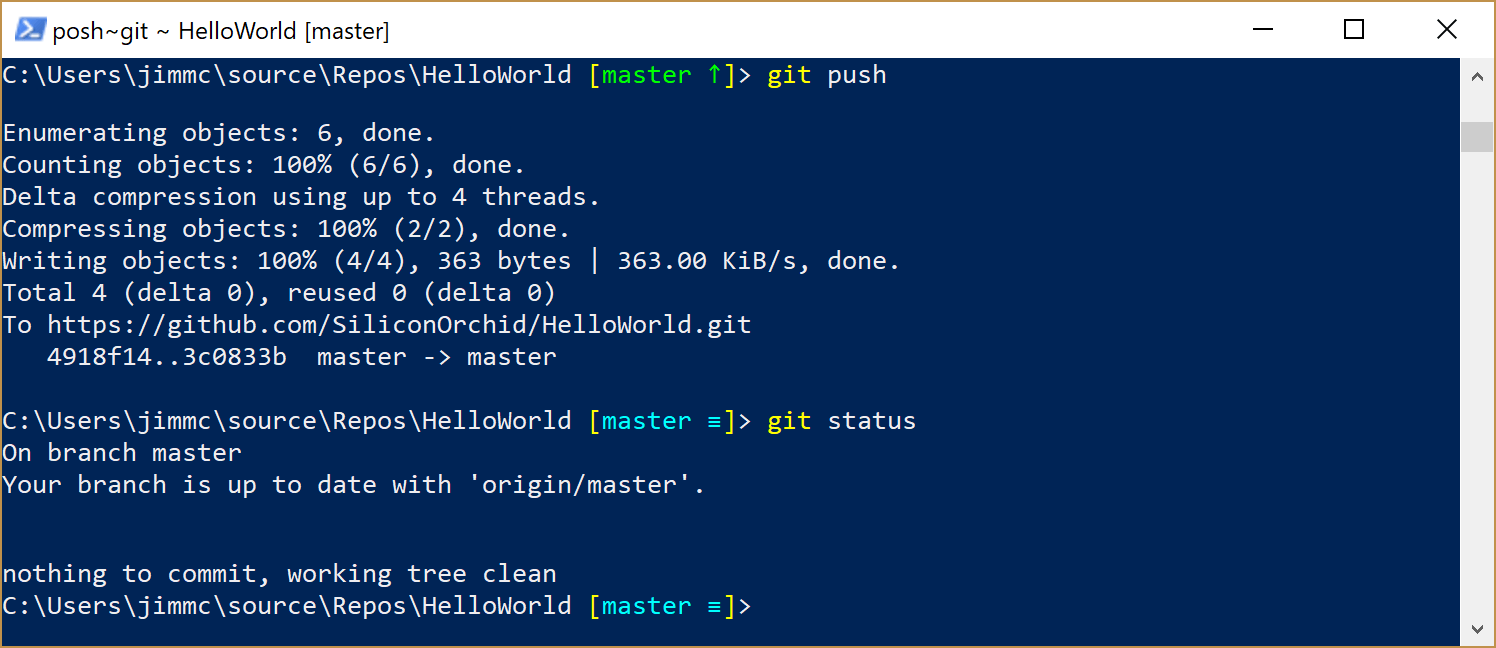
There is a fair bit of information returned when we perform the push, but the key thing to notice is the word “delta”. This means “difference”.
When you push a commit back to the server, Git doesn’t send all the files - instead it only sends the difference between your version and the version in the previous commit. It then goes one step further and compresses that data, meaning that the information you have to send to the server is as small as it can be.The
git statuscommand doesn’t have much to say this time, other than “the files in your local version are identical to the latest version on the server”.
If you’re working alone on your own project, things generally tend to get no more complicated than the steps described here in this article.
When multiple people start working on the same project, things can get a little bit more complicated. Some reasons for this include:
- you need to make sure that you push your work up to the server so that other people have access to your latest changes.
- you need to remember to pull changes from the server, back to your local copy so that you have the latest version of what other people have worked on.
- you need to take care when working on the same file, otherwise, it can lead to merge conflicts.
Merging your code with that of other people’s is a routine activity when working with teams. We’ll cover this topic in a future article.
Next, in part 6 of this series, we’ll introduce you to working with Git branches.
PREVIOUS : Read part 4 : Install Git and clone a GitHub repository