
This is part two of a nine-part series that explores how to create a Unity application for a mobile device, using Augmented Reality and Azure Spatial Anchors
- In Part 1 we introduce the project, requirements, technologies and various AR concepts.
- In Part 2 we follow the steps in the project QuickStart guide.
- In Part 3 we create a basic Unity ARFoundation application.
- In Part 4 we look at one of the building blocks of AR - the “Placement Cursor”.
- In Part 5 we explore how the UI for the project works.
- In Part 6 we learn how Azure Spatial Anchors can be used in our project.
- In Part 7 we step up our game by looking at how we can add and move virtual scenery.
- In Part 8 we develop functionality that saves and restores virtual scenery to the cloud.
- In Part 9 we learn about the Azure Functions backend for the solution.
The entire project sourcecode that accompanies this series can be found at:
This Quick Start article is intended for people who prefer to just grab a copy of the code and get the demo set up and working.
The source code for this project can be found at https://github.com/SiliconOrchid/Unity-AR-AzureSpatialAnchor-Demo
This project has several parts that will need to be created and configured.
Download any tools and SDKs necessary.
The demo project was created and tested by using the following:
- Visual Studio Community 2019 (get the IDE)
- Unity 2019.2.17f1 (get Unity)
- .NET Core 2.1 (get the latest SDK)
- Azure Functions v2 (read about developing locally at Microsoft : Code and test Azure Functions locally)
Clone the project source code
Clone the source code for this project. The Git CLI command would be:
git clone https://github.com/SiliconOrchid/Unity-AR-AzureSpatialAnchor-Demo.git

Create Azure Resources
Create the following Azure resources - the naming of these resources is unimportant:
- Azure Resource Group - to group our resources together.
- Azure Function AppService - to be used for an HTTP-triggered API service.
- Azure Storage Account - to be used for storing text files in the cloud.
- Azure Spatial Anchors (ASA) - a service used to store spatial anchors in the cloud.
Tip: If you are not familiar with creating Azure resources, try referring to the various documents linked in part one of this series Introduction - Primary Documentation for guidance.
Configure Azure Resources
When we have created a new Azure Storage Account:
- Locate the section “Settings” and open up “Access Keys”.
- Make a note of the “Connection String” - which we will use immediately in the next step.
- Locate the section “Settings” and open up “Access Keys”.
When we have created a new Azure Functions AppService:
- Locate the section “General Settings” and open up “Configuration”.
- We should go ahead and provide the following settings now:
- [AzureStorageAccountConnectionString] : use the storage account connection string
- [AzureStorageAccountContainerName] :
azurespatialanchordemo - [CurrentAnchorIdBlobName] :
CurrentAnchorIdBlob.txt - [CurrentSceneryDefinitionBlobName] :
CurrentSceneryDefinitionBlob.json
- Locate the section “General Settings” and open up “Configuration”.
When we have created a new Azure Spatial Anchor service:
- Locate the section “Overview” and make a note of the value “Account Id” for later.
- Locate the section “Access Keys” and make a note of the value “Primary Key” for later.

Deploy Azure Functions
Use your IDE (e.g. Visual Studio) to open up the demo solution found here:
..../Unity-AR-AzureSpatialAnchor-Demo/src/BackendFunctions/BackendFunctions.sln
There are several ways to deploy our code to the cloud, but we will use the simple so-called “Right Click Publishing” which is supported by Visual Studio:
- Using Visual Studio, right-click on the
BackendFunctionsAzure Functions project (in case of confusion, note that the project shares the same name as the parent solution) - Select “Publish”
- Use the dialogue to publish the project to our Azure Function AppService resource that we created earlier.
- If you need guidance, refer to Microsoft : Develop Azure Functions using Visual Studio : Publish to Azure
Get Azure Function URL details
Next, we want to get the Public URL of the Azure Function and the Function Keys.
- Return to the Azure Portal and navigate to the Azure Function AppService that we created earlier.
- In the “Overview”, make a note of the Url for later (it will be in the form
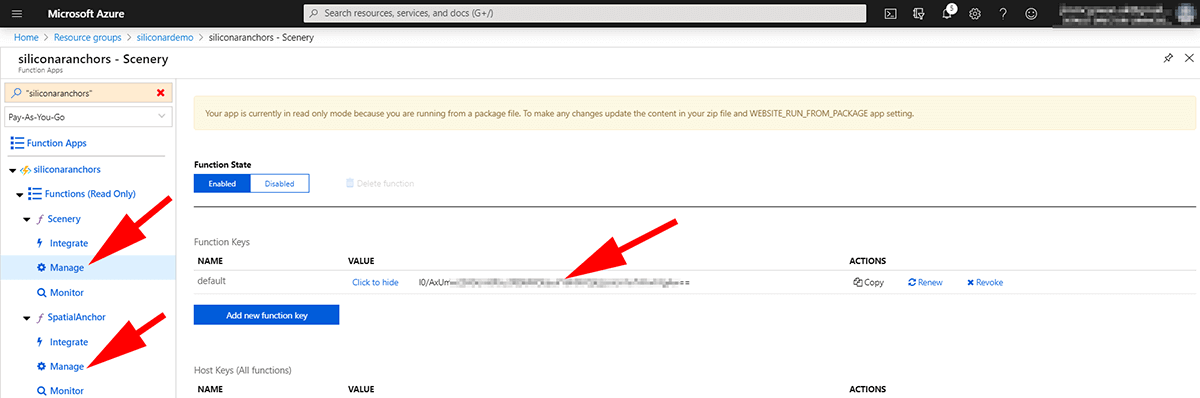
https://yourservice.azurewebsites.net) - In the left-hand blade, we should see a group-heading called “Function (Read Only)” - underneath this, we should see the names of two functions that we have created for this demo; They are named “Scenery” and “Spatial Anchor”:
- Click on “Scenery -> Manage”.
- Find the “Function Key” called “Default” and press “click to show”.
- Make note of this key for later (taking care to note that this applies to the “Scenery” function)
- Find the “Function Key” called “Default” and press “click to show”.
- Click on “Spatial Anchor -> Manage”.
- Find the “Function Key” called “Default” and press “click to show”.
- Make note of this key for later (taking care to note that this applies to the “Spatial Anchor” function)
- Find the “Function Key” called “Default” and press “click to show”.
- Click on “Scenery -> Manage”.
Note: Later, when we want to call the Azure Function, the function key needs to be added as a URL parameter in order to grant access.
Get Azure Function URL details
Let’s turn our attention to the Unity part of this project next…
Using Unity Editor 2019.2, open the project found at:
.../Unity-AR-AzureSpatialAnchor-Demo/src/Unity/AR-SpatialAnchor-Demo
Tip: Opening the project for the first time may take a while because Unity needs to restore a load of files that are not included in source control.
Open up the scene
Scenes/SampleScene.Initially, we can expect to see a bunch of errors because we still need to import some missing 3rd party assets.
Obtain and install the ASA SDK
The ASA SDK is not available in the Unity Package Manager, so we need to get it manually.
- Visit the MS GitHub SDK download page: https://github.com/Azure/azure-spatial-anchors-samples/releases
Locate and download the
AzureSpatialAnchors.unitypackage- this demo was created using version 2.2.1.
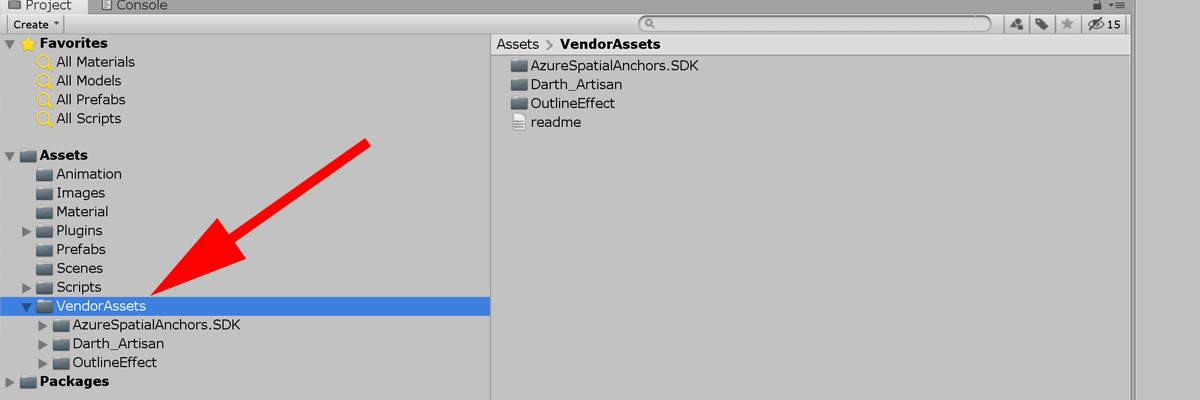
From the Unity Editor, use “Assets -> Import Package -> Custom Package” to import
AzureSpatialAnchors.unitypackagefrom your download folder.For the purpose of keeping files and folders organised, in the Unity Editor, move the newly-added
AzureSpatialAnchors.SDKfolder toVendorAssets
Install other 3rd-party Assets
Using the Unity Asset Store;
- Import the package “Cakesplice - Outline Effects”.
- When importing this package, save some space by deselecting the demo resources - we don’t need them.
- If prompted, permit the automatic update.
- Move the new package folder into “VendorAssets” folder
- When importing this package, save some space by deselecting the demo resources - we don’t need them.
- Import the package “Darth_Artisan - Free Trees”.
- Move the folder into “VendorAssets” folder
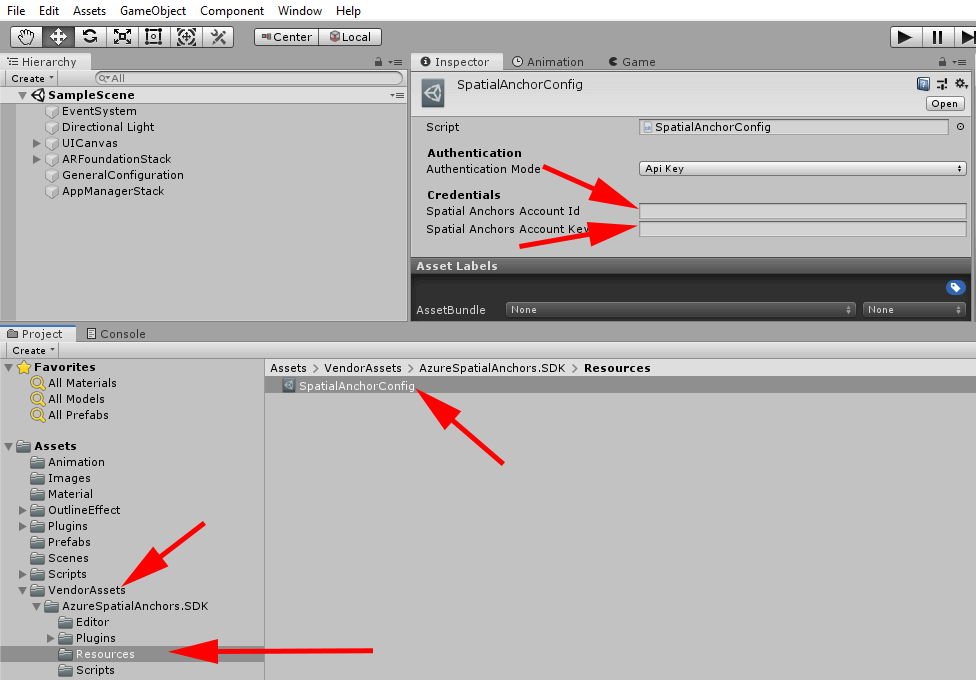
Add ASA Credentials into Unity Project
Using the Unity Editor;
- In the Asset Panel, locate the folder
Assets/VendorAssets/AzureSpatialAnchors.SDK/Resources. - Select the SpatialAnchorConfig GameObject.
- In the Inspector, locate the two fields “Spatial Anchors Account Id” and “Spatial Anchors Account Key”.
- Using the credentials that we noted earlier, insert these values into the two fields.
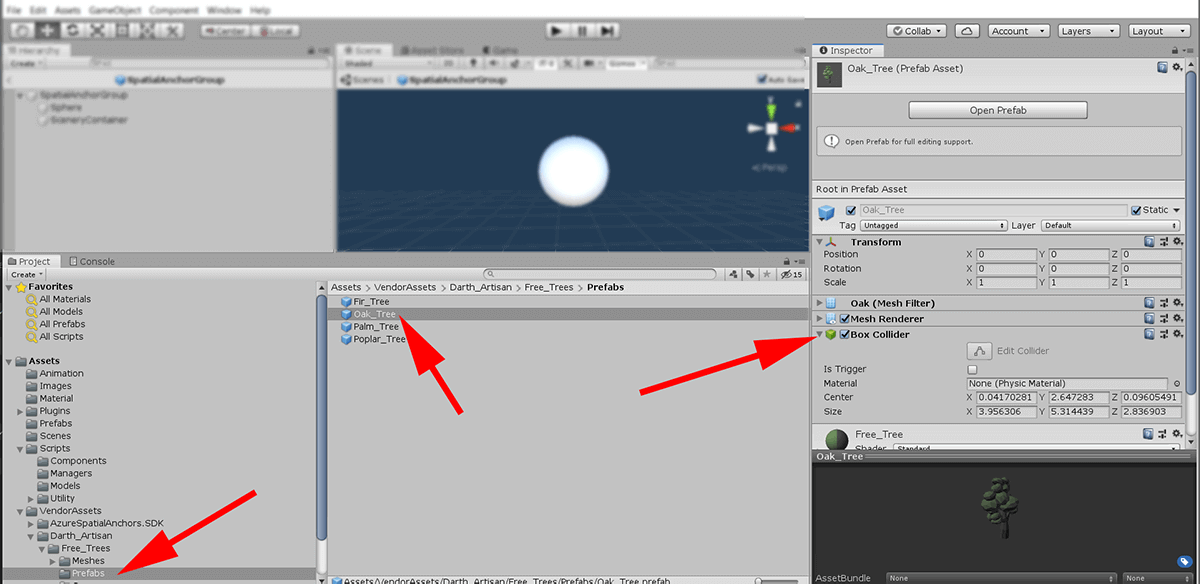
Add physics collider to scenery objects
In our demo, we will use a finger to tap the on-screen scenery objects (low-poly 3D tree models) in order to select and interact with them.
For this to work, the code will use Raycasting which is part of the Unity physics engine.
This requires that the scenery objects each have a “collider” Component.
- Locate the two Prefabs that we will be using for scenery. They are the “Free Trees” assets that we added in a previous step - they are located here:
VendorAssets/Darth-Artisan/Free_Trees/Prefabs/Oak_TreeVendorAssets/Darth-Artisan/Free_Trees/Prefabs/Poplar_Tree
- For each of these two prefabs, add a “Box Collider” Component:
- select the Prefab in the Project View
- use the “Add Component” button in the the Inspector View
- use the search-dialogue to find and add the “box collider”

Check that everything seems to be fitting together
Assuming that we have placed the assets in the expected location, the cloned project should already be wired up correctly.
However, it may be helpful to still give the project a quick once-over to pre-empt any problems:
- In the Hierarchy, click on the following GameObjects in turn - we’re looking for any “missing scripts”:
ARFoundationStackGeneralConfigurationAppManagerStack
A majority of our own scripts can be found in the /Scripts folder.
If the script for
AppManagerStack/Spatial Anchor Manageris missing, we can find that in the ASA SDK :Assets/VendorAssets/AzureSpatialAnchors.SDK/Scripts/SpatialAnchorManagerIf any of the scripts for
ARFoundationStackseem to be missing, these can be found in the Unity ARFoundation package :Packages/ARFoundation/Runtime/AR
Tip: The
.gitignoreincluded with this project excludes the Visual Studio.slnsolution files from the GitHub source code.If you are planning to edit the scripts in this project, now would be a good opportunity to regenerate the solution file by double-clicking any script file from within Unity. This is a one-time exercise,
Associate assets and add configuration:
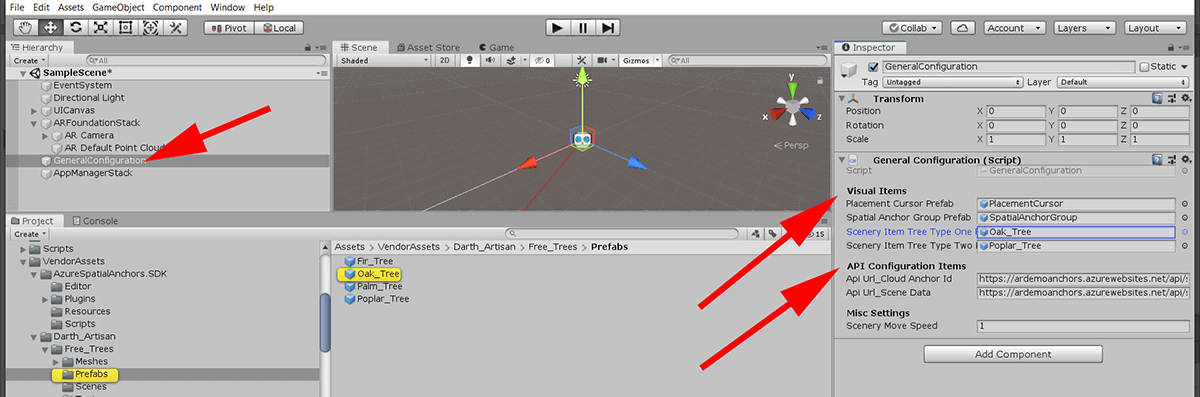
In this project, the asset declarations can largely be found together in one place - the component GeneralConfiguration.
Start by selecting the GeneralConfiguration Gameobject in the Hierarchy. Using the Inspector, locate the sub-section “Visual Items” (part of the “GeneralConfiguration” Component):
- Check that each of the Prefab fields has been populated:
- [Placement Cursor Prefab] :
Prefabs/PlacementCursor - [Spatial Anchor Group Prefab] :
Prefabs/SpatialAnchorGroup - [Scenery Item Tree Type One Prefab] :
VendorAssets/Darth-Artisan/Free_Trees/Prefabs/Oak_Tree - [Scenery Item Tree Type Two Prefab] :
VendorAssets/Darth-Artisan/Free_Trees/Prefabs/Poplar_Tree
- [Placement Cursor Prefab] :
We also need to add some configuration items to the component GeneralConfiguration.
- Locate the section “API Configuration Items”
There are two API’s that we need to add references to: api/scenery and api/spatialanchor
- We now need to refer back to the notes that we made earlier and supply URLs to our Azure Functions. The URL will be a combination of:
- The main Function host Url - e.g.
https://<yourhostname>.azurewebsites.net/ - The route to one of the two function - this will be either
api/sceneryorapi/spatialanchor - The function key, supplied as the URL parameter
?code=- and applicable to each function separately - e.g.?code=l0/AxUmw2bX9om8P
- The main Function host Url - e.g.
Tip: This is an example of what a complete URL could look like (this is not a real example, so don’t try testing it!):
https://ardemoanchors.azurewebsites.net/api/scenery?code=l0/Axxxxxxxxxxxxxxxxx6MObauIrY6NXVQk2poxxxxxxxxxxxgAw==
Configure Build Settings and Android Player
This demo has been created and tested using an Android device, but Unity ARFoundation also supports iOS.
Unity provides instructions about how to configure the player:
The following instructions for Android, have been derived from the Android guide linked above:
- Open up the Unity “Build Settings” (File -> Build Settings)
- Select “Android” and click the “Switch Platform” button. We will need to wait a few moments while Unity makes project changes.
- Click “Player Settings”. The project source should have all the necessary settings already made, but to preempt complications, check the following sections of “Other Settings” are correct::
- Graphics APIs should be “OpenGLES3” only. If “Vulcan” is present, remove it.
- Multithreaded Rendering should be disabled.
- Package Name should be personalised to you.
- Minimum API Level should be set to “Level 24 - Nougat”
- Check the following setting for “Publishing Settings” are correct:
- Custom Gradle Template is set to true, and that it points to the template provided with the ASA SDK -
Assets/Plugins/Android/maintemplate.gradle
- Custom Gradle Template is set to true, and that it points to the template provided with the ASA SDK -
All done
You’ll need a working internet connection for this demo to work, but you should be all set now, so go and have some fun!

How does the demo application work?
Firstly the app starts up:
- A new Cloud Anchor Session is automatically created.
- The code establishes a connection to the ASA cloud service, using methods provided by the ASA SDK.
The app then automatically starts mapping the world that it sees:
- We move the device around, automatically constructing a point cloud model of the physical space.
- The app will automatically detect the planes as soon as possible, this happens transparently - we just need the appropriate ARFoundation components added to our Unity app.
- Every frame, we constantly use the RayCast mechanism to detect whether there is a Plane detected - and if so, what is the Pose of the intersection.
- If a plane is detected, we draw a small graphic which we call the “placement cursor”.
Next we create and save a spatial anchor:
When we tap the UI “New Anchor” button:
- We spawn a new instance of the
SpatialAnchorGroupPrefab. - A
SpatialAnchorGroupis a GameObject that is a compound of:- the actual native and ASA spatial anchor components
- a child-object that serves to visualise the anchor - arbitrarily, this demo uses a simple sphere, but there is no need to actually visualise the anchor at all, if it’s not needed.
- another child-object called
Scenery Container- this is used as a “container parent” for any “scenery objects” that we choose to add later.
- We position the new
SpatialAnchorGroupobject into the game world, using the Pose identified by the “placement cursor”.
- We spawn a new instance of the
When we press the UI button “Save Anchor”
- If the ASA SDK decides that it already has enough point-cloud data, it saves the data to the ASA cloud service immediately. Otherwise, it prompts us to move the device around some more and then saves once there is enough data available.
- The point-cloud data is saved to the ASA cloud service using ASA SDK methods. The ASA cloud service responds with an
AnchorId, that we can use to identify the ASA record. - We immediately take the
AnchorIdthat we just received as a response from the ASA API, and send it to an Azure Function API that is part of this project’s backend. The value of theAnchorIdis ultimately stored as a text file in Azure Blob Storage.
With the spatial-anchor created we can now add virtual scenery. In this demo, we have used low-polygon “trees” which are available as free assets in the Unity Store. If you want to substitute these for something else, that’s completely up to you.
- We press the “Add Scenery” button.
- in our project, we work with two different tree models. Our code randomly selects a model which is then added to the virtual world.
- The “placement cursor” has a constantly updated Pose which is made available to various other components, by way of being copied to the
AppStateManagercomponent. This Pose is used to position the 3D model of a tree onto the Plane. - The newly spawned 3D model, is set to be a child-object of the container
SceneryContainer(as a reminder, this itself is a child of theSpatialAnchorGroupgameobject).
With scenery added, we can reposition it within the scene:
- we can tap the scenery object - another RayCast is used to detect it.
- using a 3rd-party Unity Asset, we can apply an “outline” effect to indicate that the object has been selected.
- we can use our “place cursor” to provide new coordinates and apply “tweening” to smoothly move the “scenery object” to the new location.
We can then save the layout data, for the scenery, to the cloud:
- When we press the “Save Scenery” button we:
- Extract the local Pose data for each of the “scenery objects” in the container
Scenery Container - The coordinate information is serialised into a JSON string.
- This JSON is sent to our own second Azure Function API. This is used to persist the JSON to a file in Azure Blob Storage.
- Extract the local Pose data for each of the “scenery objects” in the container
With a sample set of data now saved to the cloud, we can either close and restart the application … or we can run the application on a completely different mobile device:
The process of “rehydrating” the virtual world works like this:
- We start the app afresh (just as before, a cloud anchor session is created and connected at startup).
- We tap the UI button “Restore Anchor”.
- The code calls our Azure Functions API to request the most recent
AnchorIdfrom storage. - Now that we know the
AnchorId, we can send a request using the ASA SDK - this returns the point-cloud data for that anchor. A “watcher” begins looking for a match between the restored point-cloud and the point-cloud of the live AR session.- When a match is detected, a
SpatialAnchorGroupis added to the virtual world, pretty much the same as if we had placed one manually.
- When a match is detected, a
With an anchor once again available, we can go ahead and restore the previously saved “scenery objects”.
- The UI button for “Restore Objects” is activated by updating the application state-management appropriately.
- Tapping this button invokes a web request to our Azure Function API that returns the JSON that represents the previously saved scenery.
- When the JSON is available, it is parsed and code is executed that respawns the “scenery objects” into the correct pose.

Gotchas
Below are some of the “Gotchas” that I have encountered.
ASA has very specific version number requirements
Be warned that, at the time of writing, the Unity/ASA ecosystem currently seems to be very sensitive to versioning and currently requires that we use specific Unity and package versions.
If you experience problems, make sure to double-check things like package version numbers very carefully.
Unfortunately, the error that falls out of this is rather vague and doesn’t really help us to diagnose the underlying problem.
If you discover errors such as this: System.DllNotFoundException: azurespatialanchorsndk try the following suggestions:
- Check your Unity version - at time of writing, only 2019.1 and 2019.2 are supported. The demo project accompanying this series uses 2019.17f1 specifically.
- Carefully review the packages and package version that we have installed.
- This topic is discussed in Github Issues : DllNotFoundException: azurespatialanchorsndk
Note: at the time of writing, the official MS documentation had just been updated to make it clear that Unity 2019.3 has breaking changes.
By the time you read this article, this situation is highly likely to have changed again, so make sure that you refer to the latest versions of official documentation
Blog Update 22 May: During BUILD 2020, it was announced onstage that ASA is now GA; however MS developers have, today, clarified that support for Unity 2019.3 support is still unavailable at this time. Please refer to GitHub Issues : Unity 2019.3 for current advice. In the meanwhile, stick with 2019.1 or 2019.2 and wait for the team to work their magic :-)
ASA SDK/samples use a custom Gradle template
As part of the ASA SDK, Microsoft provides and requires the use of a custom gradle template.
If you are simply cloning either the MS ASA Unity sample project - or the source code for this project - you won’t encounter this problem as it has already been set up correctly.
I personally stumbled hard with this issue, as it’s extremely easy to overlook.
What makes diagnosing the problem to be tricky, is that the reported error message is the same as for the previous Gotcha (i.e. System.DllNotFoundException: azurespatialanchorsndk)
To rectify the problem, we need to update the Unity build process:
- Build Settings -> Player Settings
- Expanding “Publisher Settings”
- Click checkbox for “Custom Gradle Template”
- The custom gradle template file can be found here:
\Assets\Plugins\Android\mainTemplate.gradle
Unable to select scenery objects
If you’re tapping on the screen in an attempt to select scenery objects and nothing is happening, you may have missed the step that requires us to add a collider component to the prefab of our scenery object.
For performance, just use a simple box collider.
If this still doesn’t work, focus your debugging efforts particularly on SceneryPlacementManager.cs and the method TouchSceneryItem().
Next, in part three, we create a basic Unity ARFoundation application.