
This is part one of a three-part series that shows you a way to combine several Serverless technologies, creating an online chat system that sends messages between users of WhatsApp and a real-time web app.
In part 1 of this series, we introduce you to the scenario and walk through the configuration of an entire solution, ready for local testing.
In part 2 of this series, we look at the various pieces of code that make up our solution in detail.
In part 3 of this series, we walk through the additional steps needed to setup and deploy the solution to the cloud.
A majority of technical blogs tend to focus on just one single facet of a problem or feature. Whilst this is great because it keeps articles short and focussed, it does often mean that they entirely miss, or at least gloss-over, many of the details that may be obvious to some, but not to others.
In this article, we’re going to have an in-depth exploration of an entire working solution. We’ll go through step by step:-
- How to integrate a number of distinct technologies together.
- An explanation of all the code and features of a fully working development system.
- How to publish everything to a cloud environment.
We’ll be using the following technologies:
- Azure Functions 2 (a Serverless platform, using .NET Core)
- Azure SignalR Service (another Serverless platform for realtime communication)
- Azure Storage Static Site (for hosting static web content)
- Twilio WhatsApp API (for access to WhatsApp users)
There isn’t actually a great deal of code in this solution - so the majority of the series will be covering the setup, configuration and integration of the system.
Introduction
If you keep up to date with development tech, you will probably be aware of the increasingly popular “Serverless” solutions that various cloud providers offer. This technology presents some interesting options when it comes to creating highly scalable software with the potential to significantly reduce operating costs (when using the consumption model).
Azure Functions have been with us for a couple of years at this point. If you’re someone who is more typically a “late-adopter”, either through personal preference or the nature of your business, then you should know that they represent the evolution of several well-established technologies. This is especially true with the 2018 release of Azure Functions 2, which supports a broad selection of languages and importantly for the .NET developer, support for .NET Core.
With that said, it’s only recently that they’re matured in certain respects, notably in terms of framework and feature parity with more established products such as ASP.NET Core. The inclusion of native dependency-injection is tantalisingly close now here, so if you aren’t already looking at (or indeed using) Azure Functions, then Summer 2019 is probably the time to start considering them seriously.
In this short series of articles, we’re going to create a simple “chat application”. It’s fair to say that this has become something of a cliched / staple subject for the many examples using SignalR. However, this is with good reason, because the topic is simple to understand and reasonably easy to demonstrate.
To differentiate this series of articles, we’re going to be using two relatively recent products from Microsoft and Twilio.
- Firstly, we’ll use the SignalR Service (instead of regular “hosted SignalR”) to provide a back-end for users of a real-time web-based client.
- We’ll be using a new messaging API from Twilio (still in beta, at time of writing) to connect the chat app to other users using WhatsApp.
Twilio WhatsApp API
Twilio have a new WhatsApp Api that lets us send and receive instant chat messages using the popular WhatsApp service. Twilio have done a terrific job of making this easy to use and if you’ve ever used their service to send regular SMS messages, you’ll already be on very familiar ground.
At the time of writing, the WhatsApp API from Twilio is still in Beta. One of the consequences of this is that each WhatsApp user needs to manually re-join the WhatsApp/Twilio sandbox group every 24hrs in order to send and receive messages.
Microsoft Azure
From the Microsoft Azure perspective, we’ll be using three of their services for deployment:
Azure SignalR Service, to provide a backend for real-time connectivity to web-based clients. Please note that although this is very similar to regular SignalR, it is not quite the same thing. We’ll talk about this in more detail in a moment, but for now, we just need to note that if you’ve used SignalR in the past, the way you interact with the service version is slightly different.
Azure Functions 2, to provide HTTP triggered API endpoints (very similar to ASP.NET Web API). The distinction with “version 2” of Azure Functions, is that it uses .NET Core.
Azure Storage Static Site, to provide hosting for our static web client. As our website does not have any active content, when we deploy, we won’t require a regular web server. Azure Storage Static Websites offers an exceedingly cheap hosting option.
Prerequisites
This article assumes that you already have at least a preliminary understanding of what serverless computing is (e.g. you already know that it means that there are still servers and that you understand the benefits).
There will be an assumption that you have familiarity working with:
A familiarity with how the older, “hosted” SignalR works would be helpful, but is not required.
You’ll need to have installed the .NET Core 2.x SDK, as appropriate to your platform.
You’ll need something to edit and build your project.
- This demo was primarily created using .NET Core 2.1 on a Windows 10 system using Visual Studio 2019 Community edition. There is no reason why you cannot use other platforms, code editors and CLI tools - my recommendation would be to use Visual Studio Code.
- This demo was primarily created using .NET Core 2.1 on a Windows 10 system using Visual Studio 2019 Community edition. There is no reason why you cannot use other platforms, code editors and CLI tools - my recommendation would be to use Visual Studio Code.
You’ll need to download the sample code that accompanies this article.
- Project source can be downloaded from here : https://github.com/SiliconOrchid/WhatsAppSignalRDemo
You will need an Azure account with an active subscription.
You will need a Twilio account with an active subscription. You’ll need this to access the WhatsApp API.
- If you don’t have a Twilio account or are completely new to their service, then check out their .NET Core quickstart tutorial.
Setup Azure SignalR Service
We’ll cover the setup up of some of the other Azure resources, that are only needed for deployment, later in the article.
We’ll setup the SignalR Service now as we need it available during development and testing.
- Log onto your Azure Portal
- Select Resource Groups from the favourites panel on the left and Create a new Resource Group for this project and name it “WhatsAppSignalRChatDemo”
- From your new Resource Group click the Add button (at the top) to add a new resource.
- Type “SignalR” into the search bar and select “SignalR Service” from the list (it should be at the top).
- Click the Create button.
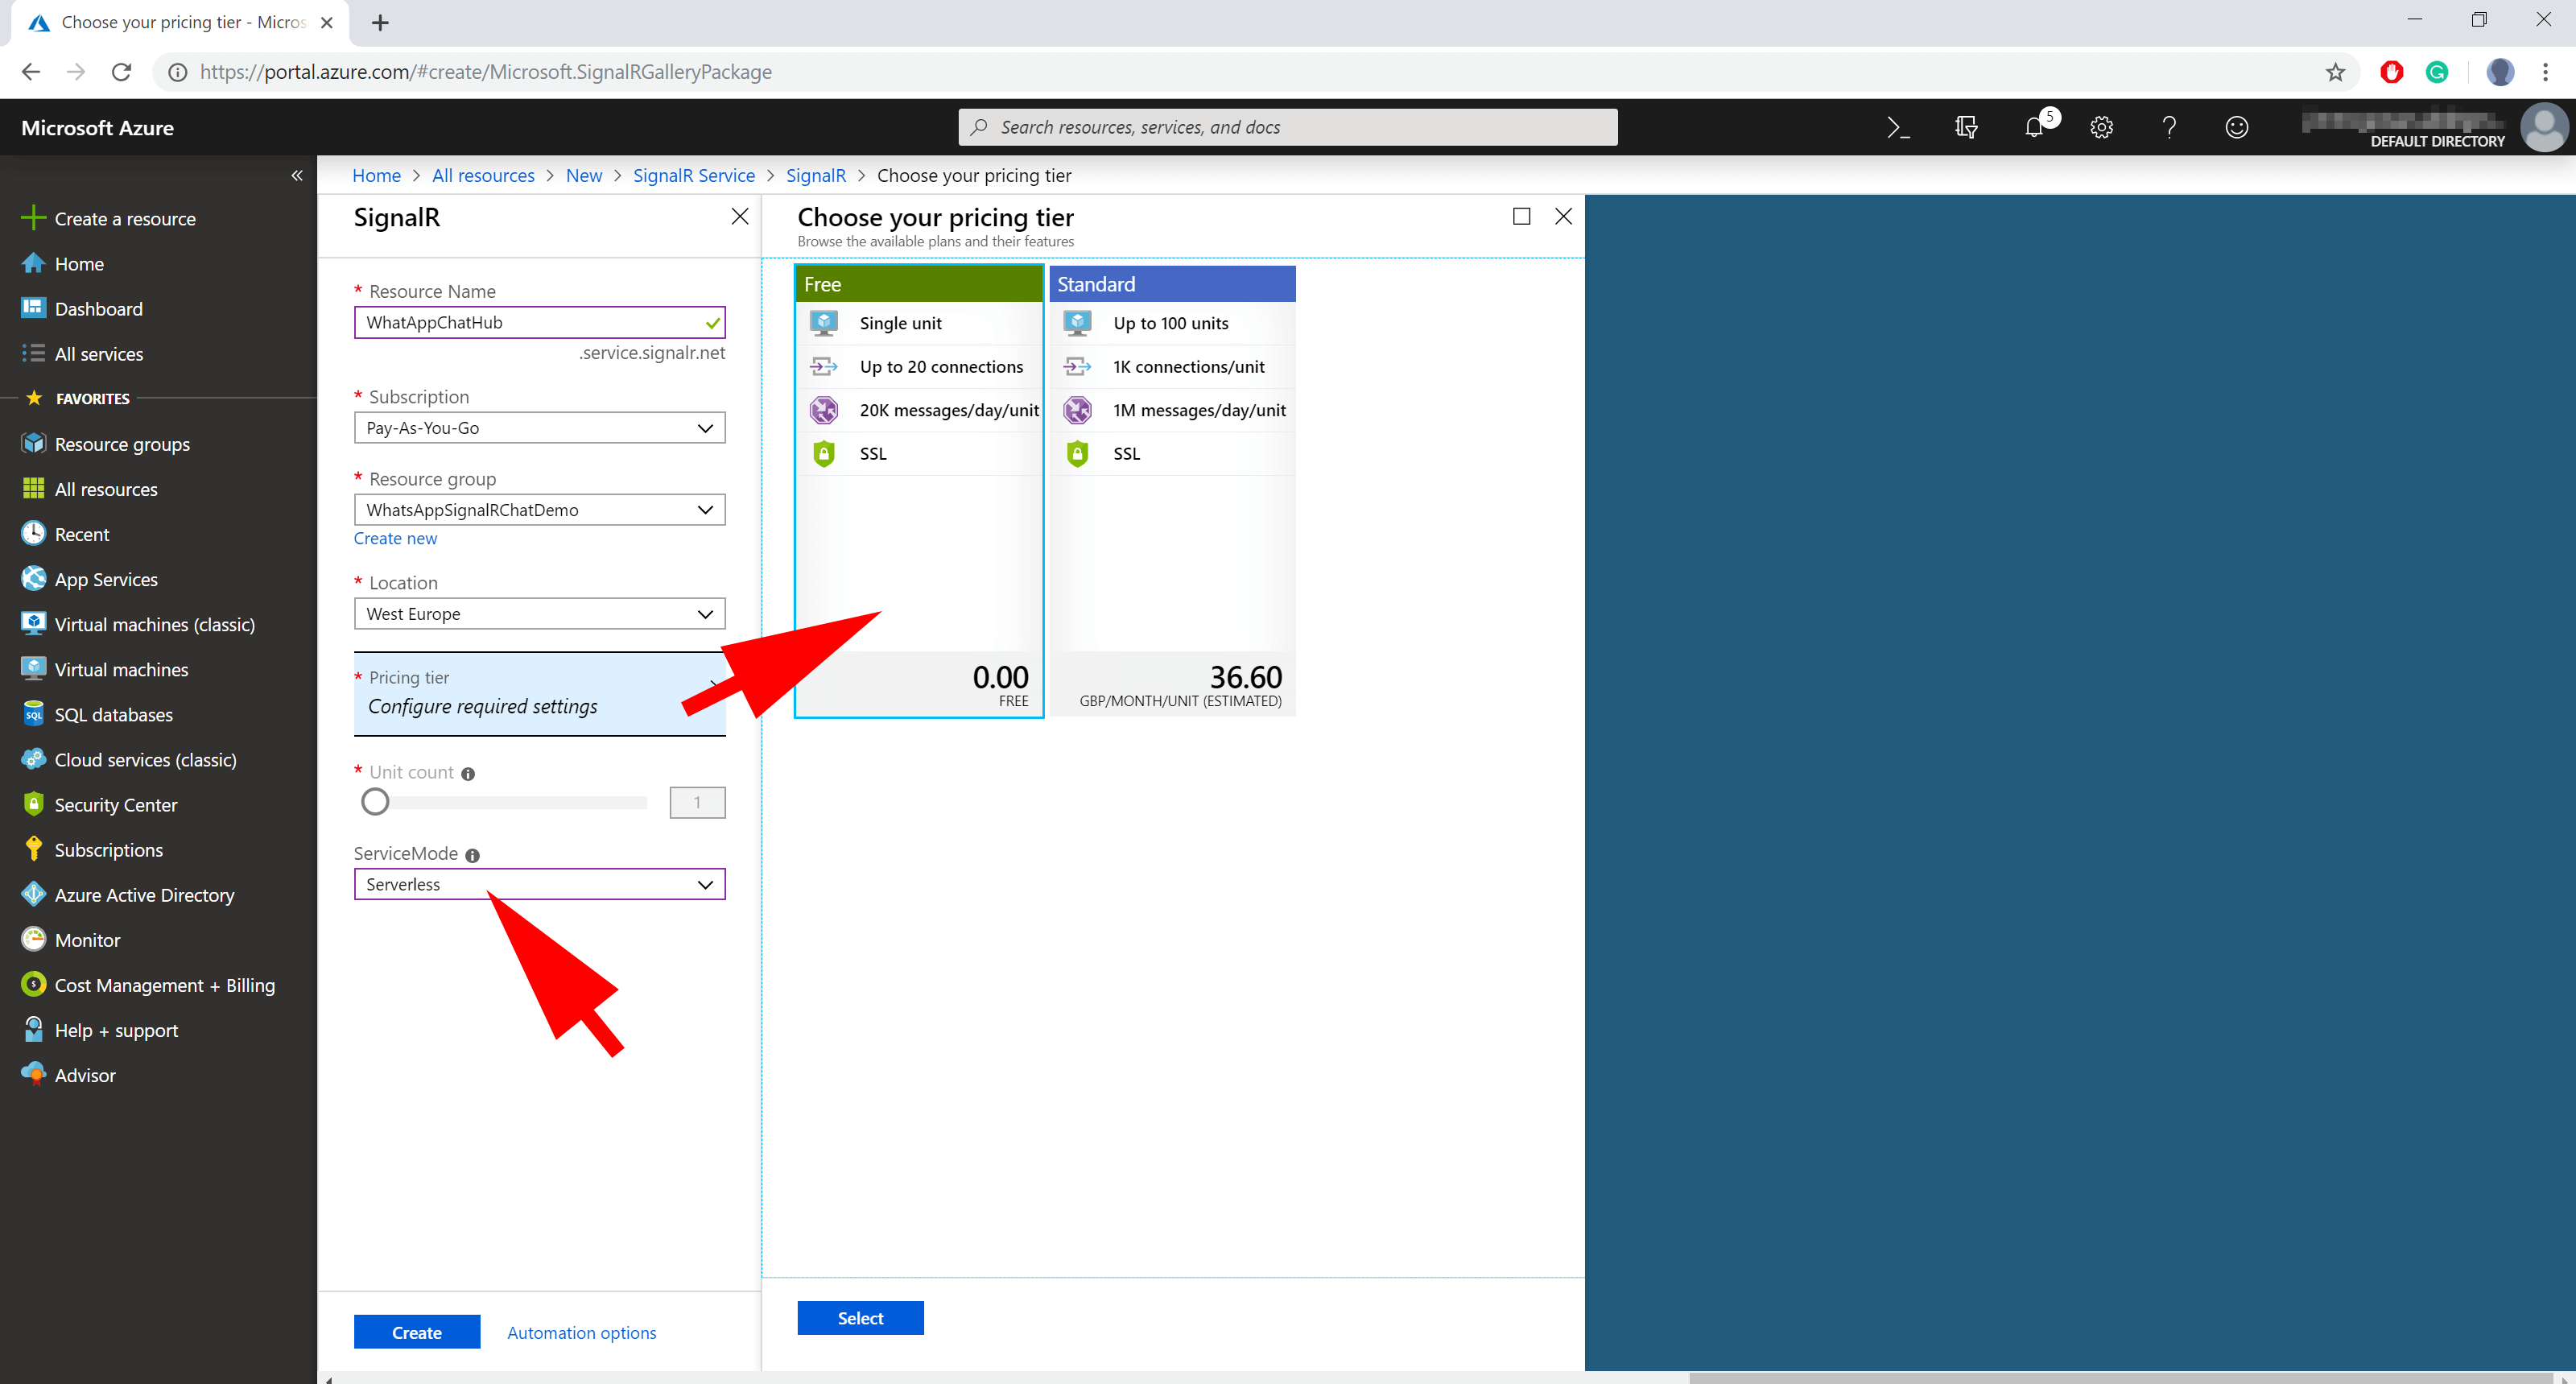
- A “SignalR Create” blade will now show. We need to provide some information:-
- Give it a resource name - I chose “WhatsAppChatHub”, but the name needs to be globally unique, so you will need to choose your own.
- Select the Resource Group that you created earlier.
- In the Pricing Tier, select the Free option.
- In the Service Mode drop-down selection, choose Serverless. We need to choose the “serverless” Service Mode option because this demo uses a completely serverless architecture.
A note about “Service Mode”
Currently, there is not a great deal of information available but you can read the Microsoft documentation here.
The basic idea with “traditional/hosted” SignalR use (i.e. when you are not using SignalR-Service), is that you would be self-hosting a SignalR Hub as part of your persistently-provisioned application (for example on a PaaS WebApp). In this scenario, any connection attempts from the clients go directly to the SignalR Hub.
However, when you use Azure SignalR-Service, the clients do not initially connect directly to that service. Instead, they need to first ask for a connection from a “negotiate” API, which then assigns them to an available resource.
There are basically two scenarios when you use SignalR Service:-
- Default - You provision an App Server, which may typically be shared as the host for the rest of your Web App. The App Server connects to the SignalR Service using a private connection string. An API endpoint for the client negotiation must be included as part of your App.
- Serverless - You do not have a server and you are entirely “serverless”. The mechanics are broadly identical to the above scenario but differ slightly in that you must provide a “negotiate” API endpoint as an HTTP-triggered Azure Function.
Setup Twilio
Similarly to the Azure SignalR Service, we need to set up the Twilio WhatsApp API in order to develop/test the system.
- Log onto your Twilio Portal (or create a free trial if you don’t already have one).
We need to locate the ACCOUNT SID and AUTH TOKEN values, which are prominently located on the dashboard. We’ll copy these credentials into our application configuration shortly, so you’ll probably find it helpful to open this page in a separate browser tab and leave it open.
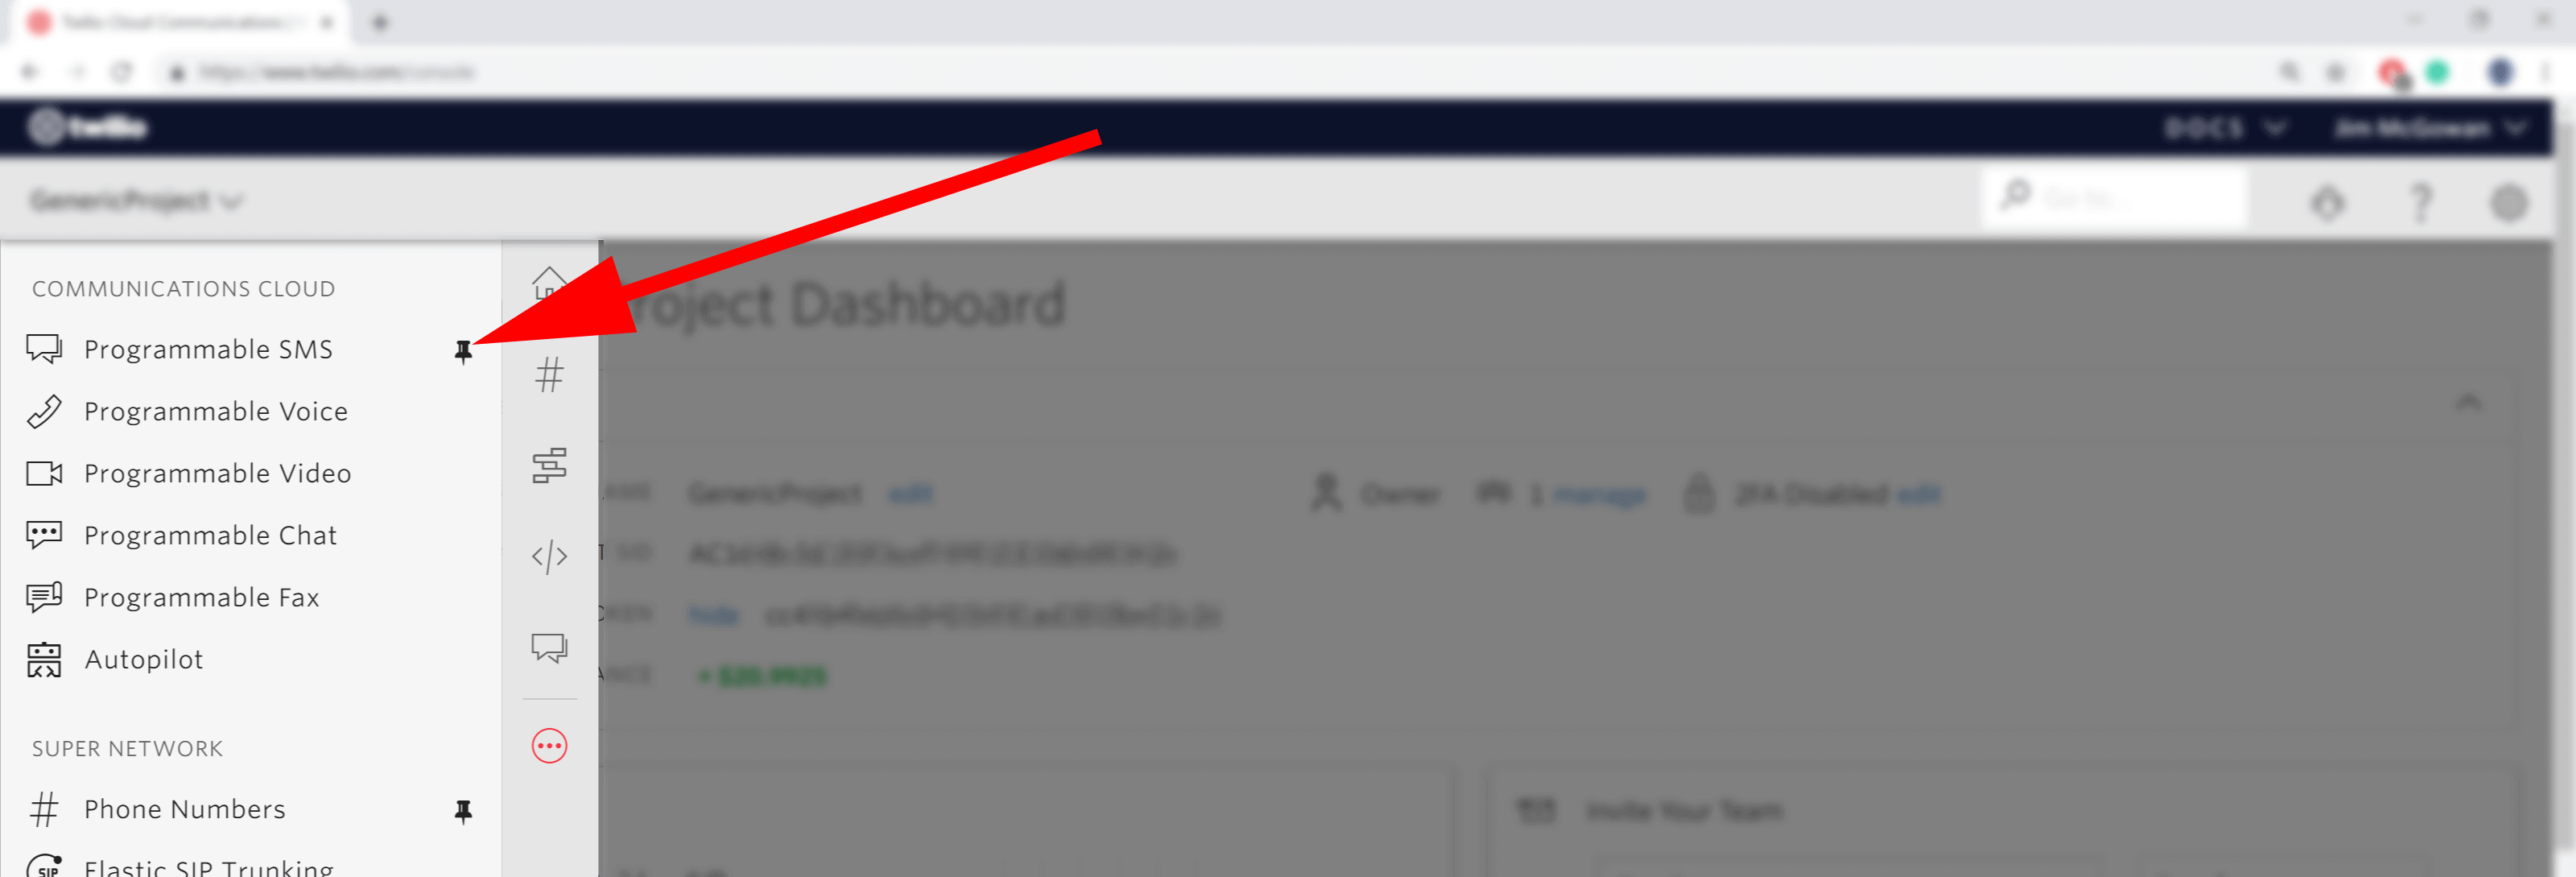
Click on the “ellipses” icon in the options menu (far left), which will make an additional selection menu slide out.

- In the slide-out menu, locate the feature Programmable SMS. If you click towards the right-side of the menu item, a “pin” icon will show. Click this pin, because it will dock this feature to the menu, making it quicker to locate in the future.
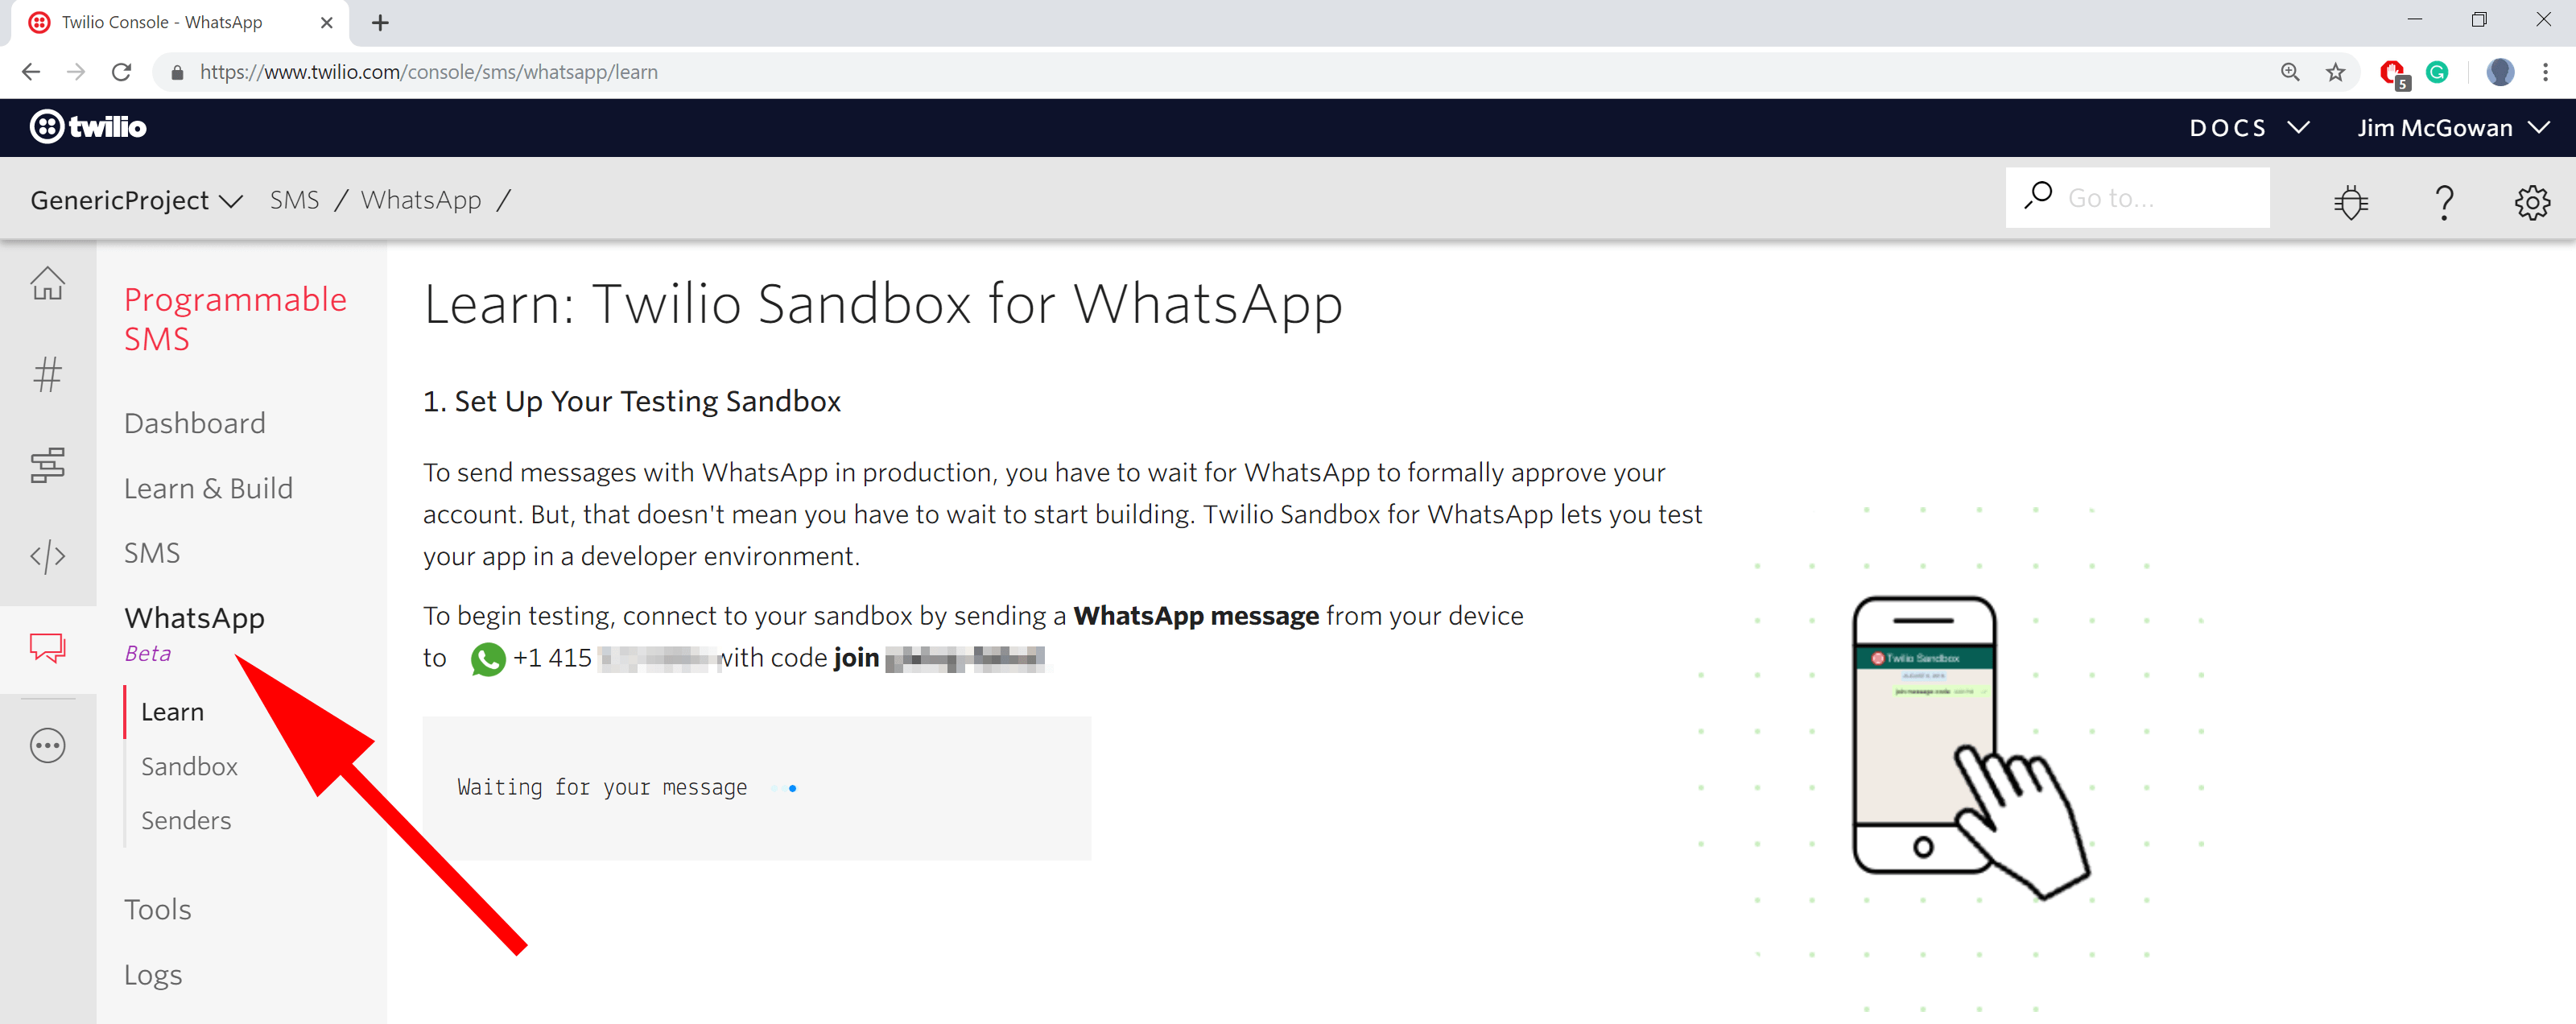
Under the Programmable SMS section, if you navigate to the WhatsApp sub-section, you will find a page that invites you to send a WhatsApp message from your device to a custom number that is provided for you.
- Follow the instructions displayed on the page, which requires you to use WhatsApp to send a customised message. If this process works correctly, you will be connected to your sandbox for the next 24 hours.
Keep this web page open in your browser, as we’ll return to it later in this tutorial to enter configuration information.
Clone The Sample Repository
In order to more easily follow-along with this tutorial, you should clone the source code from here : https://github.com/SiliconOrchid/WhatsAppSignalRDemo
Let’s Talk About App Configuration
Both the Azure and Twilio APIs require you to provide various credentials in order to use their respective services.
As might be expected with an architecture that interconnects many separately moving parts, there is a little bit of configuration needed before you can run or test your system.
The subject of configuration with Azure Functions is an entire subject in itself, with nuances that you should be mindful of. I would wholly recommend that you read my series on the subject of .NET Core configuration, specifically with relation to the topic of using local.settings.json
Let’s look at the configuration file in detail
At the top level of the WhatsAppSignalRDemo.Function project folder, you need to create a configuration file called local.settings.json.
The content will look like this:-
{
  "IsEncrypted": false,
  "Values": {
    "AzureWebJobsStorage": "UseDevelopmentStorage=true",
    "FUNCTIONS_WORKER_RUNTIME": "dotnet",
    "AzureSignalRConnectionString": "Endpoint=https://whatsappchathub.service.signalr.net;AccessKey={your secret value};Version=1.0;",
    "TwilioAccountSid": "{your secret value}",
    "TwilioAuthToken": "{your secret value}",
    "TwilioWhatsAppPhoneNumber": "whatsapp:+14155238886"
  },
  "Host": {
    "LocalHttpPort": 6060,
    "CORS": "https://localhost:44397",
    "CORSCredentials": true
  }
}
There are a few points to talk about in this file:-
- The key
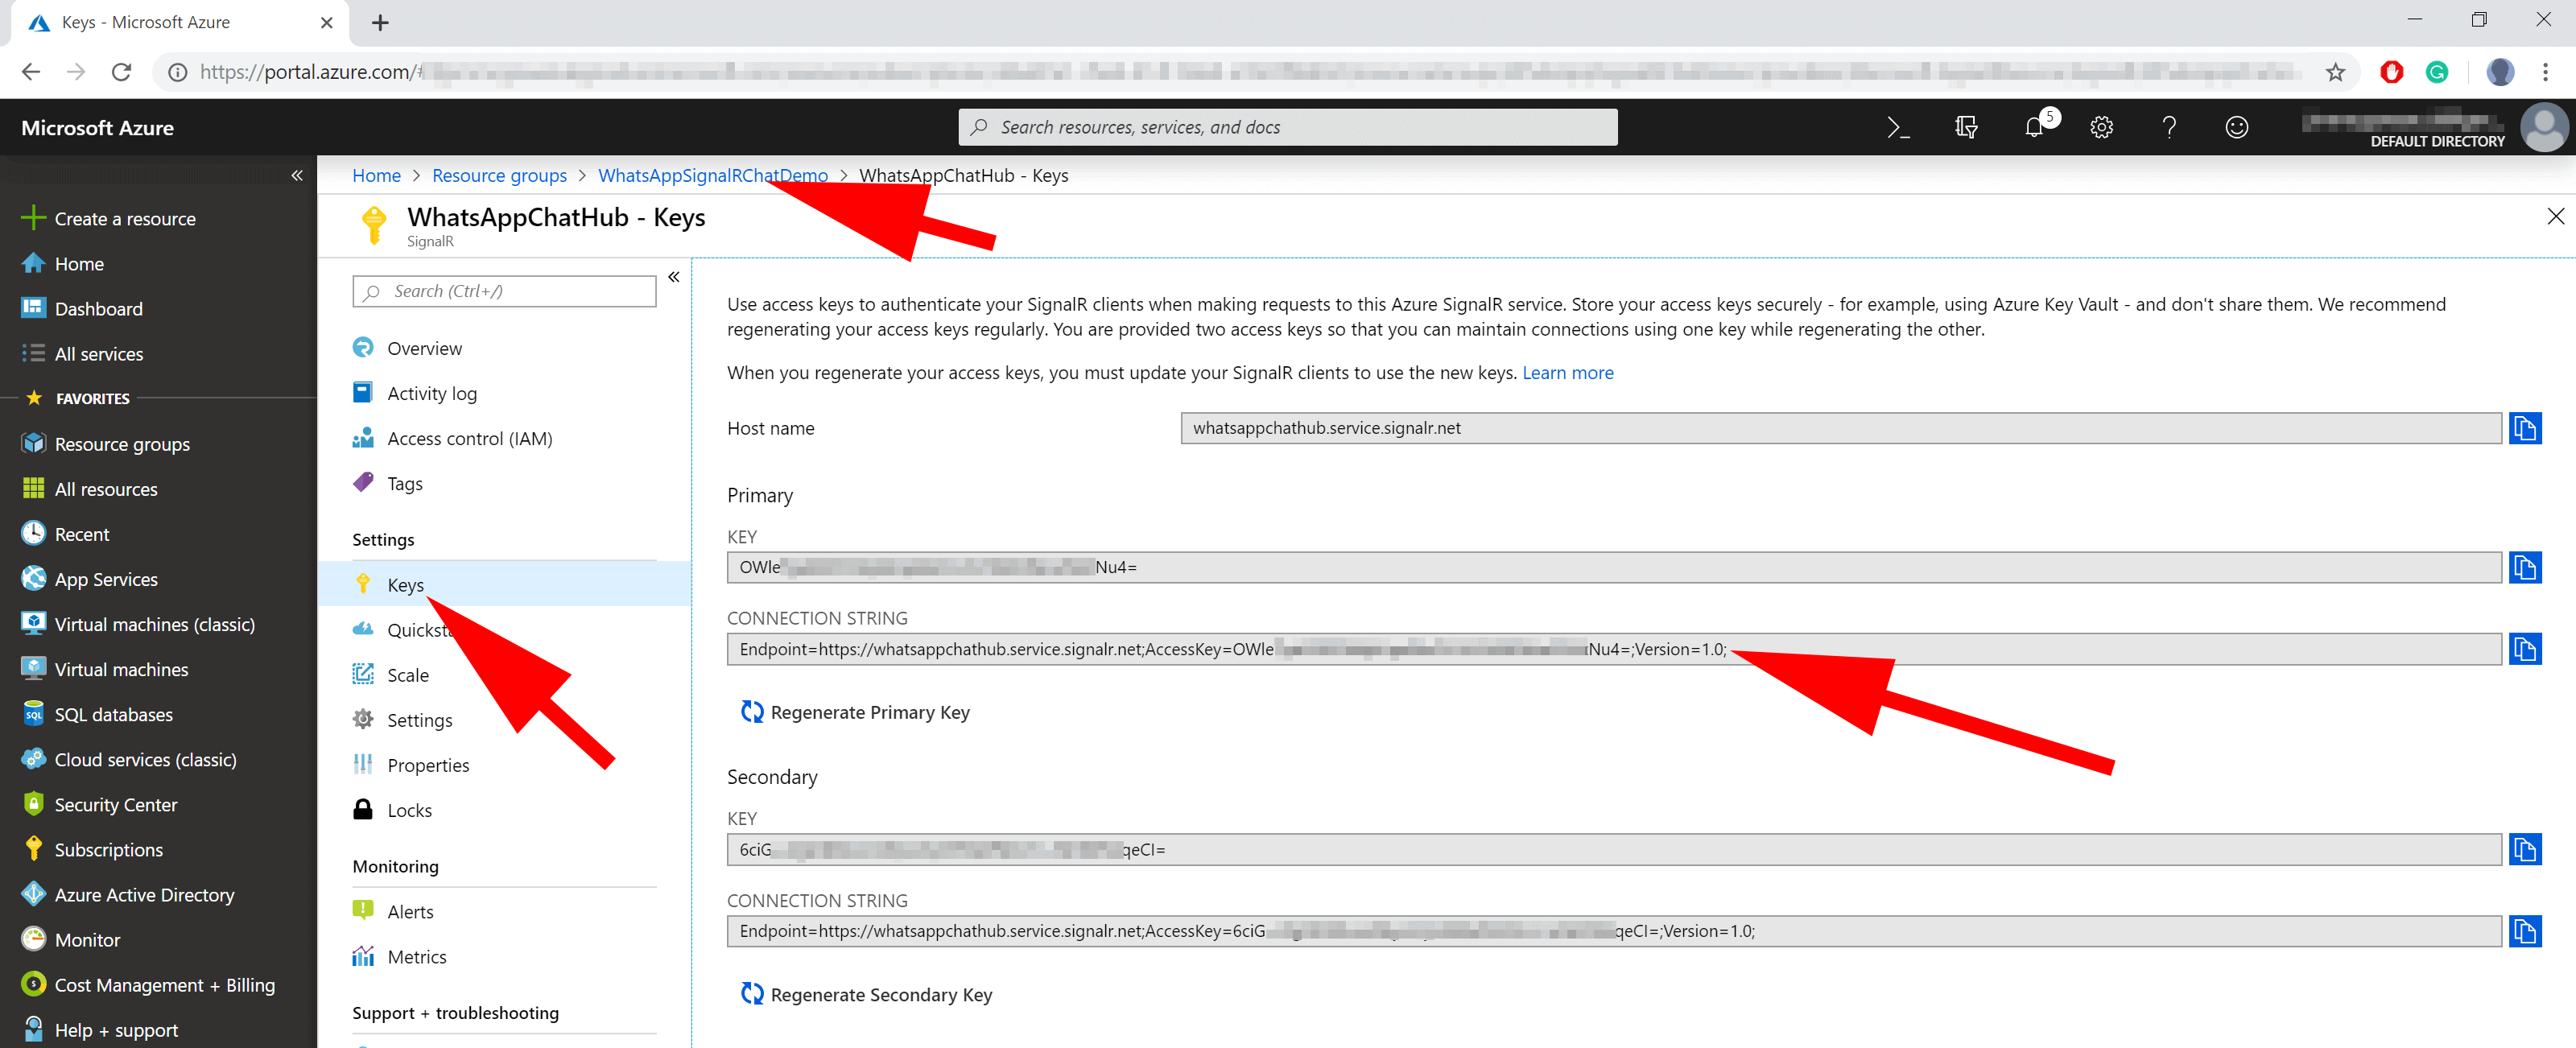
AzureSignalRConnectionStringis required. It doesn’t matter whether you are developing locally or deploying production code to the cloud, you will be using the same service running in Azure (there is no locally emulated version of SignalR Service).
- You need to copy the entire connection string for your own SignalR Service from the Keys section in the Azure Portal (see the screenshot below).
- The
Host.LocalHttpPortis the port number to be used when running the Azure Function locally during development.
There seems to be an issue with Visual Studio, in that if you run the Azure Function from VS, the port number specified in the
LocalHttpPortfield of thelocal.settings.jsonconfig is ignored and port 7071 is always used. However, if you run the function from the CLI, it seems to work fine (which confirms that the configuration is valid). The issue is raised in GitHub here. It seems the issue has been around for a long time too, as I found references to this problem in this GitHub discussion, going back to June 2017.Covering the Azure CLI was not intended to be in the scope of this article. However, if this is something that you want to explore, very briefly, follow the guidance in this Microsoft Article. It will instruct you to:
- install the Azure Functions CLI tools by entering this command:
npm install -g azure-functions-core-tools- use the command
func host start, from the project folder, to run the Function project.
- The
Host.CORSkey refers to the URL(and Port) of the web client app. It is needed to permit CORS access from the “negotiate” API (hosted in the Azure Function) to the website hosting the web client.
- A quick way to identify the port number used by the website is to quickly run the app and look at the address (see the screenshot below).

Both the
TwilioAccountSidandTwilioAuthTokenvalues can be found on the Twilio Console.The
TwilioWhatsAppPhoneNumberis+14155238886and can be found within the WhatsApp section of the Twilio dashboard.- The number is the same for everybody - the sandbox group is differentiated by the code-word you are provided to join it.
- Please note that this number will be different to any numbers you may have purchased already, so make sure you are explicitly looking at the right section.
- Importantly, the number should be prefixed with the word “whatsapp:“, like this:
"TwilioWhatsAppPhoneNumber": "whatsapp:+14155238886"
Using ngrok to expose local development API to Twilio
For the purpose of testing, both the Azure Functions and the Client Website can be hosted and debugged locally.
A minor complication is that Twilio’s WhatsApp API needs to make a callback to our HTTP triggered function ReceiveWhatsAppMessage in order to relay any messages received from WhatsApp.
When running our code fully in the cloud, we don’t have this problem, as our services are directly connected to the internet. However, for local development, we are typically behind multiple firewalls, etc, so we need a way to expose our internal development API endpoints to the public internet.
There are a number of ways to solve this problem, but a really simple way is to use the free utility ngrok.
Very briefly, ngrok is a rather useful network tunnelling service. It’s designed to help you expose your internal web service, publically to the internet. The way it works is that a temporarily assigned public endpoint is connected to your internal private endpoint by way of client software on your development machine.
My recommendation is to follow the instructions in David Prothero’s guide published by Twilio, which will take you through the steps needed to install and use it.
Assuming you have followed the instructions in that guide, you will have installed the ngrok client onto your local machine and should be at the point that you want to be execute the command that will make the magic happen.
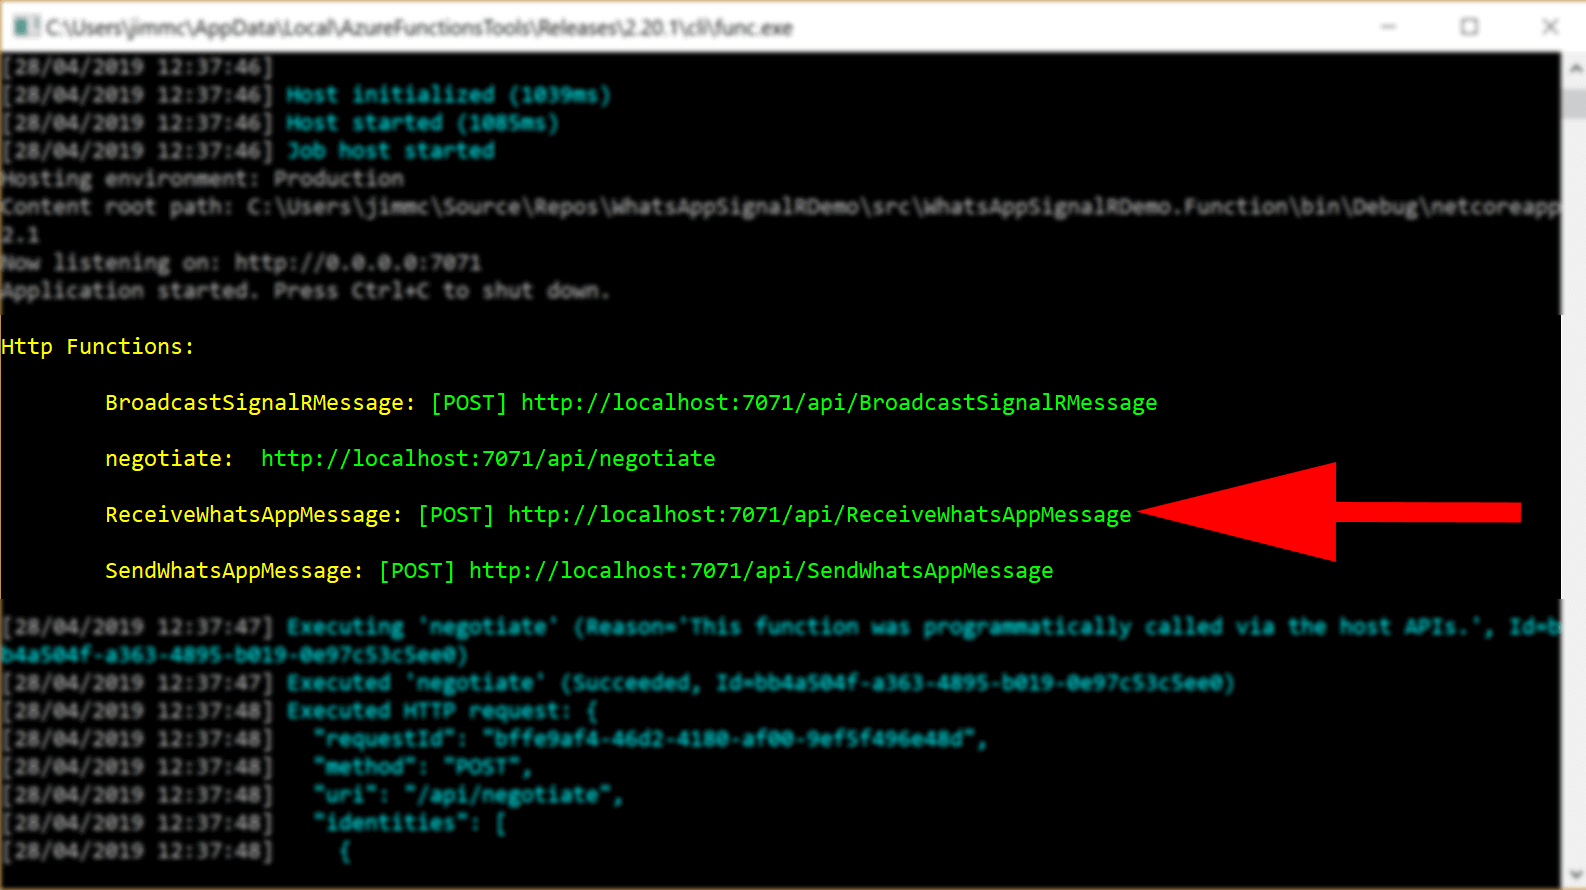
- Firstly, you need to know exactly what the internal hostname and port are. This should be just
localhost:and the port that you specified in config, but an easy way to double-check is to run the project and make a note of the various endpoints that the local Azure Functions environment reports (see the screenshot below).
You may hear the local Azure Functions environment referred to as an “emulator”. Strictly speaking, this is the exact same runtime as used in the cloud.
- Next, you want to run the ngrok command that exposes this API.
- Note that you specify only the hostname and port … you do not specify the protocol (i.e. no “http://” etc) and do not specify any Url fragments (i.e. do not specify “/api/ReceiveWhatsAppMessage” etc ).
- The command will look like this (you may have to change the port number):-
ngrok http -host-header="localhost:7071" 7071
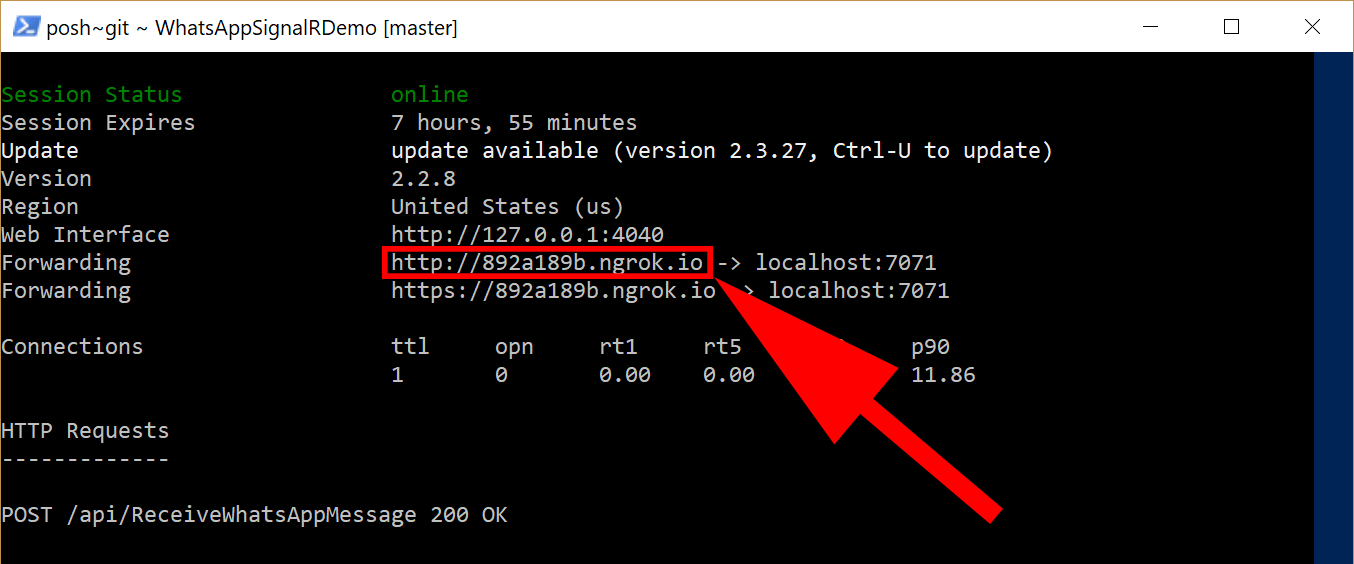
- When you run the command, you should see a result like the following screenshot. You need to copy the resulting Url, as we’ll be pasting this into the Twilio dashboard. The URL is uniquely generated each time ngrok is initiated and is valid for 8 hours.
Now that you have an externally-exposed endpoint, we need to tell Twilio’s WhatsApp API to send messages to it.
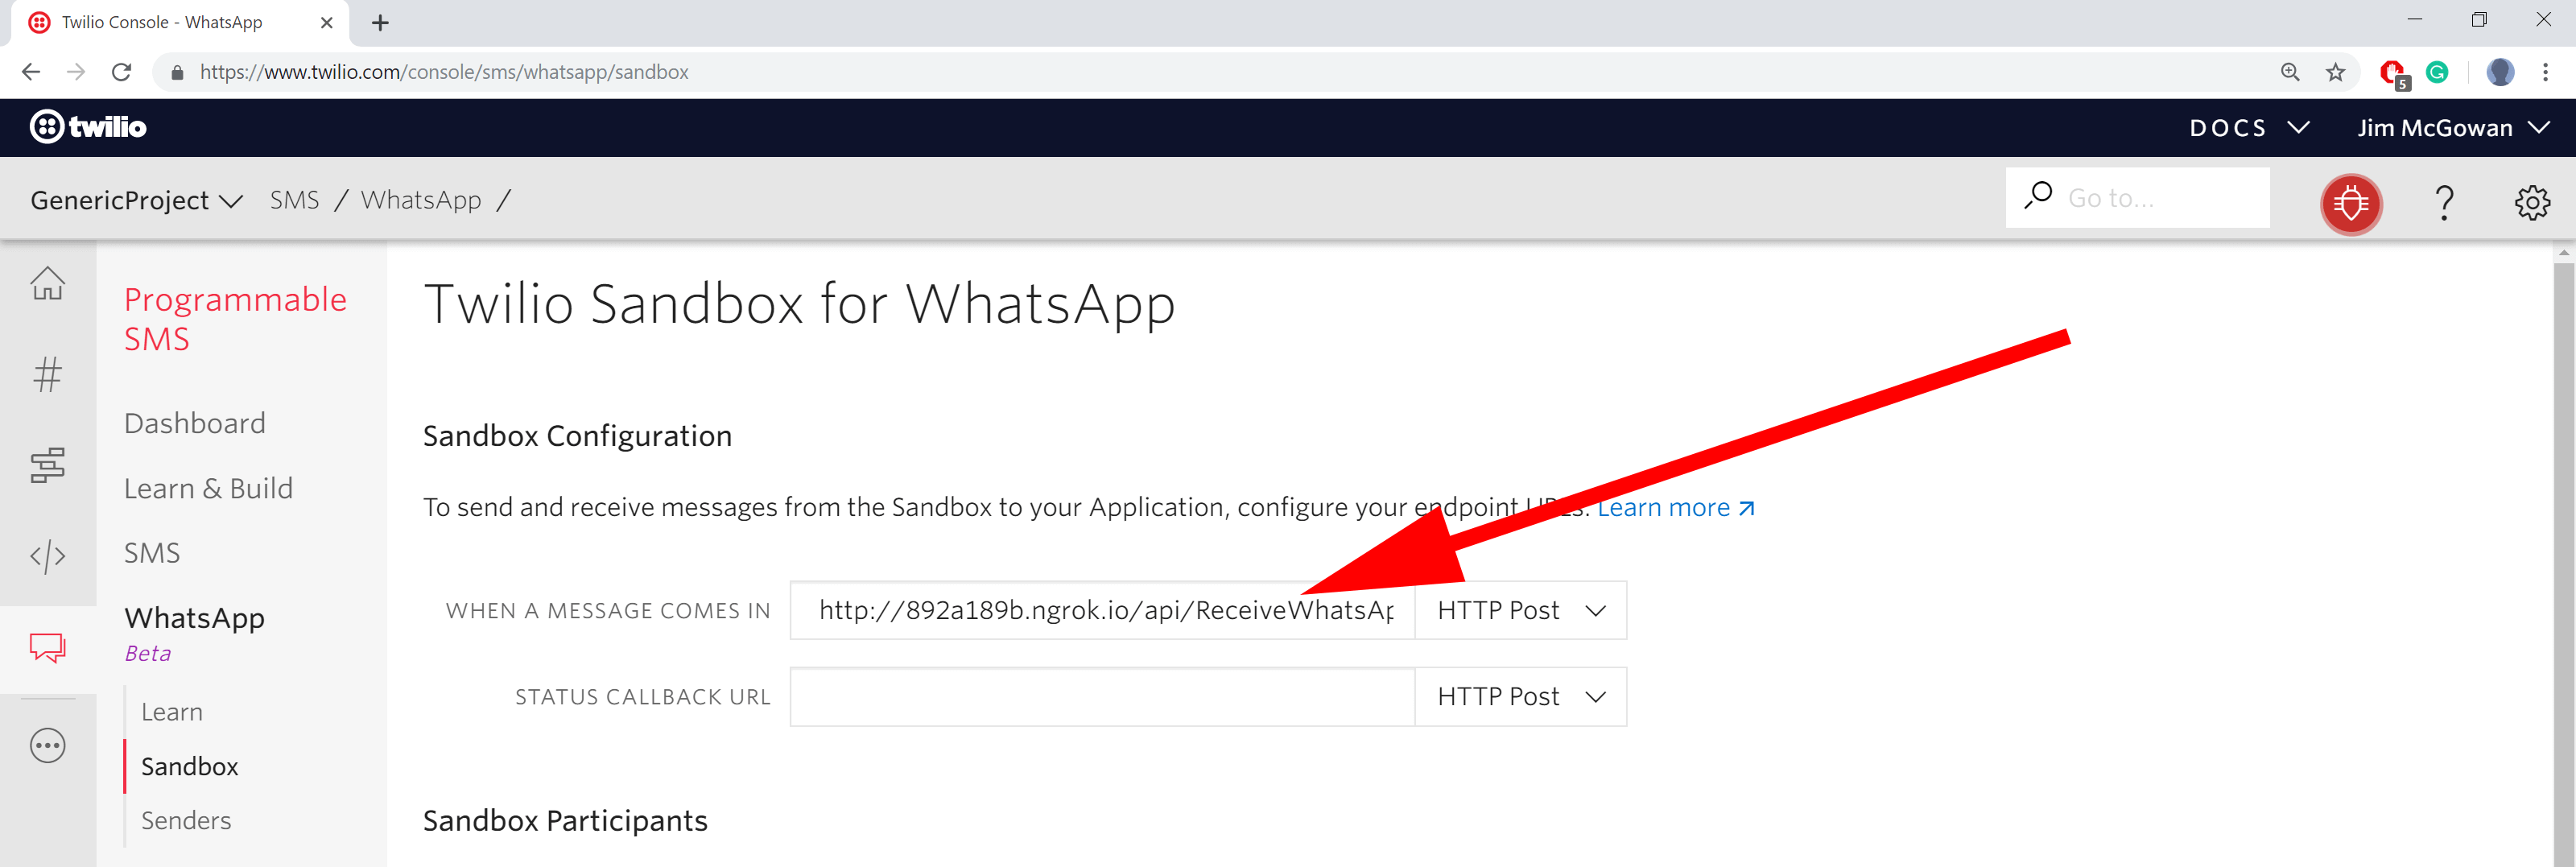
- Open up the Twilio dashboard and navigate to the “WhatsApp Sandbox” page.
- Paste the dynamically created ngrok URLinto the “WHEN A MESSAGE COMES IN” input box.
- You need to suffix the base URL with both
/api/andReceiveWhatsAppMessage. - Make sure you press the Save button on the Twilio dashboard!
Please note that you will have to repeat this entire process once the ngrok session has expired or if you restart ngrok!
ngrok offers a paid-for service, whereby you can reserve a fixed hostname, meaning you could avoid the step of changing the endpoint in Twilio.
Consider using WhatsApp web
It’s possible to pair WhatsApp on your mobile device with a web-based client. This lets you send and receive messages on your computer.
If you would like to use the WhatsApp web client, you can find instructions here.
We’ll be using the web client for screenshots, but it’s completely up to you whether you use the web client or not. If you want to just use Whatsapp on your mobile phone as usual, that’s absolutely fine.

Prepare to test the application
Let’s work through some steps prior to actually running the system:-
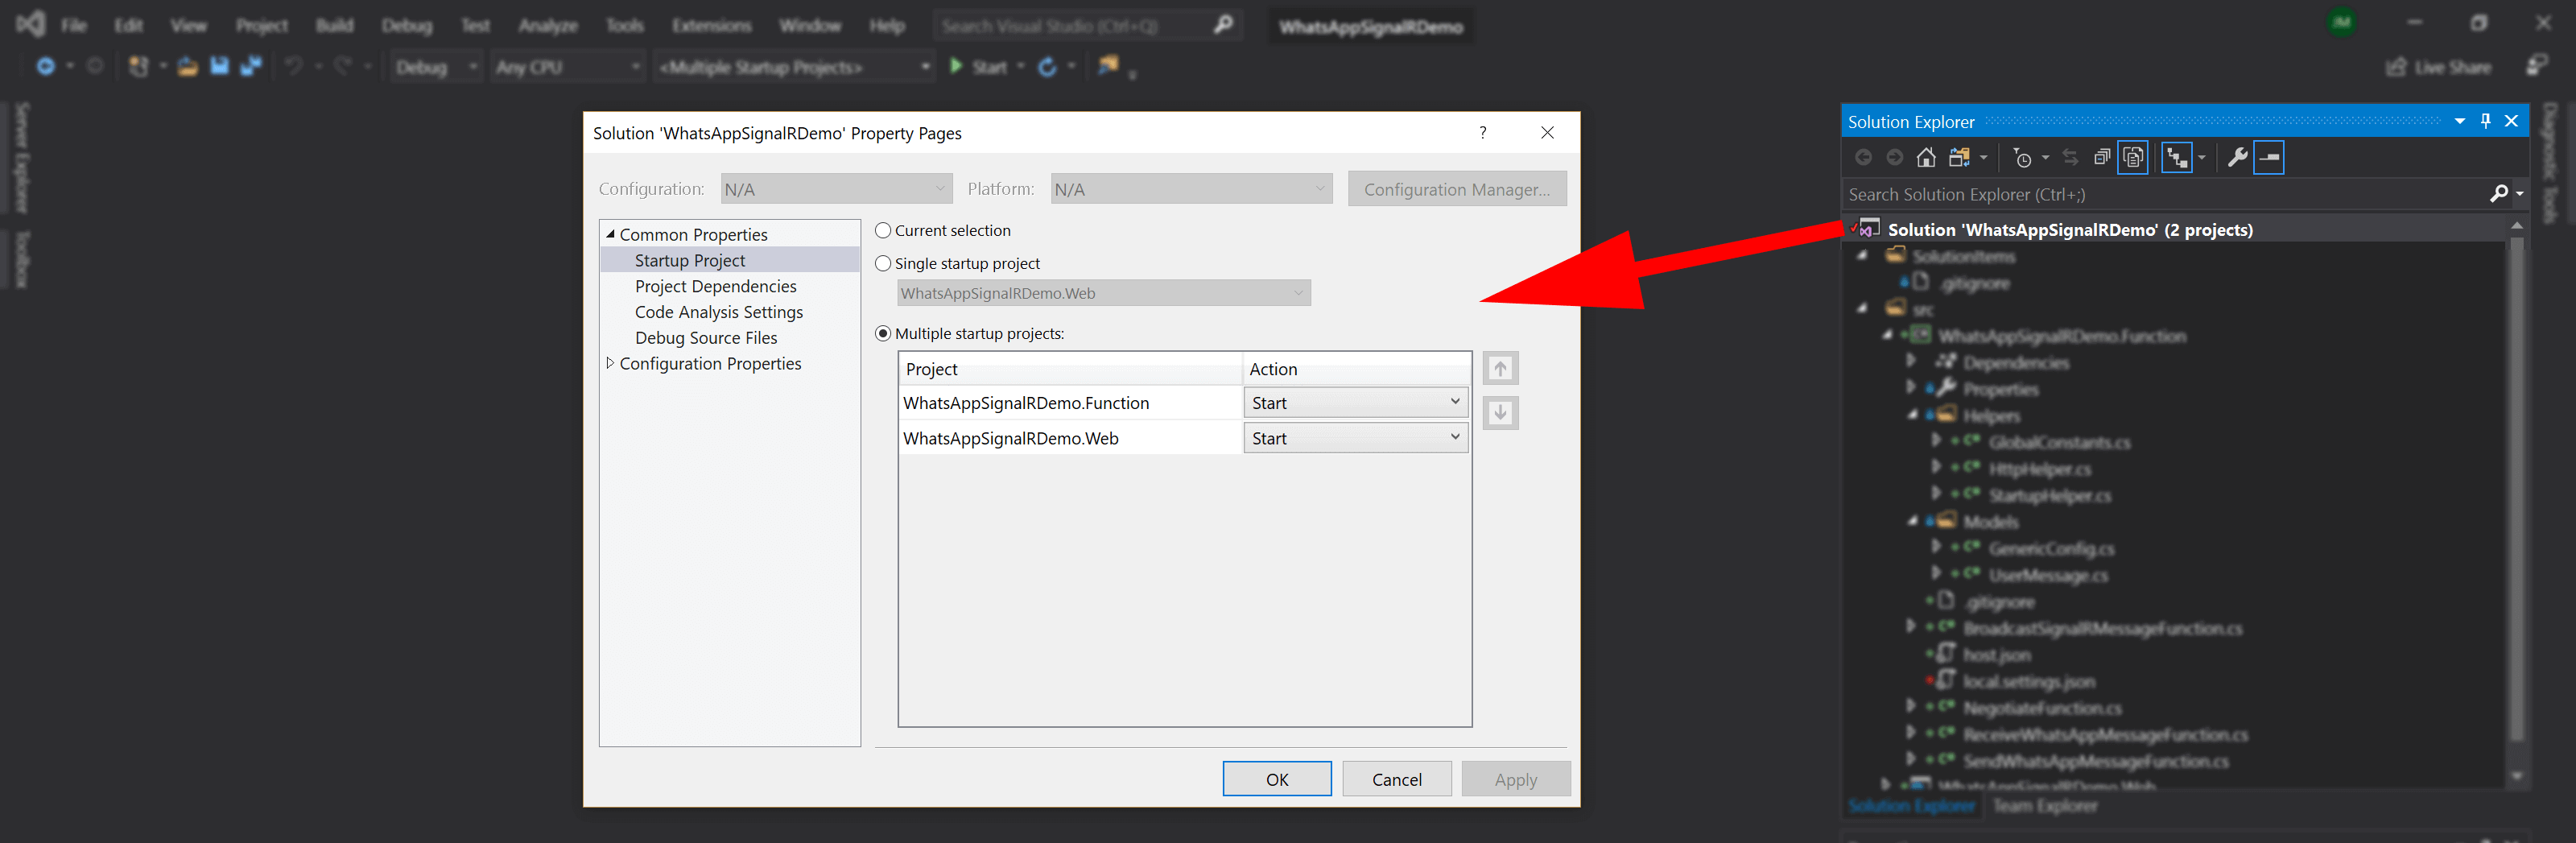
- Firstly, check that Visual Studio is configured to run both projects simultaneously.
- Right click on the Solution and select “Set Startup Projects…” from the menu (usually about ½ way down).
- In the dialogue box that appears, make sure that the “Multiple Startup Projects” option is selected and that both of the two available projects are identified as having a Start action.
- Right click on the Solution and select “Set Startup Projects…” from the menu (usually about ½ way down).
- Next, make sure that you have correctly entered the configuration data into
local.settings.jsonas described earlier in this article. There are a number of different pieces of configuration information, coming from a number of sources, so take your time to make sure this is all done correctly.
- We need to add your personal WhatsApp number to the Twilio sandbox.
- Visit the Twilio dashboard page and follow the instructions for adding your phone to the sandbox.
- This will mean sending a customised message from your WhatsApp client/device to the Twilio sandbox phone number, +1 415 523 8886 .
- The Twilio dashboard will confirm that you have joined the sandbox positively with a
Message Receivednotification.
- Visit the Twilio dashboard page and follow the instructions for adding your phone to the sandbox.
- Make sure that you have a current ngrok session and that the Twilio WhatsApp callback has been updated accordingly (as detailed in the previous section).
- As a reminder, Twilio’s WhatsApp API Beta requires you to rejoin the sandbox every 24 hours.
- As a reminder, ngrok sessions expire every 8 hours and will require you to regenerate a connection and update the Twilio WhatsApp API dashboard.
Check the Web Client Endpoint
The final piece of configuration we need to check relates to the JavaScript running on the Web Client. Locate and open up this JavaScript file:-
….\WhatsAppSignalRDemo\src\WhatsAppSignalRDemo.Web\wwwroot\js\chat.js
At the very top of the file, you should see a line of code that defines the endpoint of the Azure Function being used:-
const serviceEndpoint = 'http://localhost:7071/api/';   // include trailing slash
//const  serviceEndpoint = 'https://{your function app hostname}.azurewebsites.net/api/';
When developing locally, this will be something like
http://localhost:7071/api/, but when deploying to the cloud, you will need to remember to update this value to the endpoint of your own Azure Function.Note that you should include
/api/in the path.
Test the application
You can now go ahead and run the solution by pressing F5 from within Visual Studio.
Our demonstration will build and a console window showing Azure Function diagnostic information should open, along with a separate browser page showing our Web App.
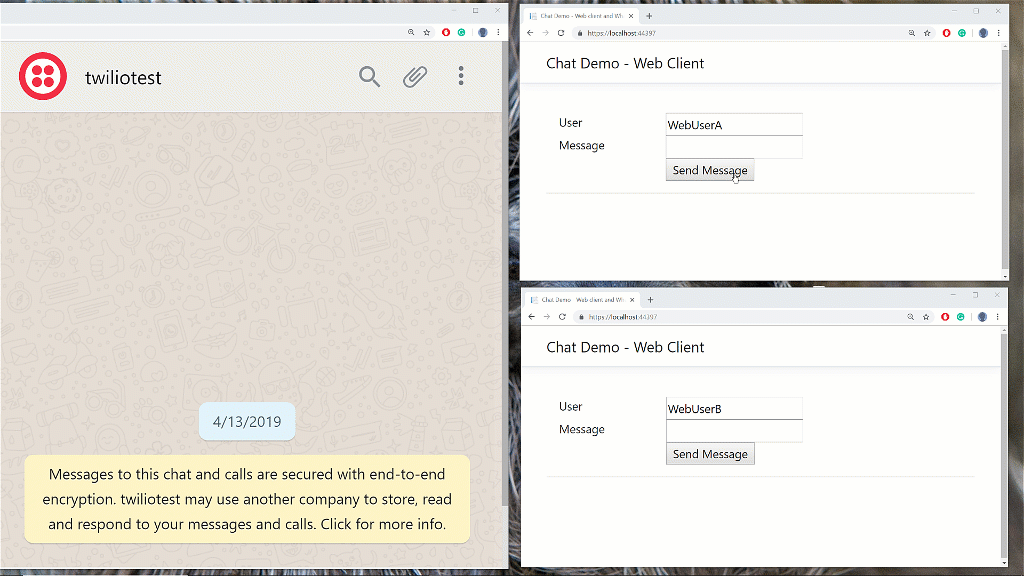
- To demonstrate the solution is working as expected, you should cut+paste the URL to the WebApp and open up at least one other browser window. This way we can prove that SignalR is correctly broadcasting to multiple clients, as shown below.
Summary
Awesome! We now have a functioning SignalR app integrated with Twilio API for WhatsApp. In the next blog we will go through the code in more detail.