
This is part four of a series exploring .NET Core configuration, with an emphasis on Azure Functions. In this article, we look at using other configuration providers in your Azure Function project, specifically Azure App Configuration and Azure Key Vault
In part 1 of this series, we introduce the subject of configuration and review how ASP.NET Core configuration works.
In part 2 of this series, we look at how configuration in Azure Functions (v2) works and talk about some of the issues.
In part 3 of this series, we show how you could include ASP.NET Core configuration into an Azure Function project.
In part 4 of this series, we look at using other configuration services, specifically Azure App Configuration and Azure Key Vault
Overview
Back in part one of this series, we learned that .NET Core configuration is created from multiple sources called Configuration Providers and that these can be combined together in Layers.
Because of the flexibility that this model provides us with, we can take advantage of increasingly specialised services. In this final article of the series, we’ll explore two such Azure services that we can integrate into our architecture: Azure App Configuration & Azure Key Vault
Azure App Configuration
You can read the official documentation here: Microsoft Documentation : What is Azure App Configuration?
Azure App Configuration is a cloud service that is used to store non-secret configuration settings in a centralised location. These configuration settings can then be shared between multiple applications, including a global context.
Usually, when researching how to use ASP.NET Core and Azure Functions, a vast majority of the documentation and examples will steer us into storing our configuration settings directly onto the host server (whether this is an Azure AppService or a traditional VM server).
Whilst there is absolutely nothing wrong with this option, for certain systems that comprise of many related, but separate, services (for example, a globally distributed solution of Azure Functions spread across multiple Azure Regions, this can lead to us having to enter copies of exactly the same configuration settings into multiple different places. Usually, where we find duplication, we find a risk of errors being introduced.
The official documentation for Azure App Configuration is really comprehensive and provides tutorials specific to Azure Functions, so we should just go ahead and follow those guides:
Microsoft Documentation : Azure App Configuration quickstart
Microsoft Documentation : Quickstart: Create an ASP.NET Core app with Azure App Configuration
Microsoft Documentation : Quickstart: Create an Azure function with Azure App Configuration

Azure Key Vault
You can read the official documentation here: Microsoft Documentation : What is Azure Key Vault?
Azure Key Vault complements Azure App Configuration by being the configurable and secure place that we should use for application secrets.
This option, in particular, is an interesting proposition, as it uses an Azure Active Directory to provide access control to secrets, from both users (i.e. developers) and resources (i.e. an App Service). For example:
The built-in integration with Visual Studio means that if we are working on a project that requires significant security controls, we can perform tricks such as granting developers usage of credentials, without ever directly revealing them.
We can explicitly grant access to a Secret Setting, by a specific Azure resource. Maybe this could be useful to minimize the risk of a credential intended for our production environment, accidentally being used in a development/testing system (e.g. because of a cut/paste mistakes) etc.
The official documentation is good, but unlike with Azure App Configuration, there are no guides that are specific to Azure Functions - so we’ll be stepping through some steps to demonstrate how we can integrate Azure Key Vault into a demo project.
You will most likely find these supporting documents helpful.
Let’s setup an Azure Key Vault!
This tutorial assumes that we already know how to:
- create new Azure Functions projects using our IDE of choice
- create new Azure Functions AppService in the Azure Portal
- publish our Azure Functions project to Azure.
1) Create a new HTTP-Triggered Azure Function from the templates.
First, create a new HTTP-Triggered Function from the templates. For the purpose of this demo, we can leave everything, including the project and function names, to their defaults (i.e. Function1 etc).
2) Add extension packages
We need to add the following NuGet packages - we can use the Visual Studio package manager, or edit the .csproj file manually like this:-
<ItemGroup>
    <PackageReference Include="Microsoft.Azure.Functions.Extensions" Version="1.0.0" />
    <PackageReference Include="Microsoft.Extensions.Configuration.AzureKeyVault" Version="2.2.0" />
    <PackageReference Include="Microsoft.NET.Sdk.Functions" Version="1.0.29" />
  </ItemGroup>
3) Create a new Resource Group in Azure
Using the Azure Portal, create a new Resource Group to keep all of the parts of our demonstration together. I used the name SiliconVaultDemoRG, but you can choose your own.
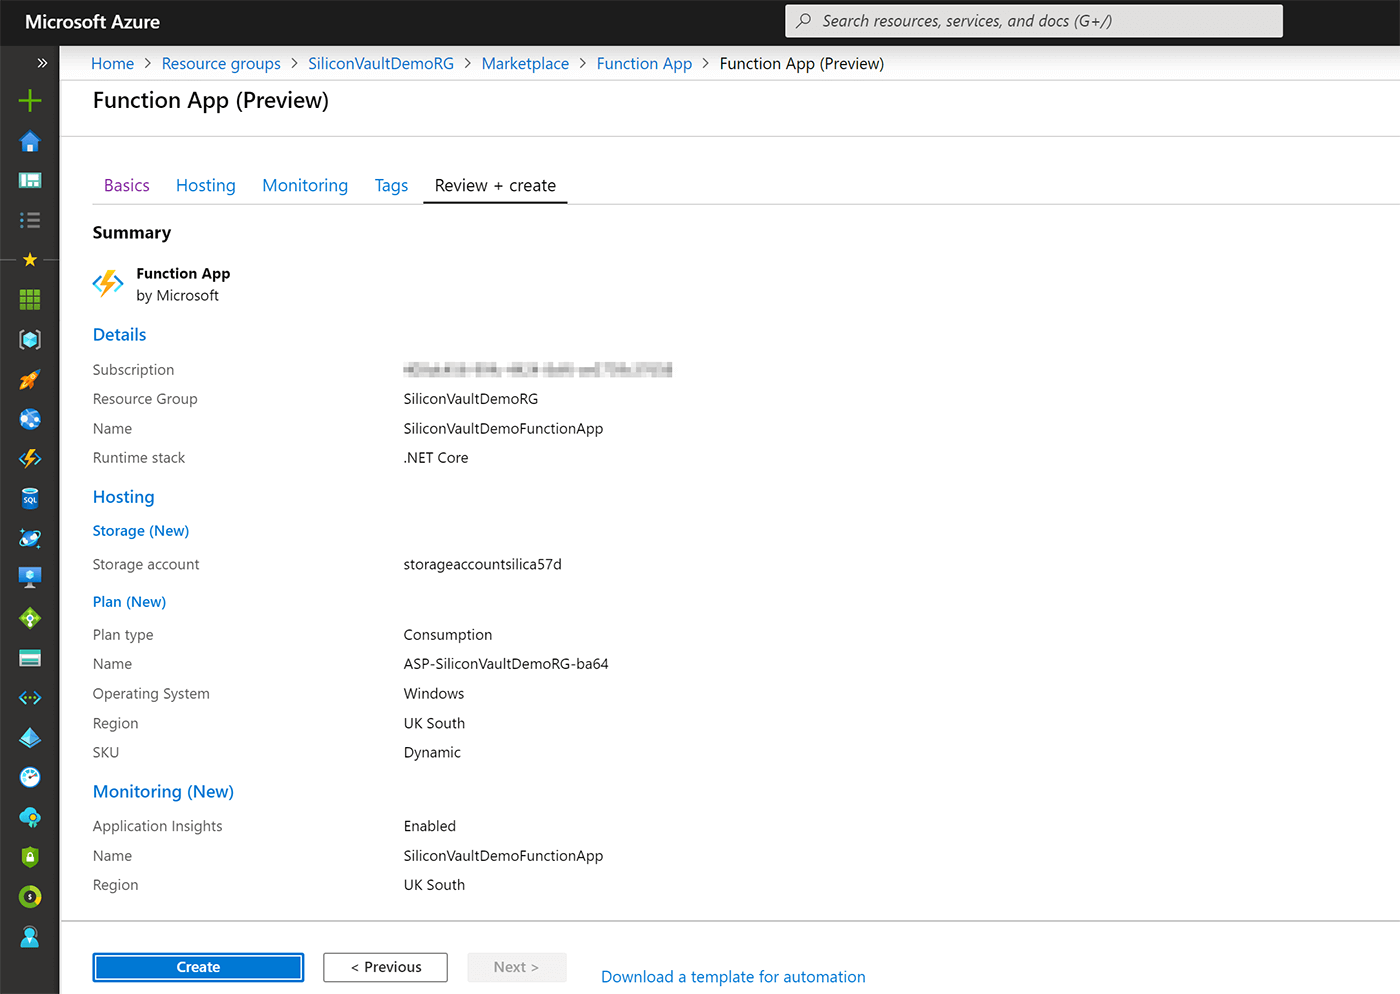
4) Create a new Azure Functions AppService in Azure.
Using the Azure Portal, create a new Function App resource. I used the name SiliconVaultDemoFunctionApp, but you can choose our own. Select the Runtime Stack to be .NET Core, the Region to be near to you, accept the automatically generated StorageAccount, and leave the Plan Type with the default of Consumption Plan.
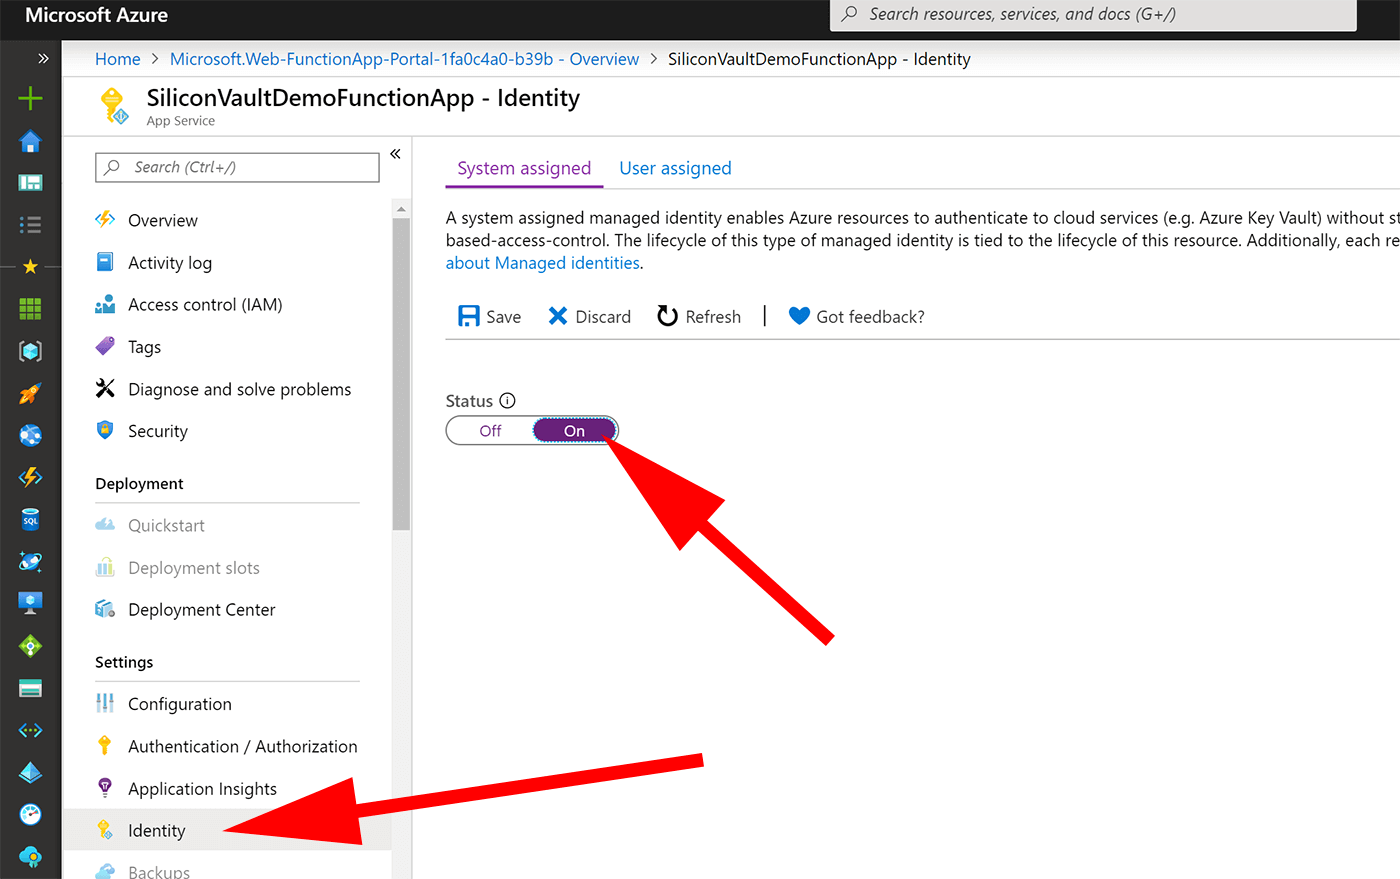
5) Set AppService to have a System-Assigned Identity
When the AppService has been provisioned, select the Identity option and enable the System Assigned Identity. Make sure that we click Save. This will register the AppService within an Azure Active Directory. We’ll be assigning this newly created identity to our Azure KeyVault resource in a few moments.
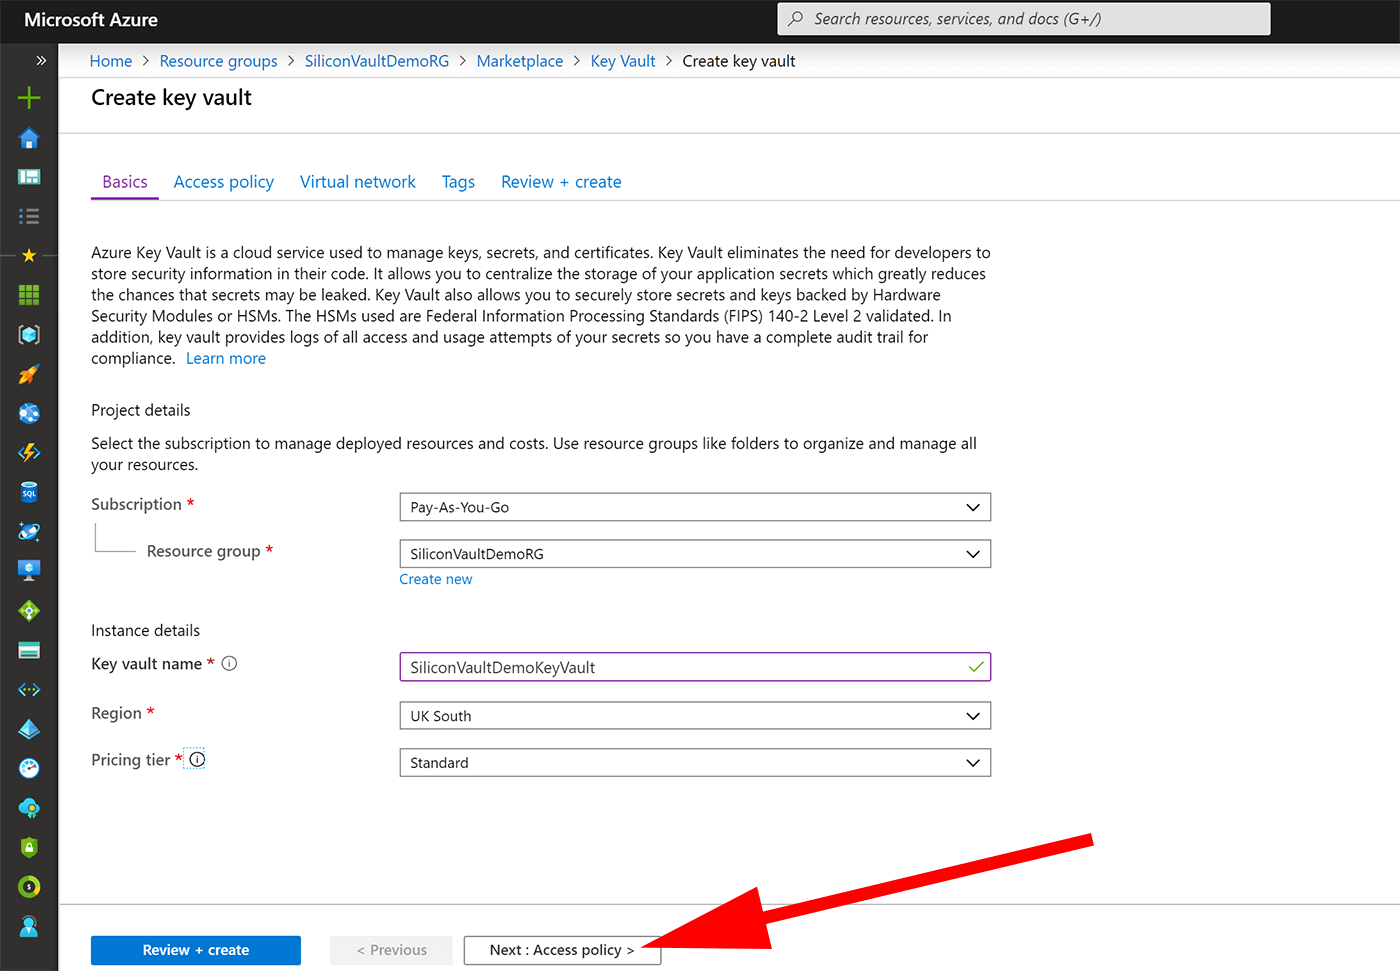
6) Create a new Azure Key Vault resource in Azure.
Using the Azure Portal, create a new Azure Key Vault. I chose to use the name
SiliconVaultDemoKeyVault, but you can choose your own. Select a Region near to you and leave the pricing tier asStandard. Note that this is a paid-for service, but depending on our usage, the costs are relatively negligible - we can check the costs here.Don’t click the
createbutton just yet, and instead select theNext: Access Policybutton.
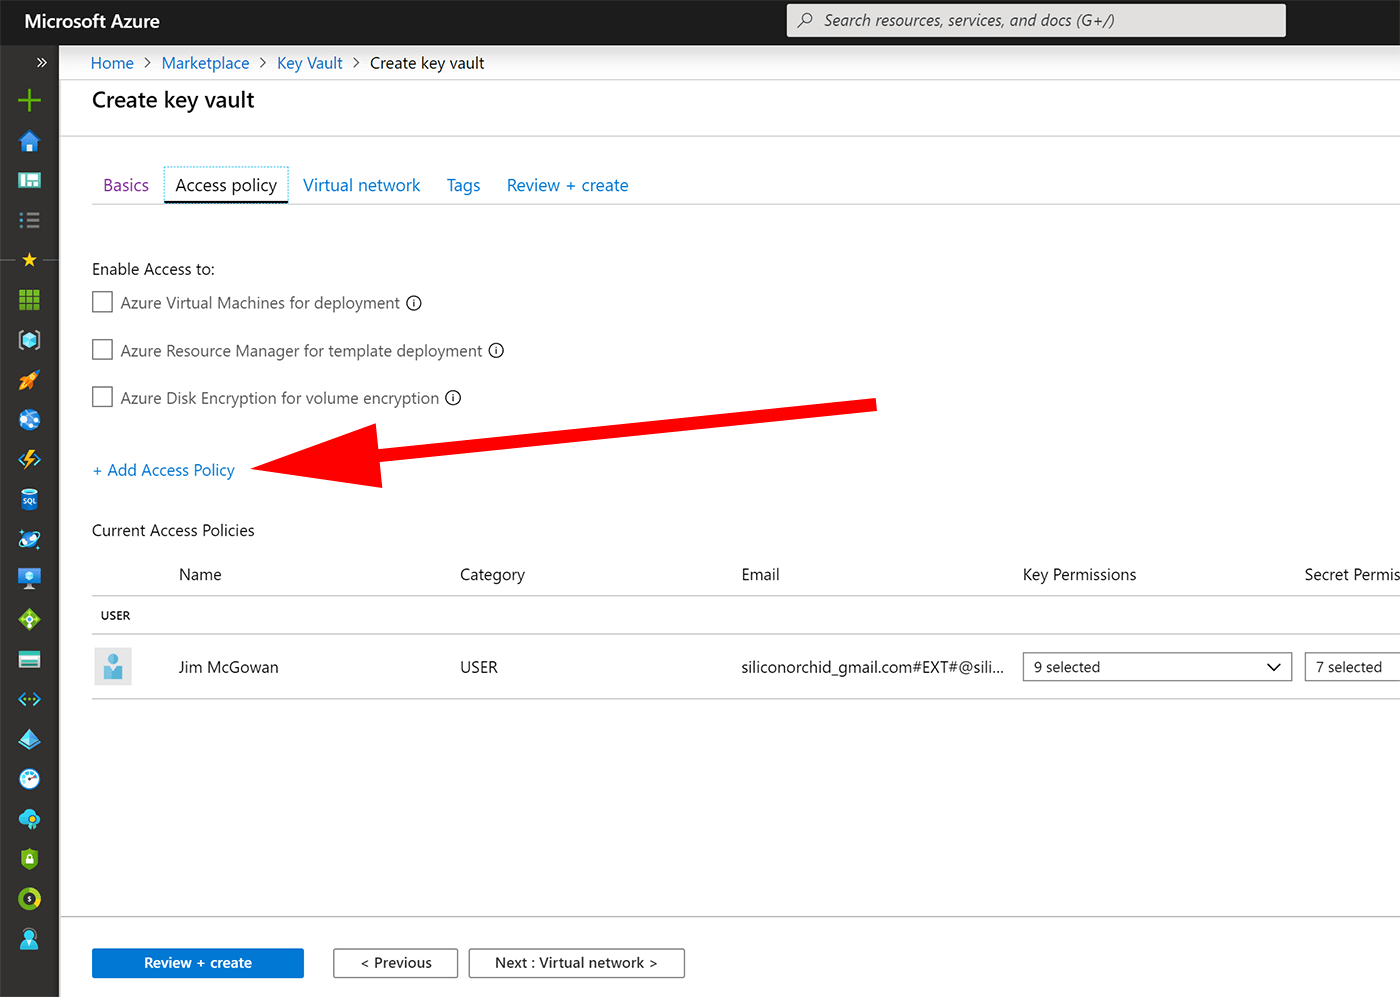
7) Grant permission to the new AppService identity.
Whilst displaying the “Access Policy” view, we should see our own user-identity appear in the current access policy list (the account that you used to log into the Azure Portal). We need to add in the identity of the AppService now.
- Click the
Add Access Policyoption.
Completely ignore the options for
Configure from template,Key PermissionsandCertificate Permissions.Click on the
Secrets Permissiondropdown and choose just the sub-optionsGetandList.Click the
Select Principleoption and in the dialogue that appears, search for the name of the ServiceApp that we created earlier. For me, I addedSiliconVaultDemoFunctionApphere.Click
Addto save the new policy record.Click
Review and Createto create the new Key Vault resource (along with the settings).

8) Make a note of service address
With the Azure Key Vault resource now provisioned, go ahead and open the new resource.
- Select
Overviewand look at the dialogue for a DNS Name. For me, this value ishttps://siliconvaultdemokeyvault.vault.azure.net/. Make a note of this, as we’ll be using it in a few moments.
9) Create a new secret setting
- Next, Select
Secretsoption and click theGenerate/Importbutton.
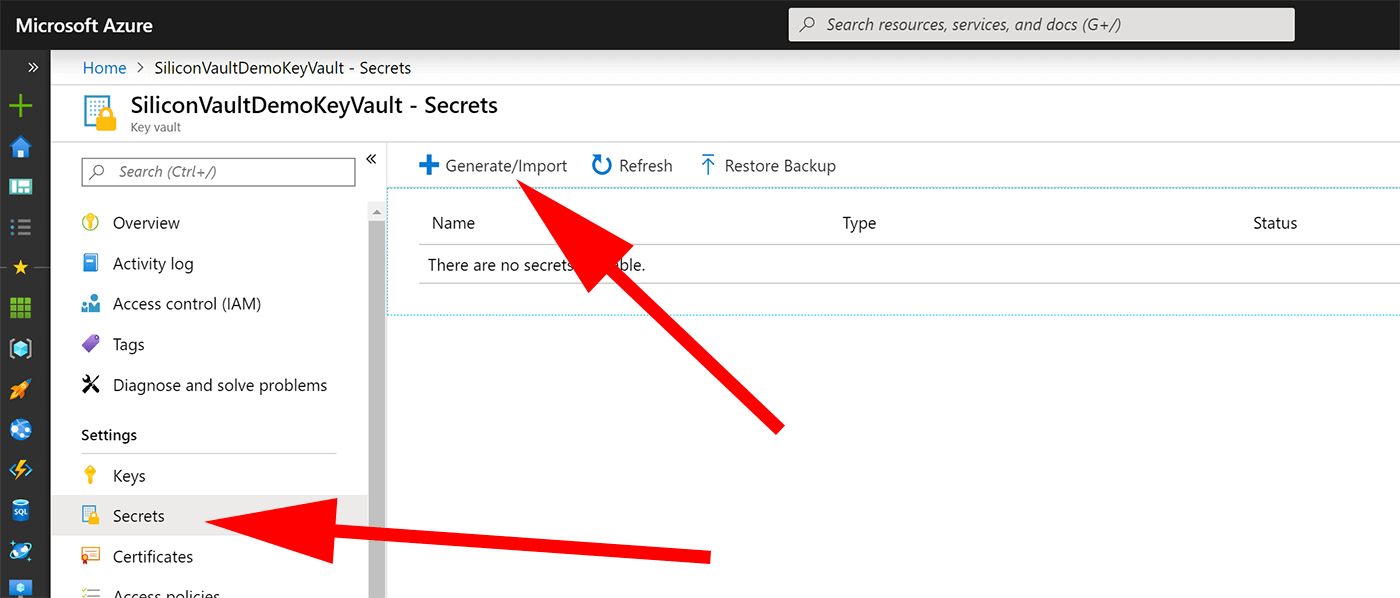
- We need to create a new secret setting, so leave Upload Options set to
Manual, provide a Name ofour-secretand provide a value of:
This is a secret from Key Vault
- Leave all other settings at their default (i.e. don’t set an expiration date), and go ahead and click the
Createbutton.
10) Add startup code
In our Azure Function project, we need to add startup code which tells our application how to connect to our new Azure Key Vault.
- Create a new class in the project called
startup.cs, which contains the following code (we will need to substitute the Azure Key Vault URL as necessary):
using Microsoft.Azure.Functions.Extensions.DependencyInjection;
using Microsoft.Extensions.Configuration;
using Microsoft.Extensions.DependencyInjection;

[assembly: FunctionsStartup(typeof(Startup))]
namespace FunctionApp1
{

    public class Startup : FunctionsStartup
    {
        public override void Configure(IFunctionsHostBuilder builder)
        {
            var config = new ConfigurationBuilder()
                   .AddAzureKeyVault($"https://siliconvaultdemokeyvault.vault.azure.net/")
                   .Build();

            var ourSecret = config["our-secret"];

            builder.Services.AddSingleton(ourSecret);
        }
    }
}
It is worth noting that although our example DI code, above, is deliberately crude, it does still demonstrate how we can go about retrieving the secret-settings just once (at instance startup), rather than repeatedly hitting the Azure Key Vault on each and every function operation (and unnecessarily driving up usage demand and costs, to that resource).
11) Update the http-triggered function code
In the file Function1.cs replace the entire code with the following:
using System.Threading.Tasks;
using Microsoft.AspNetCore.Mvc;
using Microsoft.Azure.WebJobs;
using Microsoft.Azure.WebJobs.Extensions.Http;
using Microsoft.AspNetCore.Http;
using Microsoft.Extensions.Logging;

namespace FunctionApp1
{
    public class Function1
    {
        private readonly string _ourSecret;


        public Function1(string ourSecret)
        {
            _ourSecret = ourSecret;
        }

        [FunctionName("Function1")]
        public  async Task<IActionResult> Run(
            [HttpTrigger(AuthorizationLevel.Anonymous, "get", Route = null)] HttpRequest req,
            ILogger log)
        {
            return new OkObjectResult($"We retrieved the following value from Azure Key Vault :  {_ourSecret}");
        }
    }
}
12) Login locally to “Az Functions” CLI
A cool feature of Azure Key Vault is that Active Directory users who have been granted permission to the Key Vault, can develop locally using the secrets stored in the vault. This means that we don’t need to specify those values, at all, in the local.secrets.json file.
We can read how to integrate Visual Studio at Microsoft Documentation : Add Key Vault to your web application by using Visual Studio Connected Services
To make this security integration work between Azure Key Vault and the Azure Functions CLI, we first need to make sure that we are logged in. Use the following command and enter the same credentials that we used in the Azure Portal:
az login
You could add other users to the Azure Active Directory, and grant these different users (aka “principles”) permissions to view the secrets. That is beyond the scope of this article.
13) Test our local development version.
Making a note of the appropriate HTTP-Triggered Url (for me, this was http://localhost:7071/api/Function1), we should see the secret configuration information pulled from the Azure Key Vault and displayed as an HTTP response, like this:
We retrieved the following value from Azure Key Vault : This is a secret from Key Vault
14) Deploy code to AppService and test cloud version.
Use “right-click deployment” to publish the app to the Azure Functions AppService that we created earlier. Using the appropriate URL (for me, this was https://siliconvaultdemofunctionapp.azurewebsites.net/), demonstrate that the deployed version also works.

Azure Key Vault References
You can read the official documentation here : Microsoft Documentation : Use Key Vault references for App Service and Azure Functions
With perfect timing, late in the writing process of these articles (Oct 2019), Microsoft announced that Key Vault References in App Service and Azure Functions are now generally available .
“References” are a convenient improvement over the previous approach (described in the previous section) as it means that we no longer have to explicitly add additional code into our application to read settings from Azure Key Vault.
Instead, we:
- continue to use an Azure Active Directory managed-identity for our application (as previously).
- where we need to access a secret stored in Azure Key Vault, we can replace the AppService configuration item with a specially formed “Reference String”.
You should carefully read the official documentation for “Reference Strings” here, as you are presented with a couple of requirements and a choice of string-style.
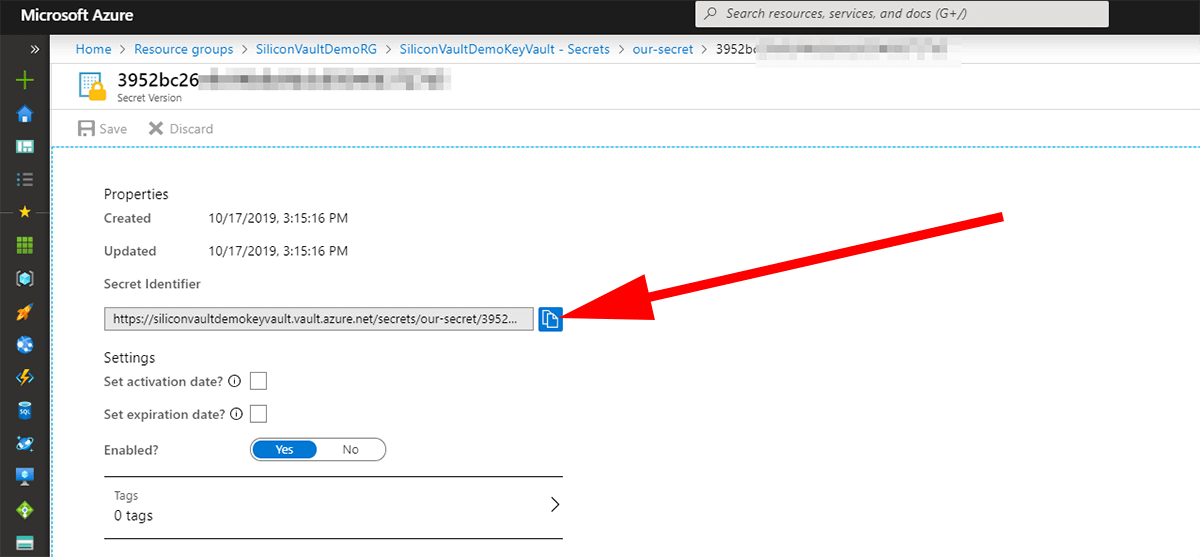
There are two ways to write a “Reference String”, here are examples of both, based on the example earlier in this article:
@Microsoft.KeyVault(SecretUri=https://siliconvaultdemokeyvault.vault.azure.net/secrets/our-secret/ec96f020xxxxxxxxxxxxxxxxxxxxxxxx)


@Microsoft.KeyVault(VaultName=https://siliconvaultdemokeyvault.vault.azure.net;SecretName=our-secret;SecretVersion=ec96f020xxxxxxxxxxxxxxxxxxxxxxxx)
The Azure Portal provides a convenient “cut+paste” facility, which you may find a convenient option. We can find this screen by clicking, first on the name of the secret and then clicking a second time on the version.
It doesn’t appear that Azure Key Vault References can be used for local development. There is no obvious place where the reference string could be used, so we need to stick to using
local.settings.jsonas usual. This exact question has been asked on GitHub quite some time ago, during the beta phase, but at time of writing remains unanswered. I’m sure this will be a useful feature that gets added in the future.

That’s all
So, we’re finally at the end of the series. If you’ve managed to read all the way through - congratulations! This series has taken a surprising amount of time to put together, so I really hope that this information is helpful to someone! If you have found it useful, please share this on social media, that way we can increase the chance of others in the developer community possibly finding the answers they’ve been looking for.
Disclosure
I always disclose my position, association or bias at the time of writing; No third party compensate me or otherwise endorse me for my promotion of their services. I have no bias to recommend Microsofts’ services.
Thumbs Up
A big thank you to Microsoft Cloud Advocate Azure Functions PM, Anthony Chu for volunteering his time and literally burning the midnight oil to provide a technical review. Some of the stuff I waded into was out of my depth and I really appreciated a voice from within Microsoft to help me out.
Thanks to Twilio Evangelist Layla Porter for supporting me once again, with her document-reviewing talents.
Further reading
Github issue “When using a FunctionsStartup class, settings are not read from the correct directory” with fix, and mention from @fabiocav that application-level configuration is planned to be supported.
GitHub issue “Load custom configuration file at startup”, which presents a way to locate the path for loading a config file.
GitHub Issue : Questions about local.settings.json / configuration files with Azure Functions.
GitHub Issue : Rename default appsettings.json file to local.settings.json - indicates that Azure Functions historically used “appsettings.json” but renamed to “local.settings.json”
GitHub Issue : local.settings.json in .gitignore - a discussion about the various merits and confusions related to the local.settings.json file
GitHub Issue : Perhaps we shouldn’t include local.settings.example.json - a discussion about the merits of having a separate
local.settings.example.jsonfile