Are you new to coding? This series of articles is a beginners’ overview of version-control, Git and GitHub.
In this article we’ll learn how to work with Git branches - how to create, switch and merge them.
In part 1 of this series, we learn that GitHub is an online service for hosting your Git repositories.
In part 2 of this series, we learn some of the key concepts and terminology related to Git.
In part 3 of this series, we learn how to use GitHub to create a new empty repo.
In part 4 of this series, we install Git on our local machine and clone our new GitHub repo.
In part 5 of this series, we learn how to begin working with Git - how to commit files, how to push them to GitHub and more.
In part 6 of this series, we learn how to work with Git branches - how to create them, move between them and merge changes.
If you haven’t already read part 2 of this series (some basic Git concepts), go back and read that article first. We introduced you to the basic concept of branching in Git in that article.
As with part 5, in order to keep things fast-paced, we’ll quickly step through a sequence of instructions so that you can get to see instant results. We’ll then review the steps in more detail and actually explain what’s going on.
This article is intended as a continuation, so we’ll assume that we are working directly on from the previous article. This means we’ll re-use the work we started creating within our existing GitHub repository.
Step by step instructions to create and work with a new Git branch.
Open a terminal/console on your computer and navigate to the root of the folder where your project is stored.
Enter the following commands:
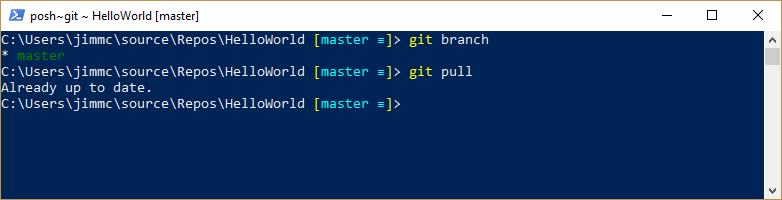
git branch
git pull
You should see responses like this:
- Then, enter these commands:
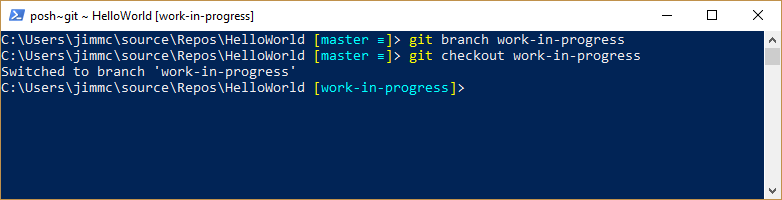
git branch work-in-progress
git checkout work-in-progress
You should now see responses like this:-
Note: As a reminder in case of any confusion, in my screenshots, I am using an extension called PoshGit. This shows additional git-related information in the powershell command prompt. In the screenshot, the words coloured cyan are there because of this extension. If you don’t have PoshGit installed, you can expect to only see your file-path in the command prompt.
Because I do have this extension running, hopefully, you can now see that it is helping me by making it clear which Git branch I am actually working on!
Next, use VS Code to create a new text file called
myexperiment.txtand include the following text inside of it:this is an experimental text file made in my work-in-progress branch. Remember to save the file.Use VS Code to edit the existing file [which you made in the previous article] called
some_text.txt. In addition to any text that was already in that file, add a new line containing the following textthis is a change that I made in my work-in-progress branch. Save the changes you made to the file.Enter the following commands:
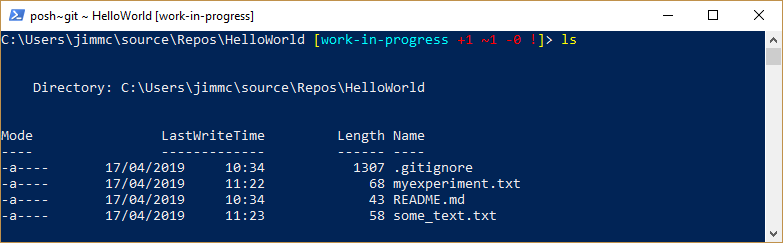
ls (or 'dir' on windows)You should see a listing like the following screenshot. Specifically, we now expect to see the new file
myexperiment.txtin the listing.
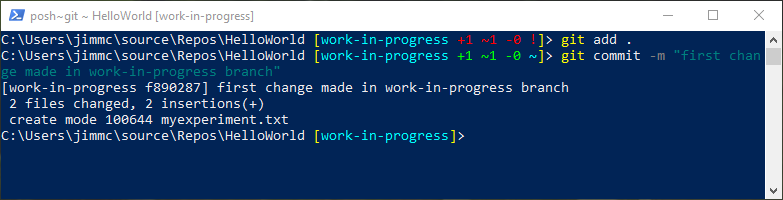
- Next, we’ll stage and commit the changes you’ve just made, using the following commands:
git add .
git commit -m "first change made in work-in-progress branch"
Things should look like this:
- To test out the concept of branches, we’re now going to return back to our original “master” branch and have a look. Enter these commands:-
git checkout master
ls
Your working folder should look like the screenshot below. Notice that the new file myexperiment.txt is missing! (do you think that you can guess why it’s not showing now?):
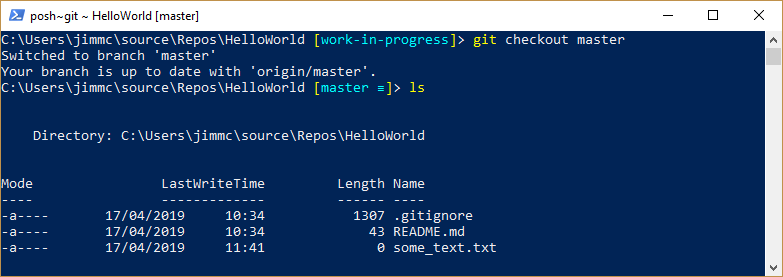
Before we move on, you should now also open up and view the file some_text.txt - you should see that the changes we made a moment ago are now missing (the file will show only the original content, before we edited it)
- To get you used to the idea of working by moving back and forth between branches, let’s return to our new branch:
git checkout work-in-progress
ls
Now that we have returned to the work-in-progress branch, if you look at the folder listing now, you should see that the changes we made previously have returned. You want to check that the file myexperiment.txt can be seen in the folder listing. Also, open up some_text.txt in your code editor and confirm that the new line of text has returned.
As a time-saving tip, experiment using the [TAB] key to auto-complete your commands. For example, I could type the following
git che[TAB] wor[TAB]as a quick way to enter the above command.
Let’s merge our work-in-progress branch into the master branch:-
git checkout master
git pull
git merge work-in-progress

- We can now check that the changes that we made in the
work-in-progressbranch are now present in themasterbranch:
ls
In particular, notice how the file myexperiment.txt is now present in the master branch.
- Finally, we can push our changes back up to GitHub with this command:
git push
Let’s go back over those steps again.
Just as before in the previous article, let’s go back over the previous steps and talk about what’s happening in more detail.
Firstly, we checked our current situation
With the
git branchcommand, we asked Git to tell us which branch we are currently working on. Thegit branchcommand on its own (i.e. with no other statements after) is used to ask this question. The console then lists out all the available branches that we have in our local copy.We then used the command
git pullto get the latest version of the repository before starting any further work. Arguably, this step wasn’t entirely necessary for the purpose of this tutorial, but we want to get in the habit of always checking for the latest version of the code. This becomes very important if you are collaborating with a team, because you want to make sure you’re working on an up-to-date version of the code and not just the last version that you touched.- Why? Consider this: If two people work on the same file at the same time, who’s changes should we be using? If someone else had commited changes to a file before you commited your own changes, then extra steps will need to be taken to [manually] resolve the differences. We’ll talk about this topic properly in a future article, but for now, if you get in the habit of pulling the latest version before you work on a file, it can help you to avoid potential frustration.
Please note that if someone else has created other branches and pushed them up to the server (GitHub), you won’t automatically see those branches in your local copy. To view a list of all branches, both those locally and those on the server that your local copy is not aware of, use the command
git branch -a
We then created a new branch and checked it out
We used the command
git branch work-in-progressto create a brand new branch called “work-in-progress”. You can call a branch anything you like, as long as it has meaning. It’s common to name a branch after a feature you are working on (e.g. “sales-calculator-module”). If you are working on a large and complex project, it’s not uncommon to create a branch containing the code/number associated with a task allocated by project/task-management software (such as products such as Jira or TFS/Azure DevOpsWe use the command
git checkout work-in-progressto then “check out” the branch we had just created. Having just checked out the new branch, you could enter the commandgit branchto confirm which branch you are now in.
Something to be aware of is that when we create a new branch, Git effectively makes a copy of whatever branch we are currently in (so “master” branch in this case) and then makes the new branch (“work-in-progress”) as an identical version.
Tip: Git is case sensitive, so take care not to create branches that are named the same, except with different capitalisation. Git will create two different versions and things will get very confusing to work with.
We made changes to our files and committed them.
You should feel fairly confident with the following steps as we covered them in an earlier article.
- We created a new file
myexperiment.txt - We edited an existing file
some_text.txt - We staged the changes
- We committed the changes with the name “first change made in work-in-progress branch”
The key thing to be aware of in this step is that any changes and commits we make are happening in the branch “work-in-progress”. At this point in the process, nothing we are doing in the “work-in-progress” branch will impact the “master” branch at all - that is now effectively a completely separate copy.
We then stepped back and forth between the two branches to manually compare the differences
As part of an actual workflow, we didn’t technically need to switch back to the master branch (by using the command git checkout master) only to then go back and forth to the work-in-progress branch. However, we wanted to demonstrate that the contents of each branch can be completely separate and independent of each other. A good way to show you this was to go and compare how the contents of the folder changed.
By using the command
checkout masterto check out the master branch, followed byls(or optionallydirin windows) to list the contents of the folder, we were highlighting that the version of the code in the master branch was missing the new filemyexperiment.txtentirely. It simply didn’t exist in the master branch. Similarly, the new line of text we added to the filesome_text.txtwould not be present and we would only see the original version.We used the command ‘git pull’ to get the latest from the server. Again, this is technically not necessary for the purpose of this demonstration exercise, but we really want to reinforce the habit of getting the latest version from the server, every time we change branches. Doing so will lessen the risk of something called a “merge conflict” (which we’ll talk about in the next article in the series).
By switching back to the new branch, using the command
git checkout work-in-progress, we demonstrated that our changes were not lost and that they were once again present in this newer branch.
We merged our new branch into the master branch
Using the command
git checkout masterwe returned back to the master branchTo form a new habit, we used
git pullto check for the latest code (noting again that this step wasn’t strictly necessary).We used the command
git merge work-in-progress. This is a fairly pivotal step in this process. We are saying “take all of the changes made in that other branch, and bring them into this current branch”.
Regarding the merge, because we have done everything in a clear sequence of progress, the merge will “just work automatically”. Any changes you had in the “work-in-progress” branch will now be part of the master branch.
Things would have become complicated if you (or people you collaborate with) had worked separately on the same files in different branches. If you think about it, there is no way for the computer to know which changes are the correct ones to use! We’ll cover the more complicated subject of managing merges in a future article.
We pushed the changes to the server
Finally, we pushed our work back to the server.
In this context, the phrase our work represents both the actual coding changes you made (new files, editing files etc) and the work we performed in Git, merging the two branches back into one.
Final thoughts
As you start to learn more about Git, you’ll rapidly find that there is an overwhelming number of commands to learn. Try not to allow yourself to become overwhelmed - instead focus on learning a small set of commands, practice using them - and then build on your knowledge over time.
For example:-
- When creating a new branch and checking it out, we demonstrated by using two separate Git commands
git branch yourbranchfollowed bygit checkout yourbranch. This was done to make it easier to follow along for beginners. However, if you prefer, you can combine these two steps into a single command using the-bswitch, like this:
git checkout -b yourbranch