
In this article, we’re going to create a solution that extracts any potential phone numbers that appear in an image file. Having extracted potential numbers we’ll then attempt to verify that they are valid phone numbers.
Introduction
The past couple of years have turned out to be really interesting times for developers.
We’ve witnessed the rise of powerful Software-as-a-Service (SaaS), that can be accessed using nothing more than a simple HTTP API call. SaaS has been transformative in the way that we work and can result in the creation of some very potent software. The big tech companies, like Microsoft and Google, have been giving us cheap access to amazing computing resources to solve problems that, only a decade ago, would have been a serious technical hurdle for regular developers to overcome.
In this article, we’re going to explore some of these awesome services and have a bit of fun. This will involve connecting together some of these APIs together in a way that could solve the sort of business-requirement that a real-world application could need solving.
Imagine you want to take a photograph of a business card, or maybe a poster you see at a convention, using your cellphone. You then want to be able to automatically extract a list of phone numbers from that image. That would be pretty useful right?
We’ll achieve this using the following technologies:
- .Net Core 2.x WebApi project
- Azure Cognitive Services
- Twilio Lookup API.
From a high-level, we’re going to perform these steps:
We’ll use the Azure Text Recognition API to process an image and return a collection of words.
We’ll then review code that attempts to extract “candidate” phone numbers from this list of words, discarding non-numbers and attempting to combine number fragments.
Finally, we’ll use a Twilio API to perform a check on the candidate phone number to verify if it is actually a real number.
As these blogs are partly intended to be an exploration into C# coding, we’ll also touch on something called method-chaining which, depending on the context of use, could be a useful way to improve your code. We’ll also make use of asynchronous programming for more efficient use of time when calling API services.

Azure Cognitive Services
Microsoft offers a powerful set of AI-driven services that they call Cognitive Services. These fall into the categories of speech, vision, language understanding and search.
In this article we’ll be interested in consuming the Computer Vision service and specifically the Text Recognition API(s).
There are actually two separate flavours of text-recognition APIs available. At the time of writing, they are still currently in preview:
- A service for extracting typed text from an image.
- A service for extracting handwritten text from an image. This API is slightly more complicated to consume, because the service takes marginally longer to process and does not yield an immediate response to the API request. Therefore we need to code a polling mechanism to receive a result.
According to the documentation, a limitation of the handwritten recognition, is that currently it only supports English language. However, given that our goal is only to extract phone numbers, this shouldn’t pose any problem for us (later in the article, we’ll be writing code that will discard anything that doesn’t look like a phone number anyway).
Twilio Phone Number Lookup.
We’ll also be calling an API provided by Twilio to lookup and verify phone numbers.
This is extremely useful, as it means that we’ll be able to go beyond the usual guess-work that is typical when working with phone numbers and be able to return a list of genuinely validated numbers.

The Problem - Validating Phone Numbers Is Hard.
Validating phone numbers is a deceptively tricky problem to address. The complexity of phone number validation can change depending upon the audience/localisation that your software will be serving:
If you are writing a solution for a domestic audience, you may be able to apply a relatively strict set of validation rules because you can reasonably expect a number to be in a particular format. In this scenario, use of something like a regular expression, could be a suitable way to validate a number.
If your application will require you to accommodate and validate international numbers, each with their own combination of valid numbers - and potentially alphanumeric text, then a strict pattern match solution just isn’t going to cut it.
Even if you attempt to get creative with a set of complicated logic rules, you run the risk of not properly accounting for regional variations (and thereby risk rejecting potentially valid numbers).
At this point I would strongly refer you to read the Twilio Voices Blog Validating phone numbers effectively with C# and the .NET frameworks, which covers many of the issues you’ll need to consider when capturing phone number data, along with potential solutions to the validation problem.
We’ll be taking advantage of Twilio’s Lookup API for number validation. The Lookup API accepts a phone number, attempts to match it against the phone network databases, and responds with appropriate information.
The solution presented in this article is far from perfect and is not intended to be a solution that will work well for everyone. However, what I have put together here is intended to be inspirational and I am certain that there will be elements that you will be able to take away and adapt into your own code.
Introducing the E.164 convention
You should be mindful that the Twilio Lookup API cannot magically figure out what a partial, or unusually formatted, phone number should be.
Part of our challenge will be that we need to supply a number to their API in a correctly formatted international convention known as E.164.
Whilst the E.164 format itself is straightforward, a difficulty we face is that the string of text extracted from the image is unlikely to be in this format. For example, it is highly likely that it will not contain the international dialling code.
So a hurdle with our code, is that we may need to get creative with how we go about “filling in the blanks”!
The problem of internationalisation is a tricky one;
If your software is serving only a domestic audience, you could potentially cut corners and make a sweeping presumption that you should add a fixed international prefix code (assuming the prefix is not already present).
If your software is serving an international audience, you may need to provide a mechanism to obtain this information from the user - for example:
- in a UI where a user uploads an image, perhaps they will be required to select a country from something like a dropdown.
- you could possibly determine the user’s geographic location (e.g. using a geolocation API from a device, or perhaps a more crude IP based lookup).
Prerequisites
There will be an assumption that you have familiarity working with:
You’ll need to have installed the .Net Core 2.x SDK, as appropriate to your platform.
You’ll need something to edit and build your project.
- This demo was primarily created using .Net Core 2.1 on a Windows 10 system using Visual Studio 2017 Community edition. There is no reason why you cannot use other platforms, code editors and CLI tools - my recommendation would be to use Visual Studio Code.
You’ll need to download the sample code that accompanies this article.
- Project source can be downloaded from here : https://github.com/SiliconOrchid/PhoneExtractVerify
You will need an Azure account with an active subscription.
- Specifically, you’ll need to create Computer Vision services. If you are a new subscriber, you can get access to this service for free (at time of writing).
You will need a Twilio account with an active subscription. You’ll need this to access the Lookup API.
- If you don’t have a Twilio account or are completely new to their service, then check out their .NET Core quickstart tutorial.
Setup Azure Computer Vision
Log onto your Azure Portal
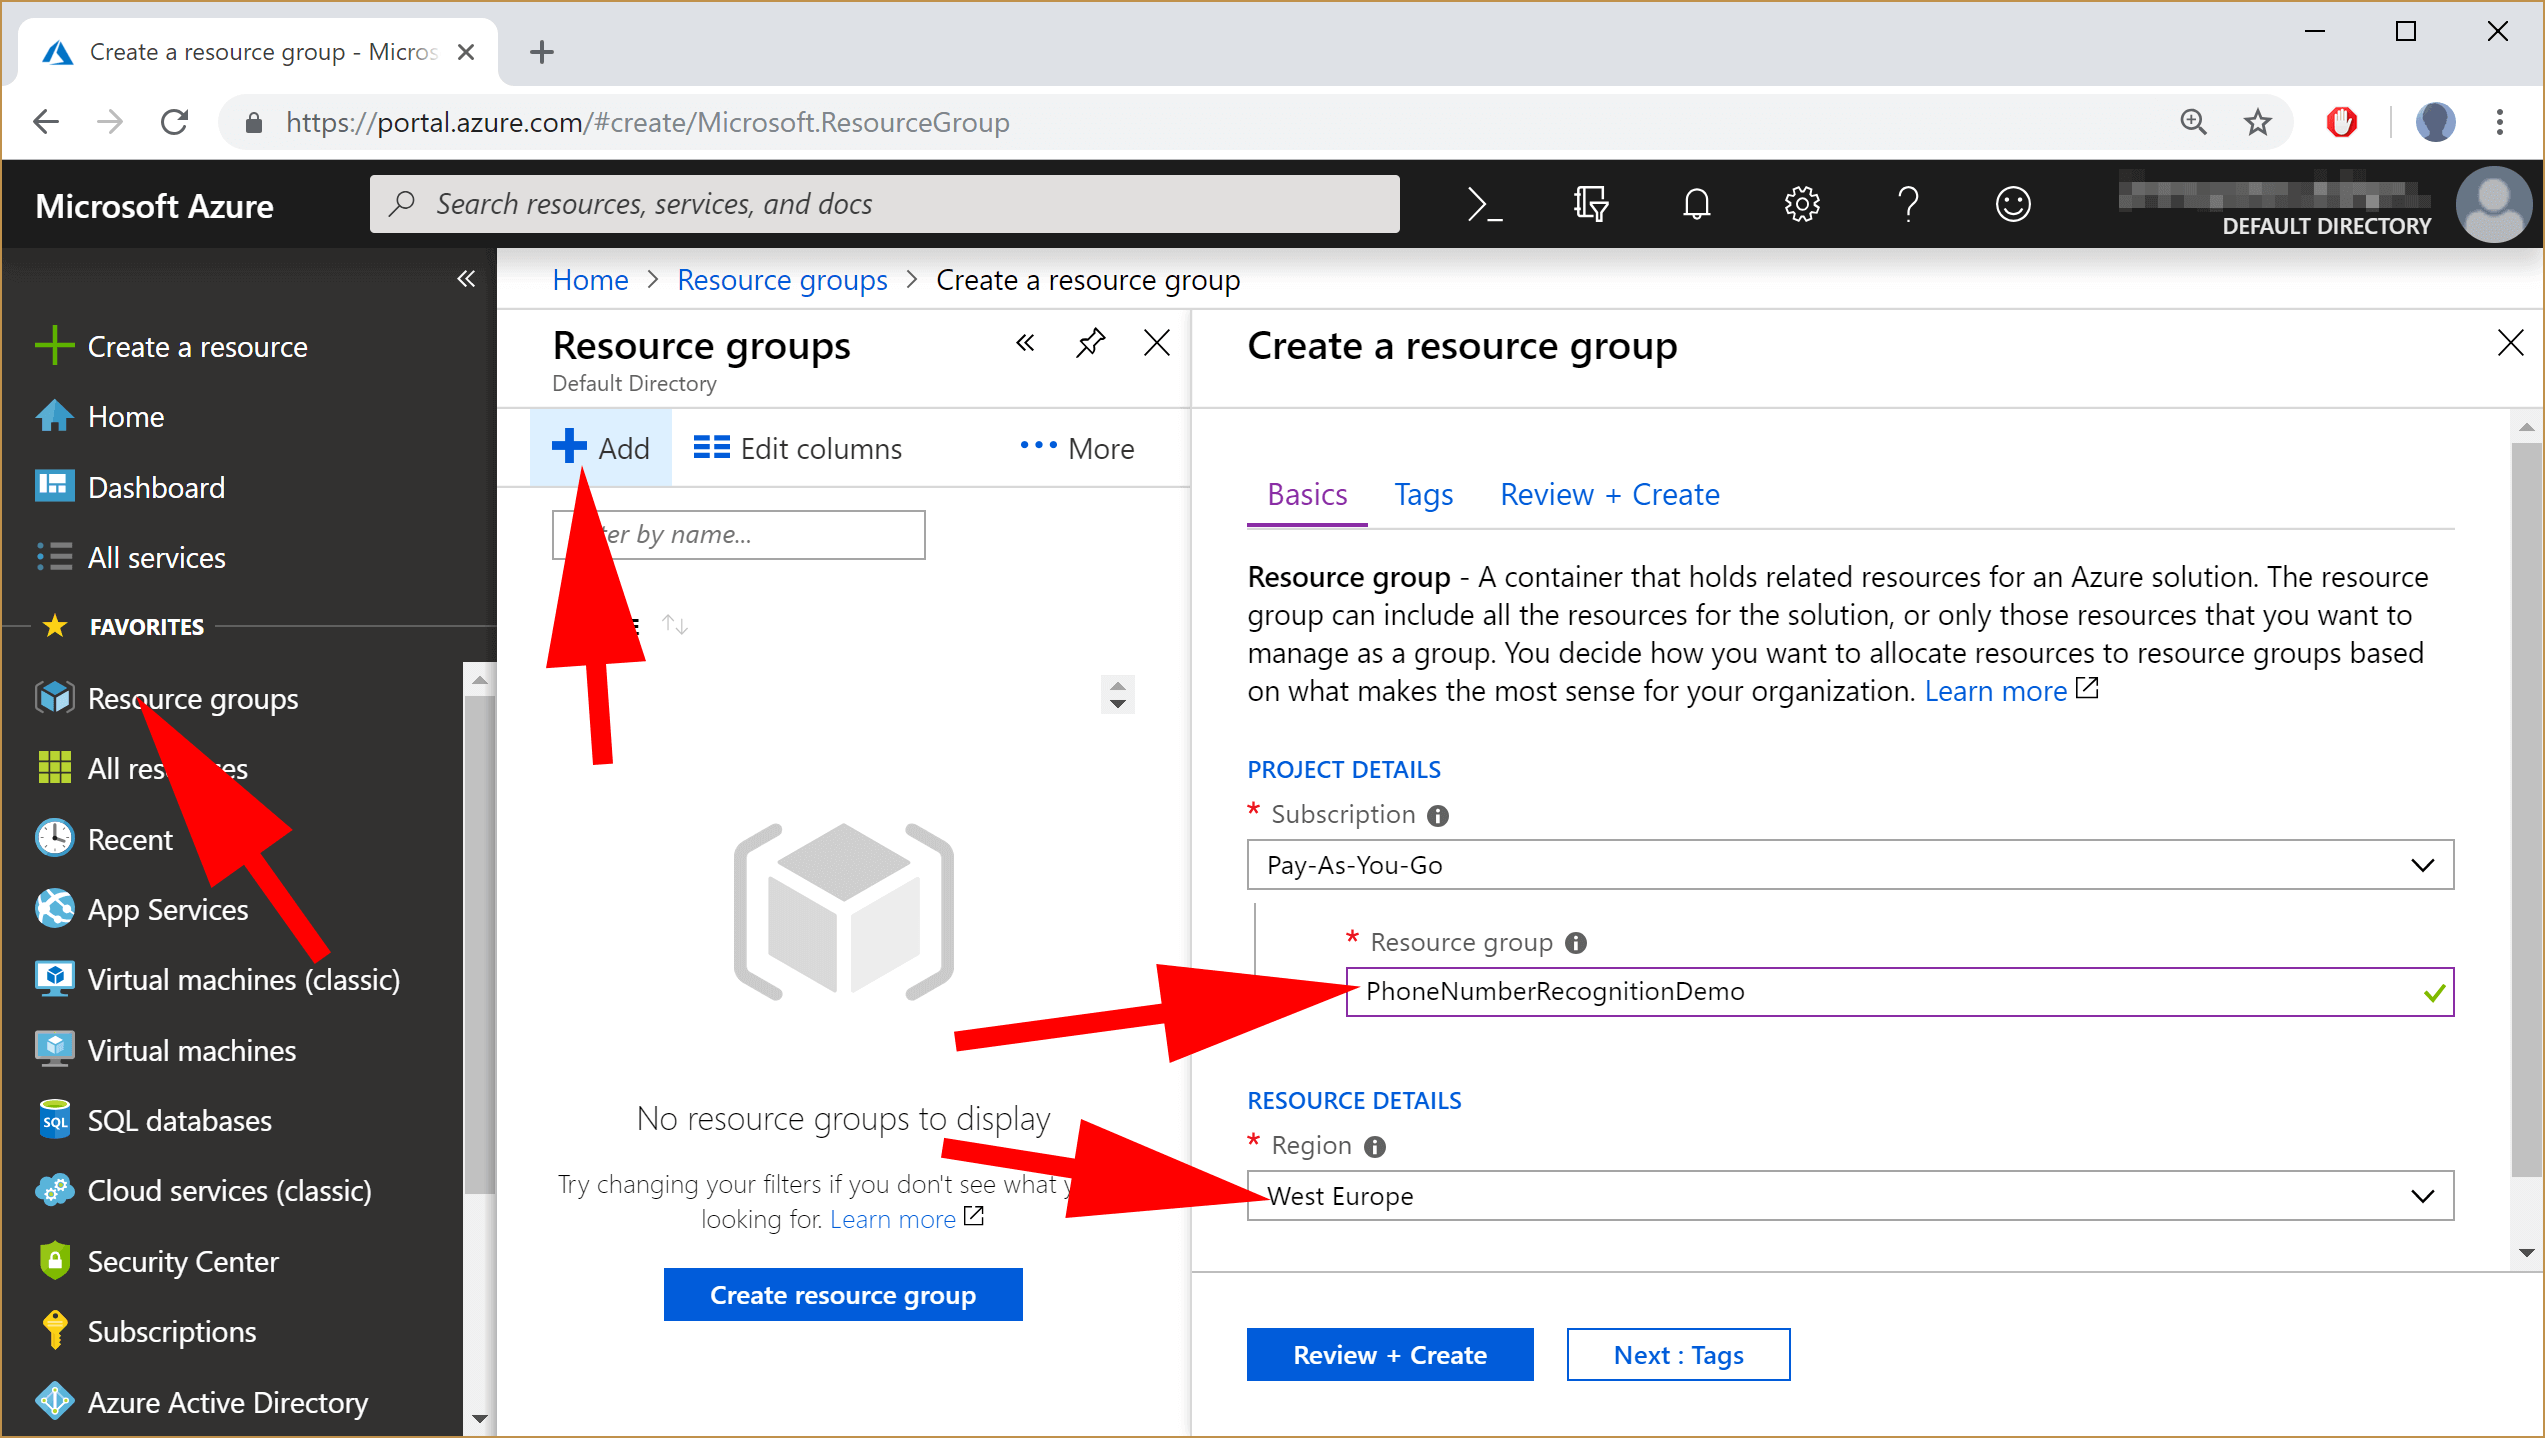
Create a new Resource Group for this project and name it “PhoneNumberRecognitionDemo”:
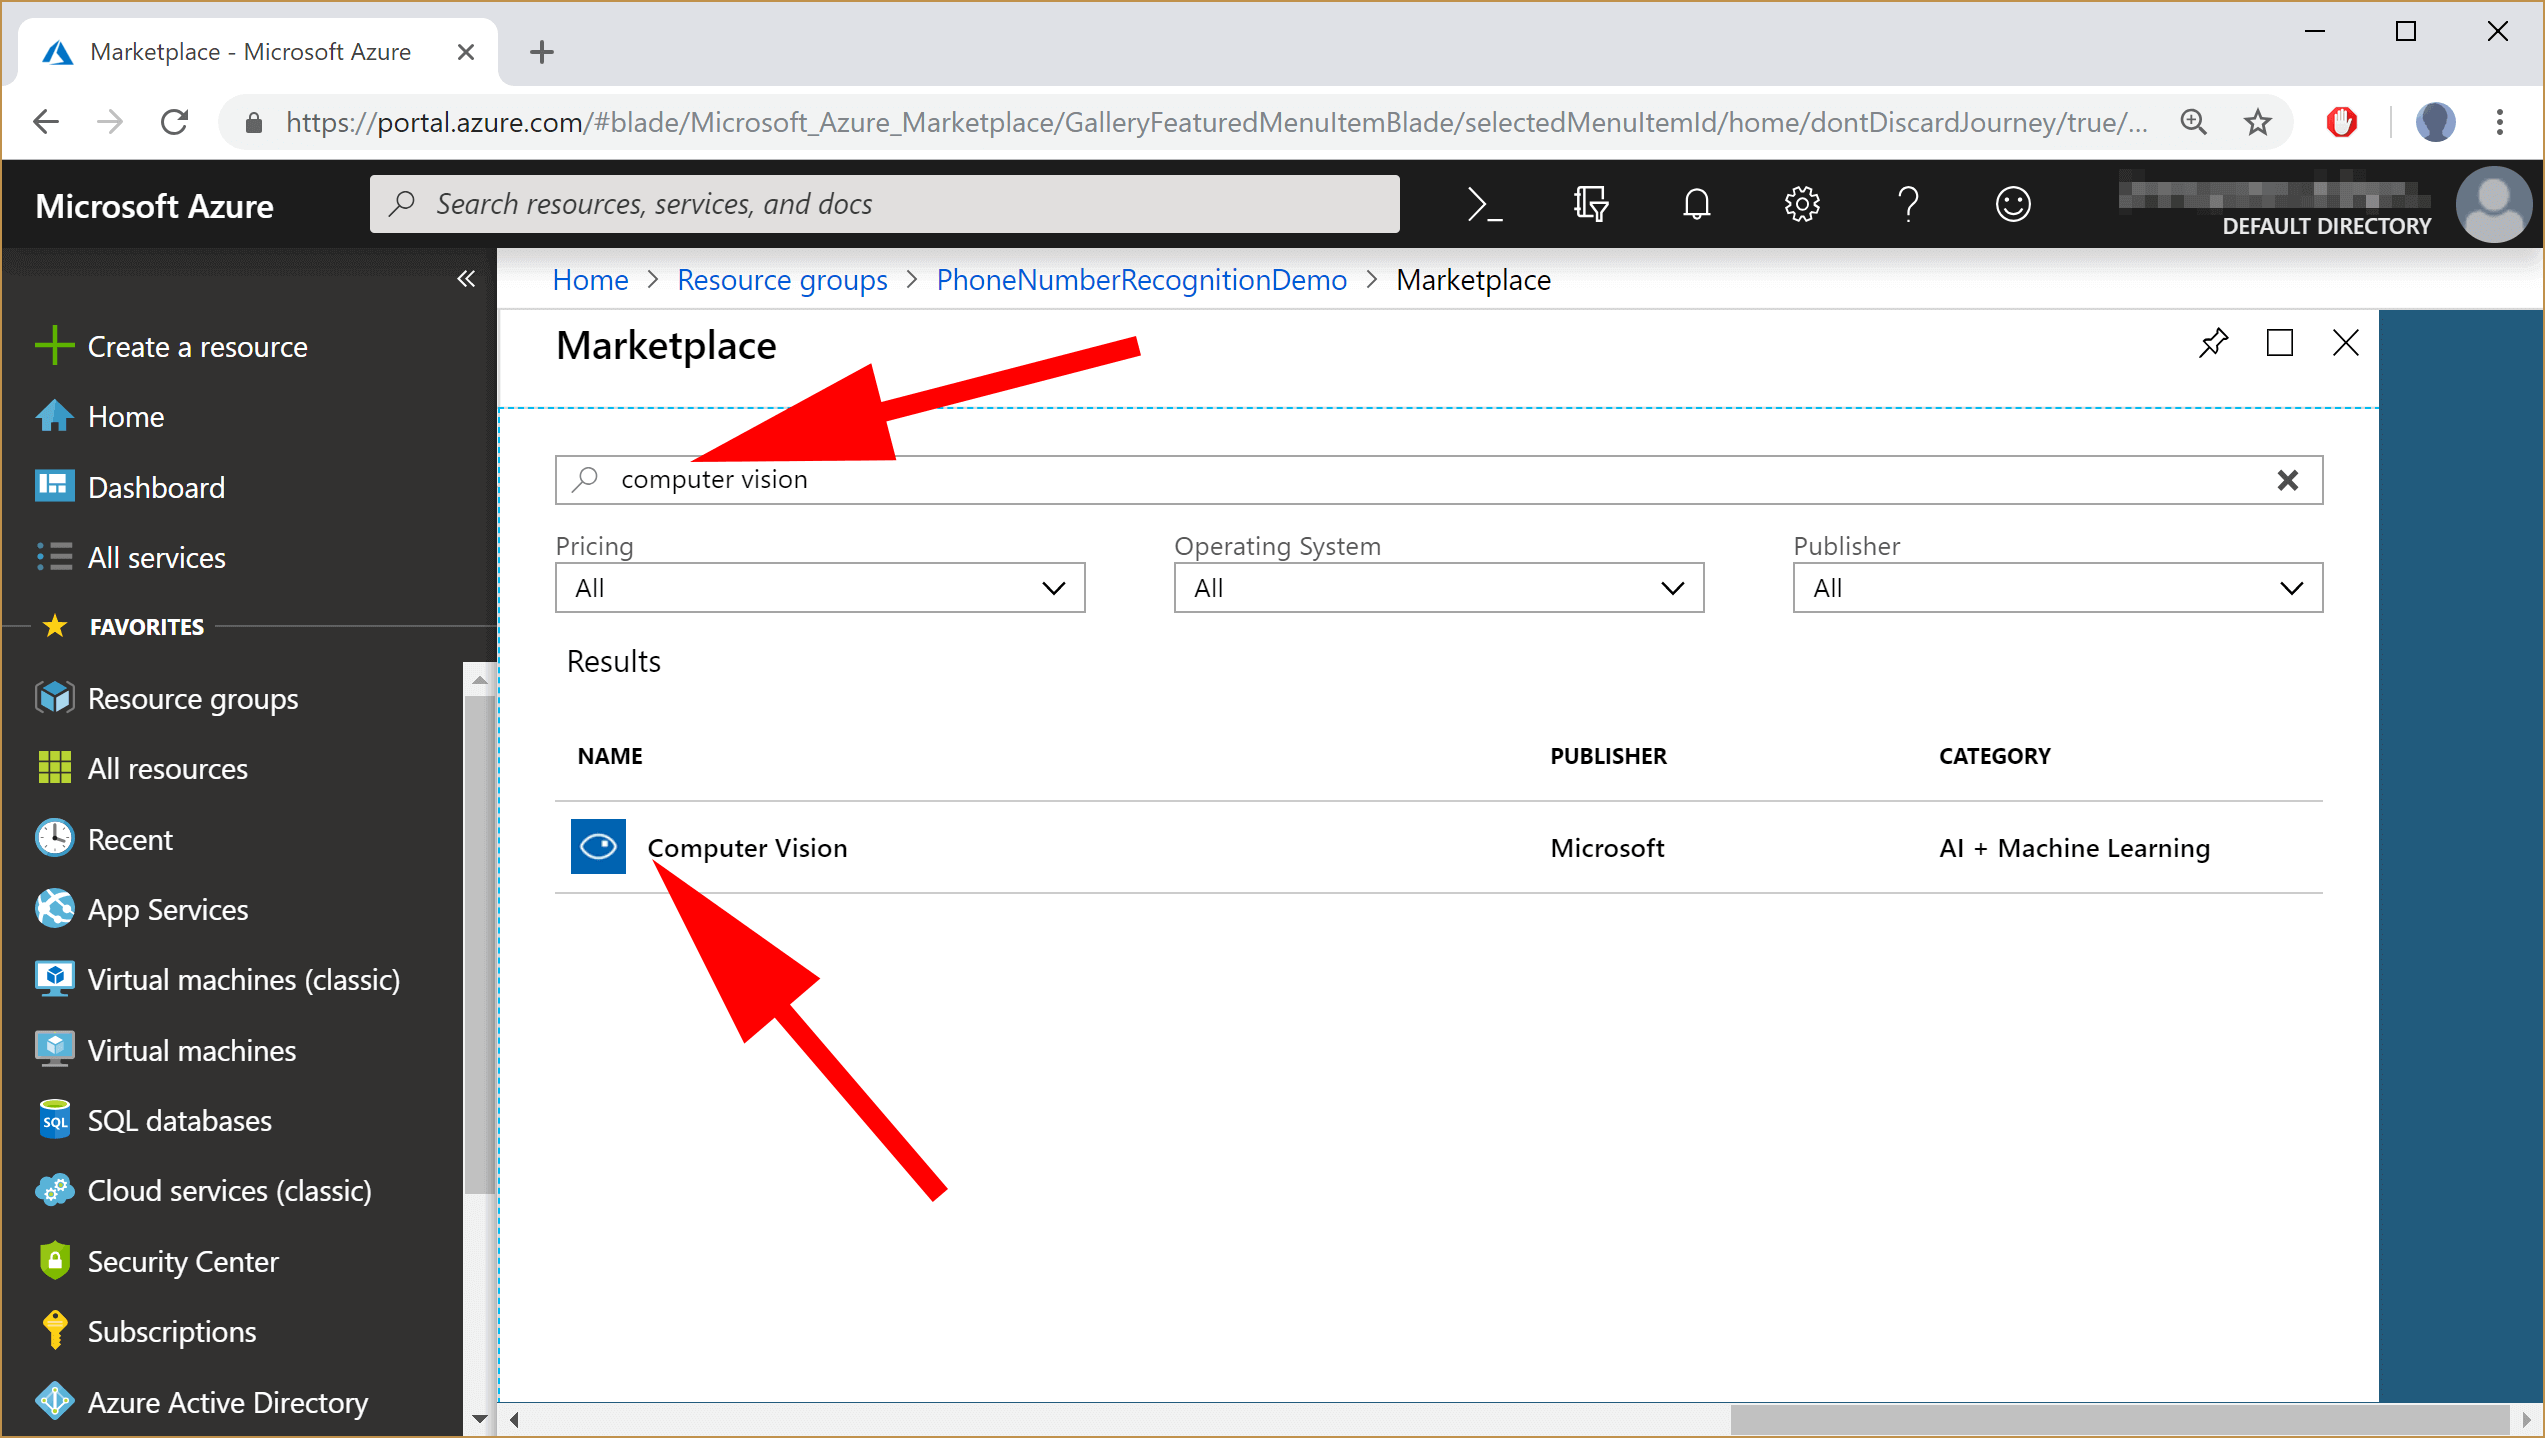
- To add a Computer Vision resource to your subscription simply by search for “computer vision” in the Azure marketplace:
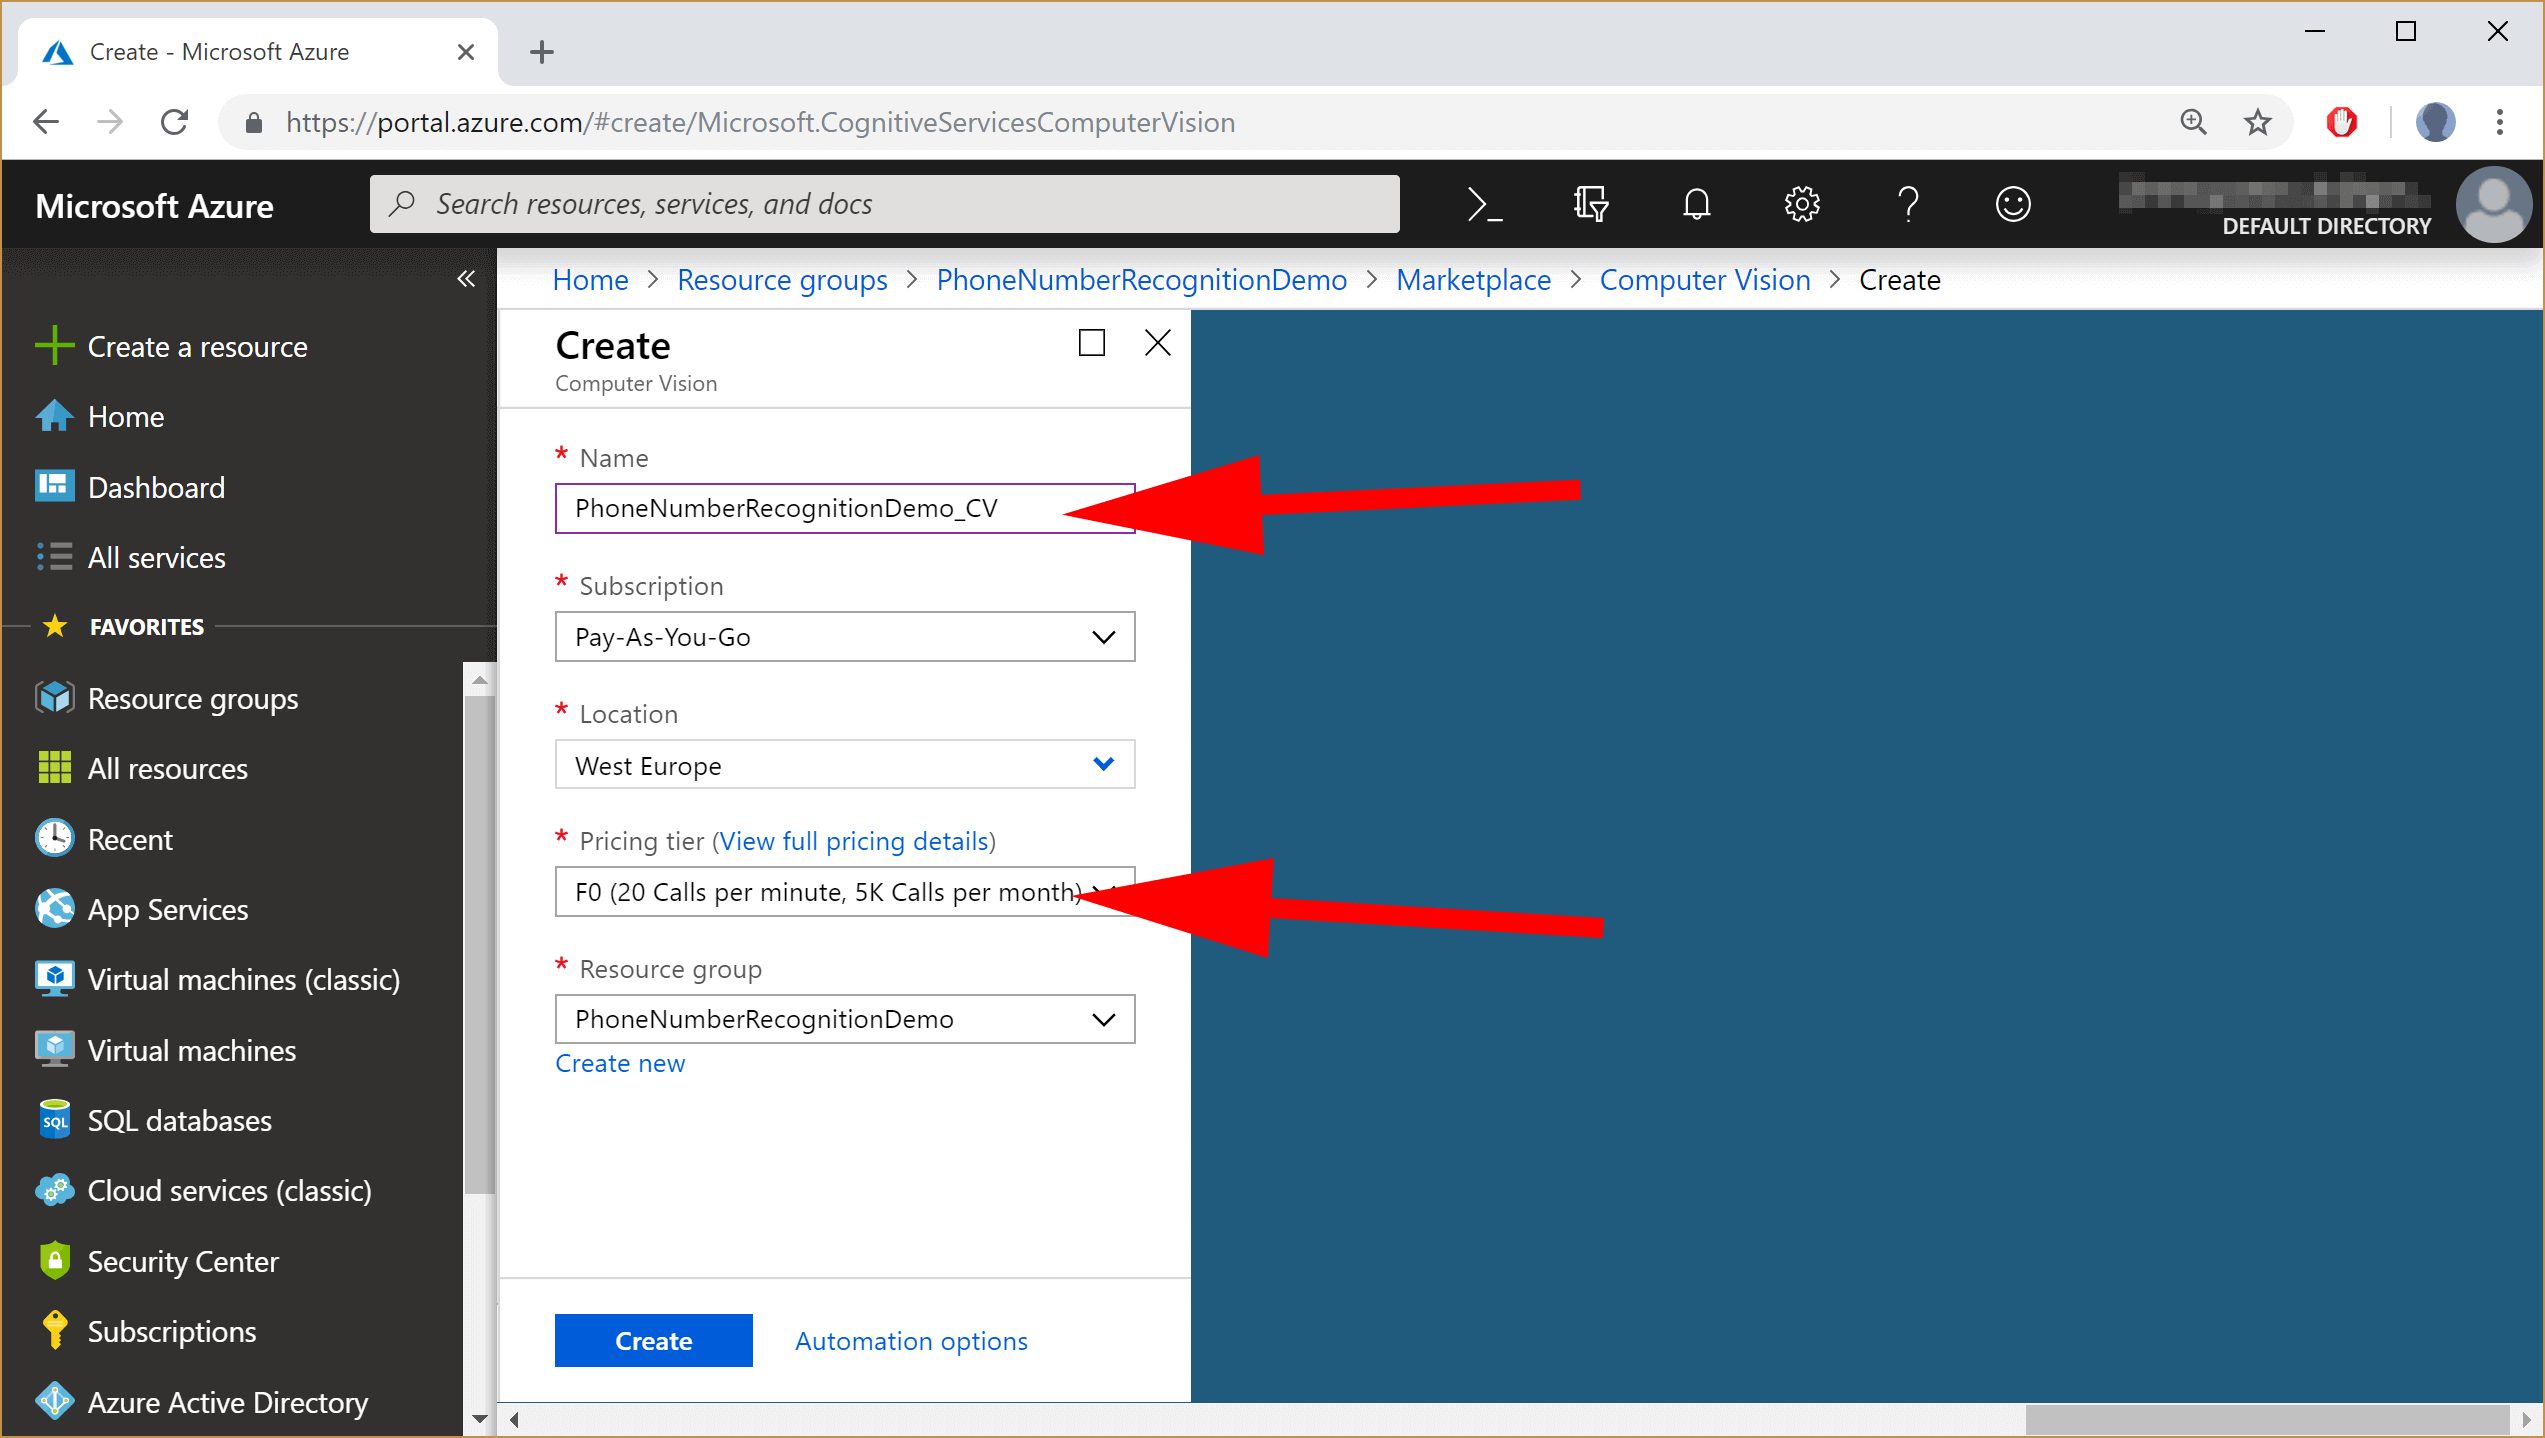
Configure the Computer Vision resource:
Give your resource a name that will make it easy to recognise (I chose to
PhoneNumberRecognitionDemo_CV, using the suffix “_CV” for “Computer Vision”).Choose a data centre nearest to your location that supports Computer Vision (Noting that this service is not available in all Azure data-centres).
Choose the ‘F0’ Pricing tier. This is the free version, but our limited usage in the demo will be fine at that level.
Wait a few moments while the resource deploys.
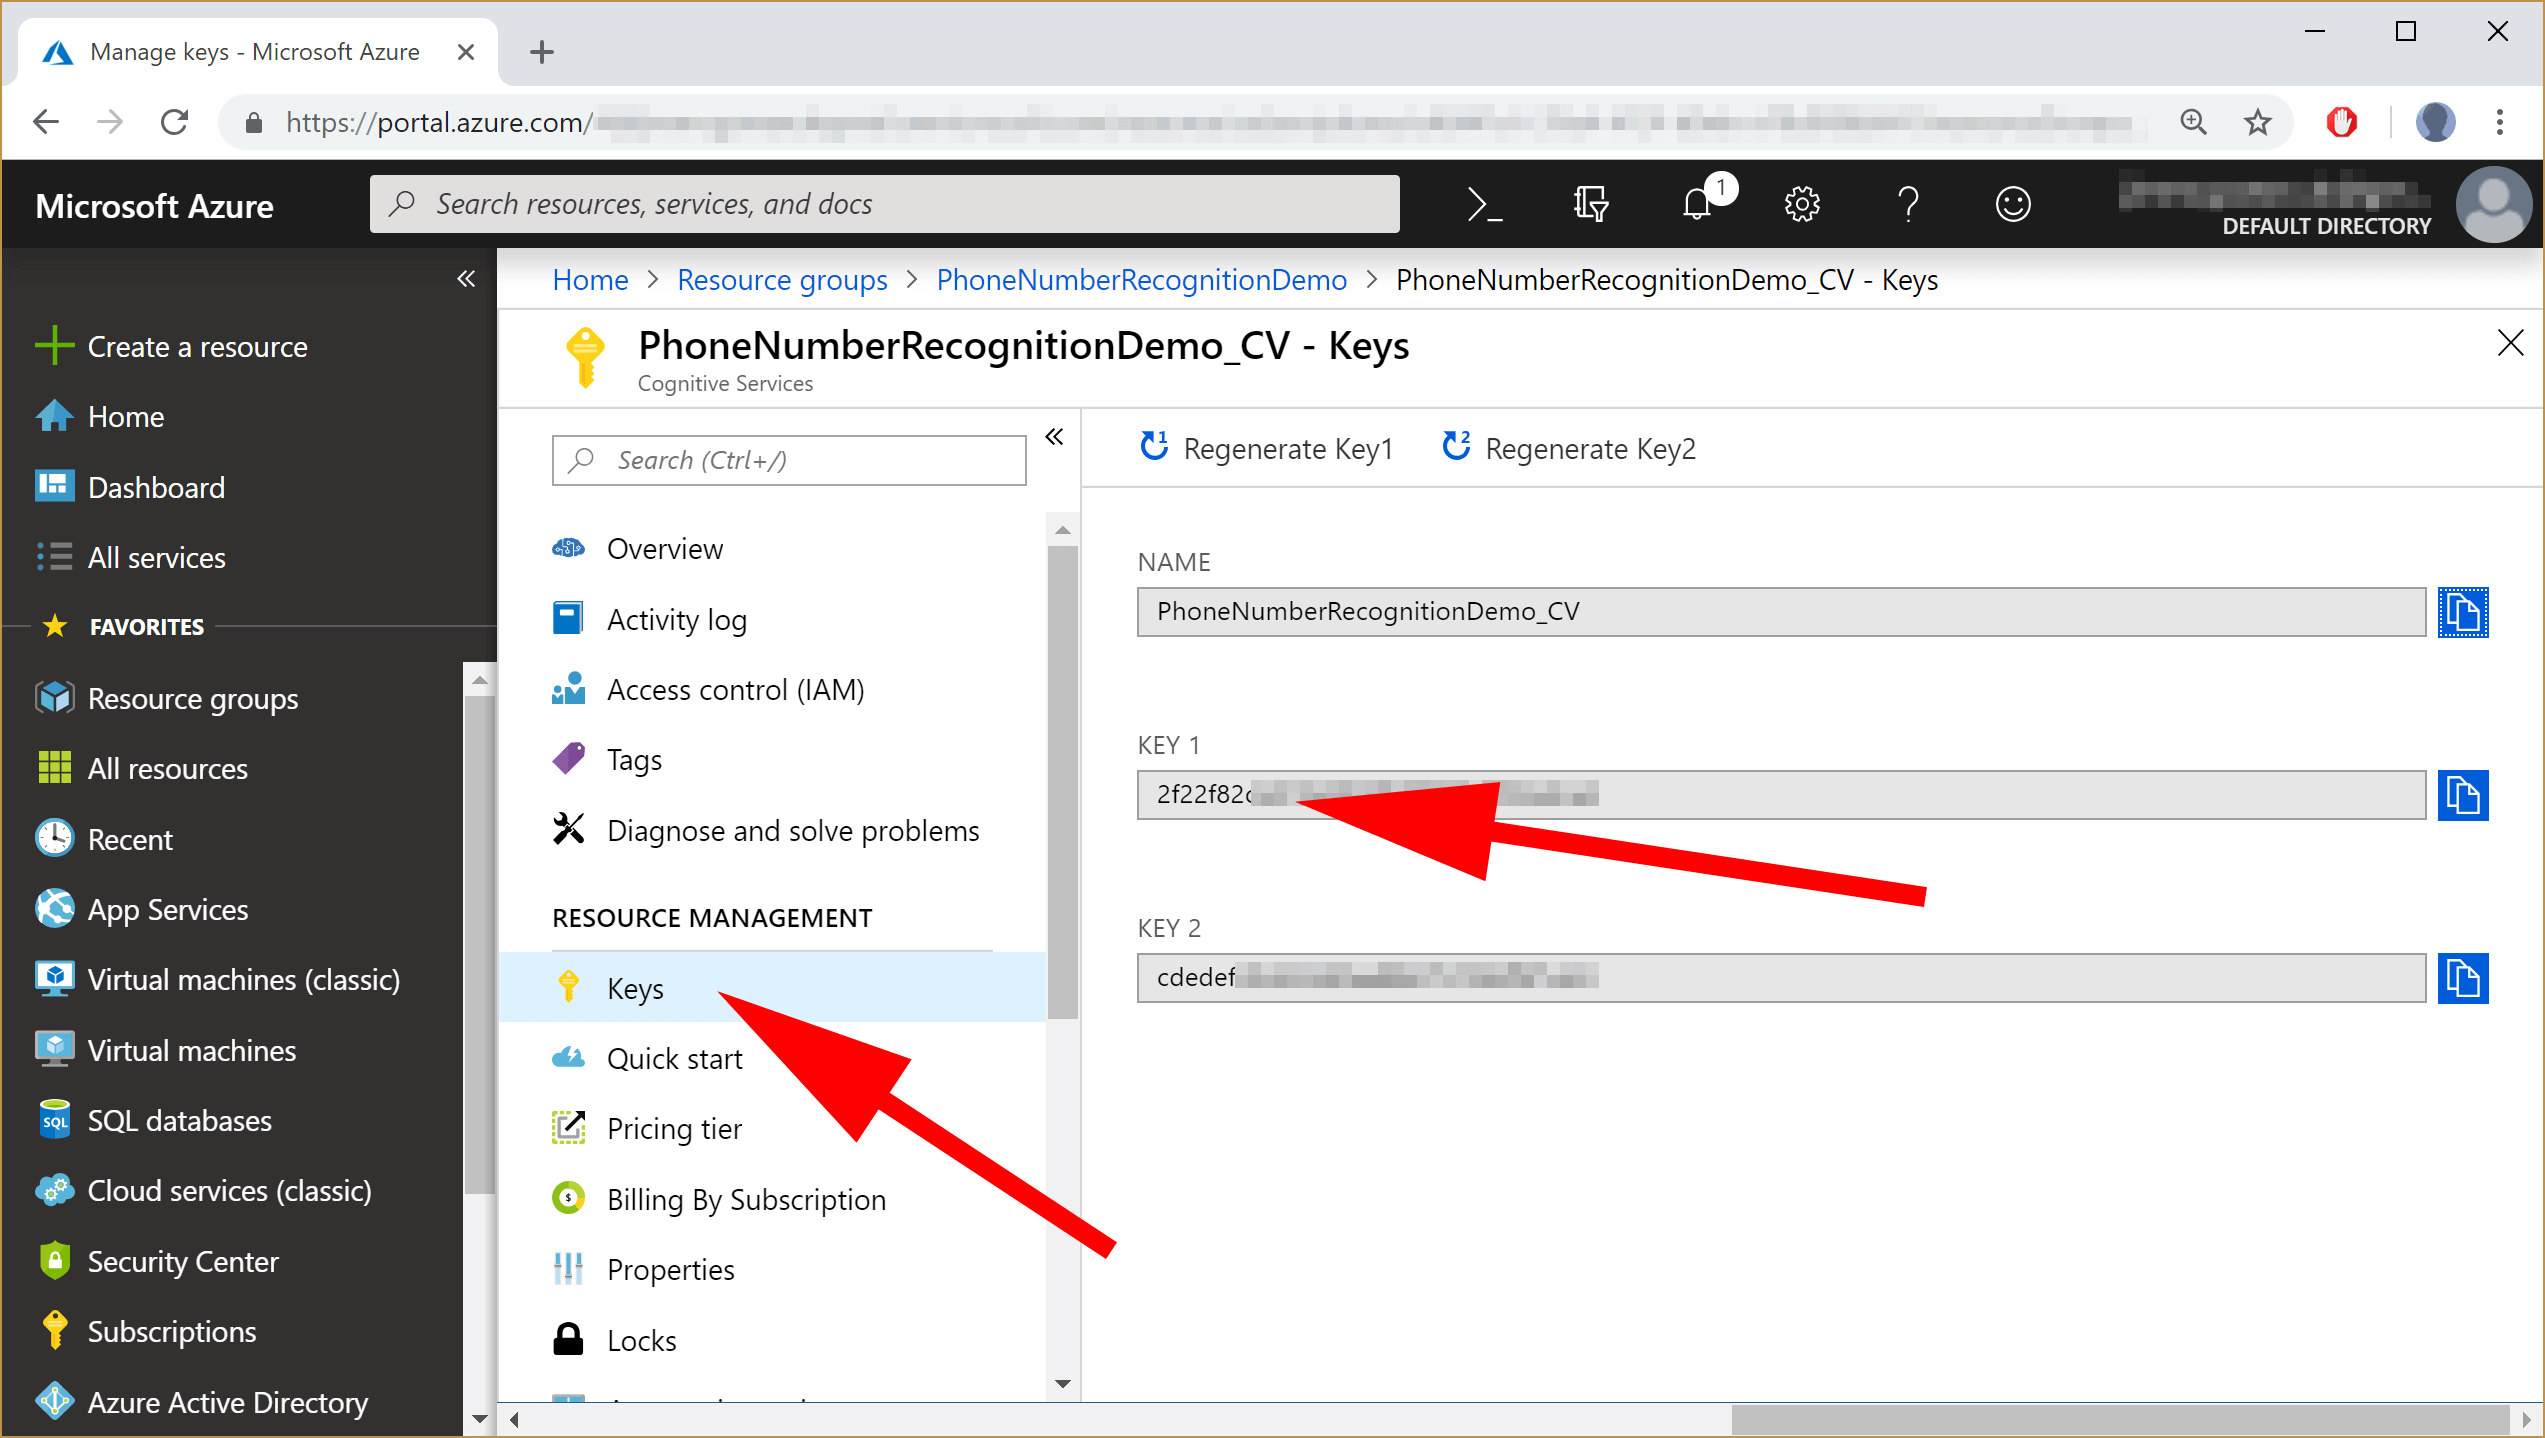
Open up the Computer Vision resource and navigate to the “Keys” section. We’ll need to copy these credentials into our project’s configuration a bit later, so keep this window open.
Setup Twilio
- Log onto your Twilio Portal (or create a free trial if you don’t already have one).
- We need to locate the
ACCOUNT SIDandAUTH TOKENvalues, which are prominently located on the home page.- The only slightly non-obvious thing that I encountered, as a brand-new Twilio user, was that in order to see any of your api keys, you must first have created at least one project, for these values to show. When I first started, I bypassed Twilio’s “My New Learn & Explore Project” introduction, meaning that I could not find the credentials.
- When you have found the credentials, keep the webpage open so that we can copy the keys into our application configuration.

Clone The Sample Repository
In order to more easily follow-along with this tutorial, you should clone the source code from here : https://github.com/SiliconOrchid/PhoneExtractVerify
Let’s Talk About App Configuration
Both the Azure and Twilio APIs require you to provide credentials in order to use their respective services.
Note that we don’t actually save any credentials directly in our code (otherwise this sensitive information will end up in version-control). Instead we will be using appsettings.json combined with User Secrets:
the
....\src\PhoneExtractVerify.Api\appsettings.jsonfile is used to provide structure.User Secrets and most likely Azure Appsettings (if you’re planning to host this solution in Azure).
If you’re not familiar with the concept of User Secrets, I could recommend that you read this blog as an introduction.
Let’s look at the appsettings.json file:
{
"Logging": {
  "LogLevel": {
    "Default": "Warning"
  }
},
"AllowedHosts": "*",

"TwilioCredentials": {
  "AccountSid": "Set In Secrets or Environment",
  "AuthToken": "Set In Secrets or Environment"
},

"AzureComputerVisionCredentials": {
  "UriBase": "https://westeurope.api.cognitive.microsoft.com/vision/v2.0/ocr",
  "SubscriptionKey": "Set In Secrets or Environment"
}
}
You can ignore the first few lines of this file that are related to logging. The parts we’re interested in are the entries for TwilioCredentials and AzureComputerVisionCredentials.
The
appsettings.jsonfile makes it clear that you shouldn’t be saving any sensitive information directly into this file.The
UriBasefor the Azure credentials is dependent on your own Azure subscription. In the sample code, this iswesteurope, but you will need to change this if you are using a different region. The URI to use is available to cut+paste out of the Azure Console, along with your other credentials.
The appSettings correlate to two strongly typed models within our code. These models are populated by binding to the configuration source and are then consumed by injecting them into the service class:-
....\src\PhoneExtractVerify.Api\Models\AzureComputerVisionCredentials.cs....\src\PhoneExtractVerify.Api\Models\TwilioCredentials.cs
The code for binding data to the configuration models can be found up in the solution startup. If you look at ...\PhoneExtractVerify\src\PhoneExtractVerify.Api\Startup.cs, the two lines with service.Configure do all the binding magic:
public void ConfigureServices(IServiceCollection services)
{
  services.Configure<TwilioCredentials>(Configuration.GetSection("TwilioAccount"));
  services.Configure<AzureComputerVisionCredentials>(Configuration.GetSection("AzureComputerVisionCredentials"));
Run the application
We’ll examine the code itself shortly, but first, let’s run the program and see an actual result!
The system is accessed using an HTTP endpoint, so assuming your code is now cloned and configured, all you need to do now is build and run the project.
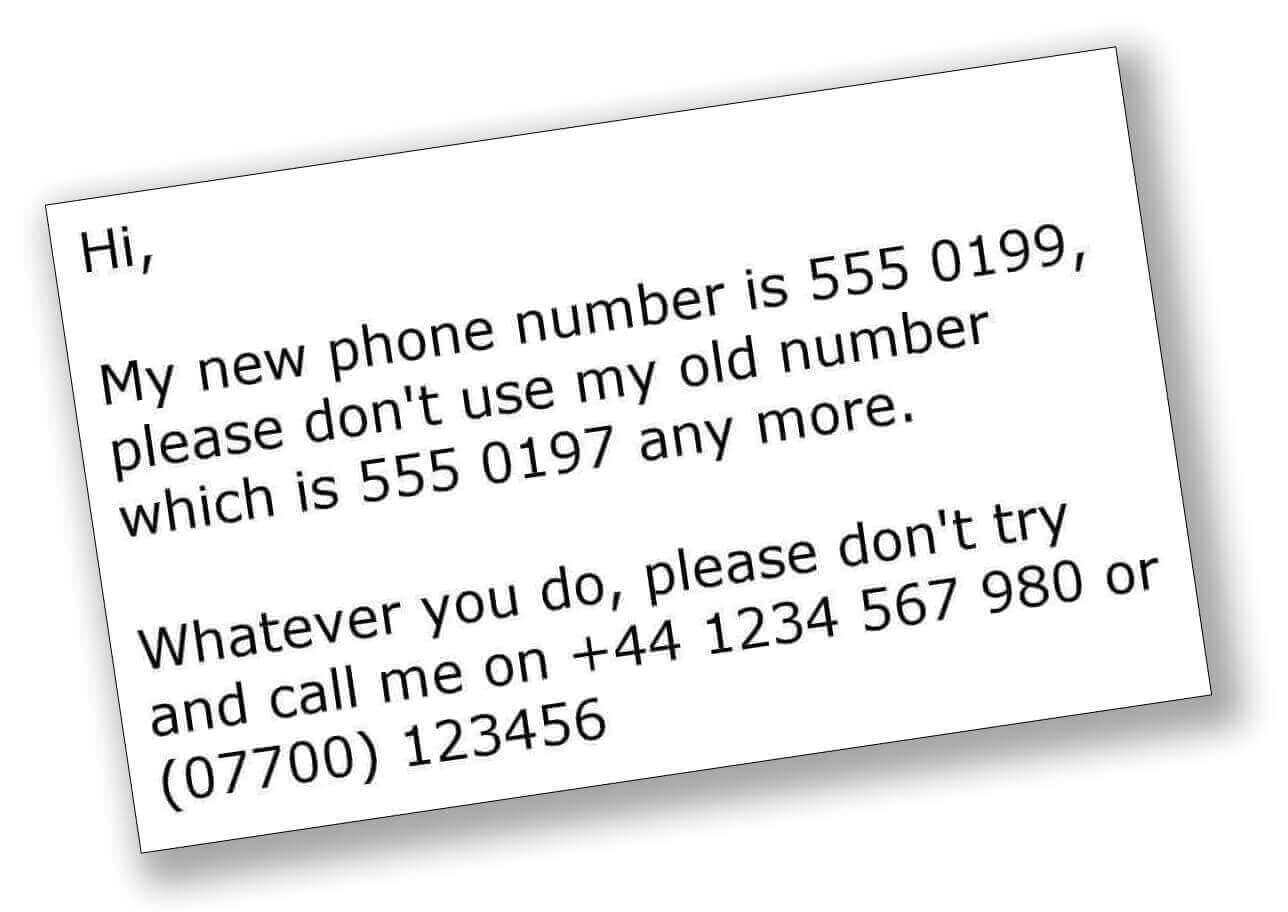
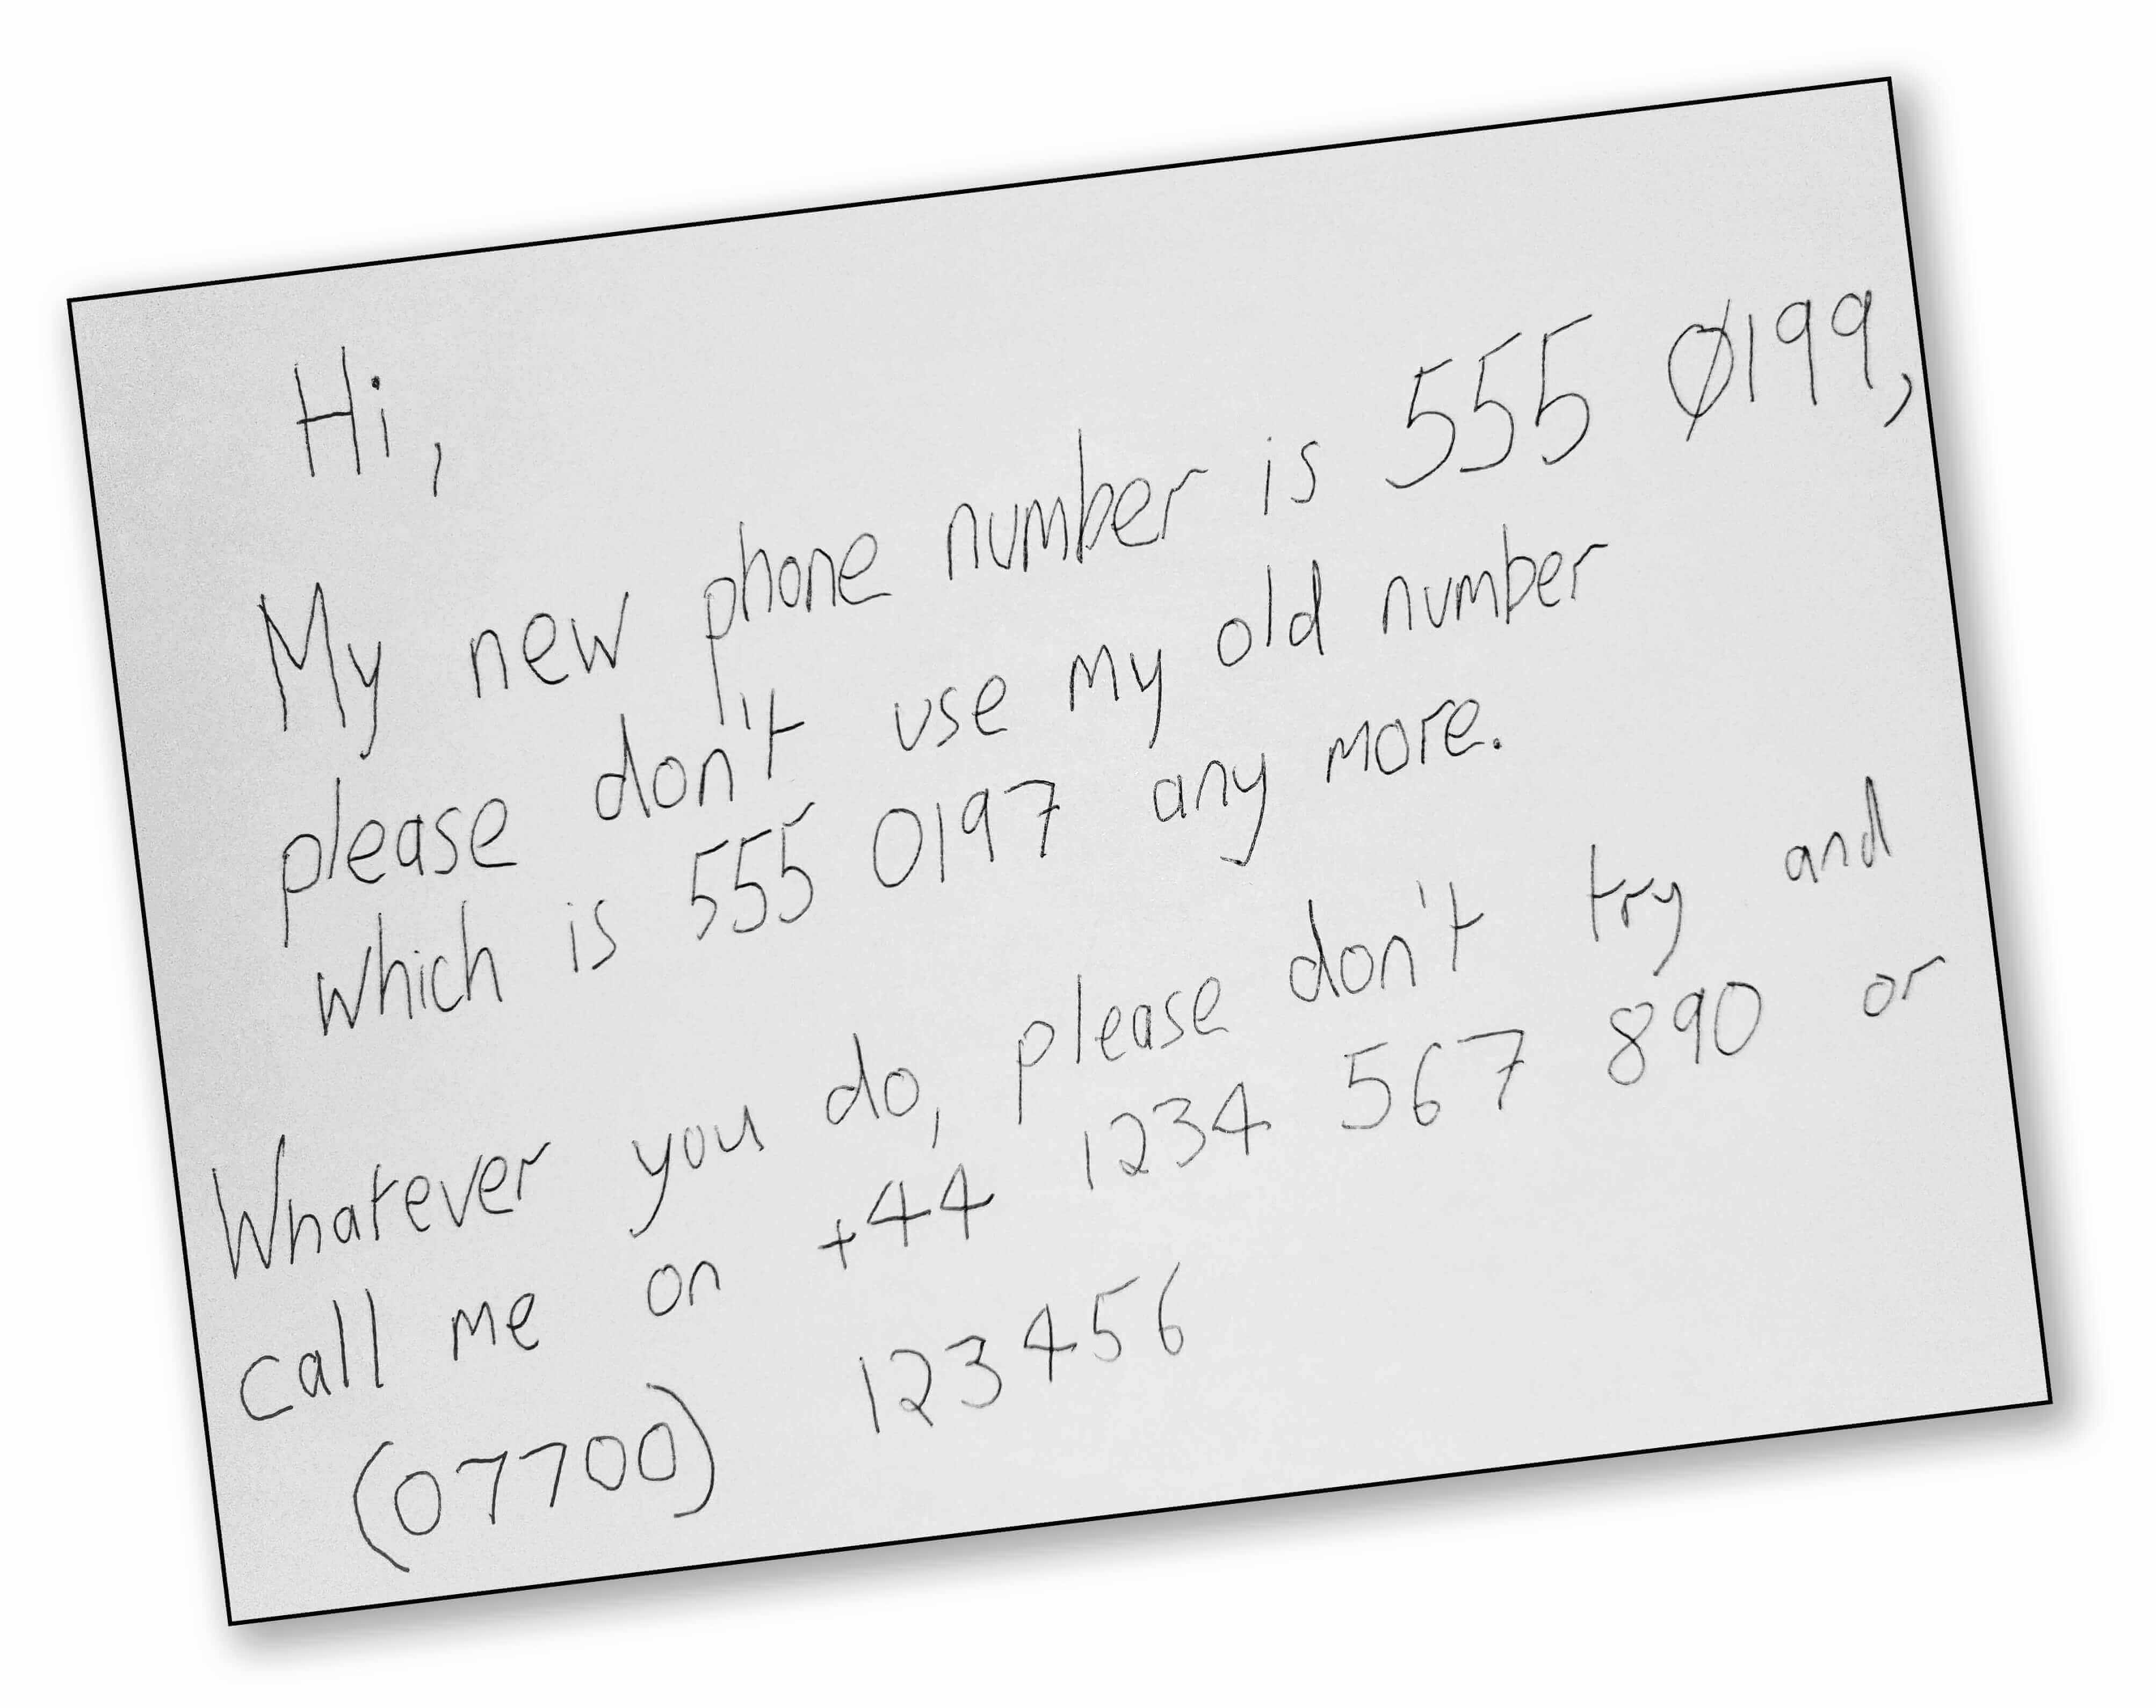
Here are a pair of sample images that you could use to perform the tests:
We need to
POSTan image to our API, so I recommend that you use a tool such as Postman to make the request:- Set the HTTP action to
POST. - Provide a URL to the correct endpoint (taking care to provide the right port number) - e.g.
https://localhost:44367/api/PhoneReader. - Set the body of the post to be a
binarytype (i.e. not form-data, etc). - Choose an image file to send (use the “typed” sample provided above if you like).
- If everything has worked, you should get an HTTP200 (ok) response from the API, along with any verified phone numbers:
- Set the HTTP action to
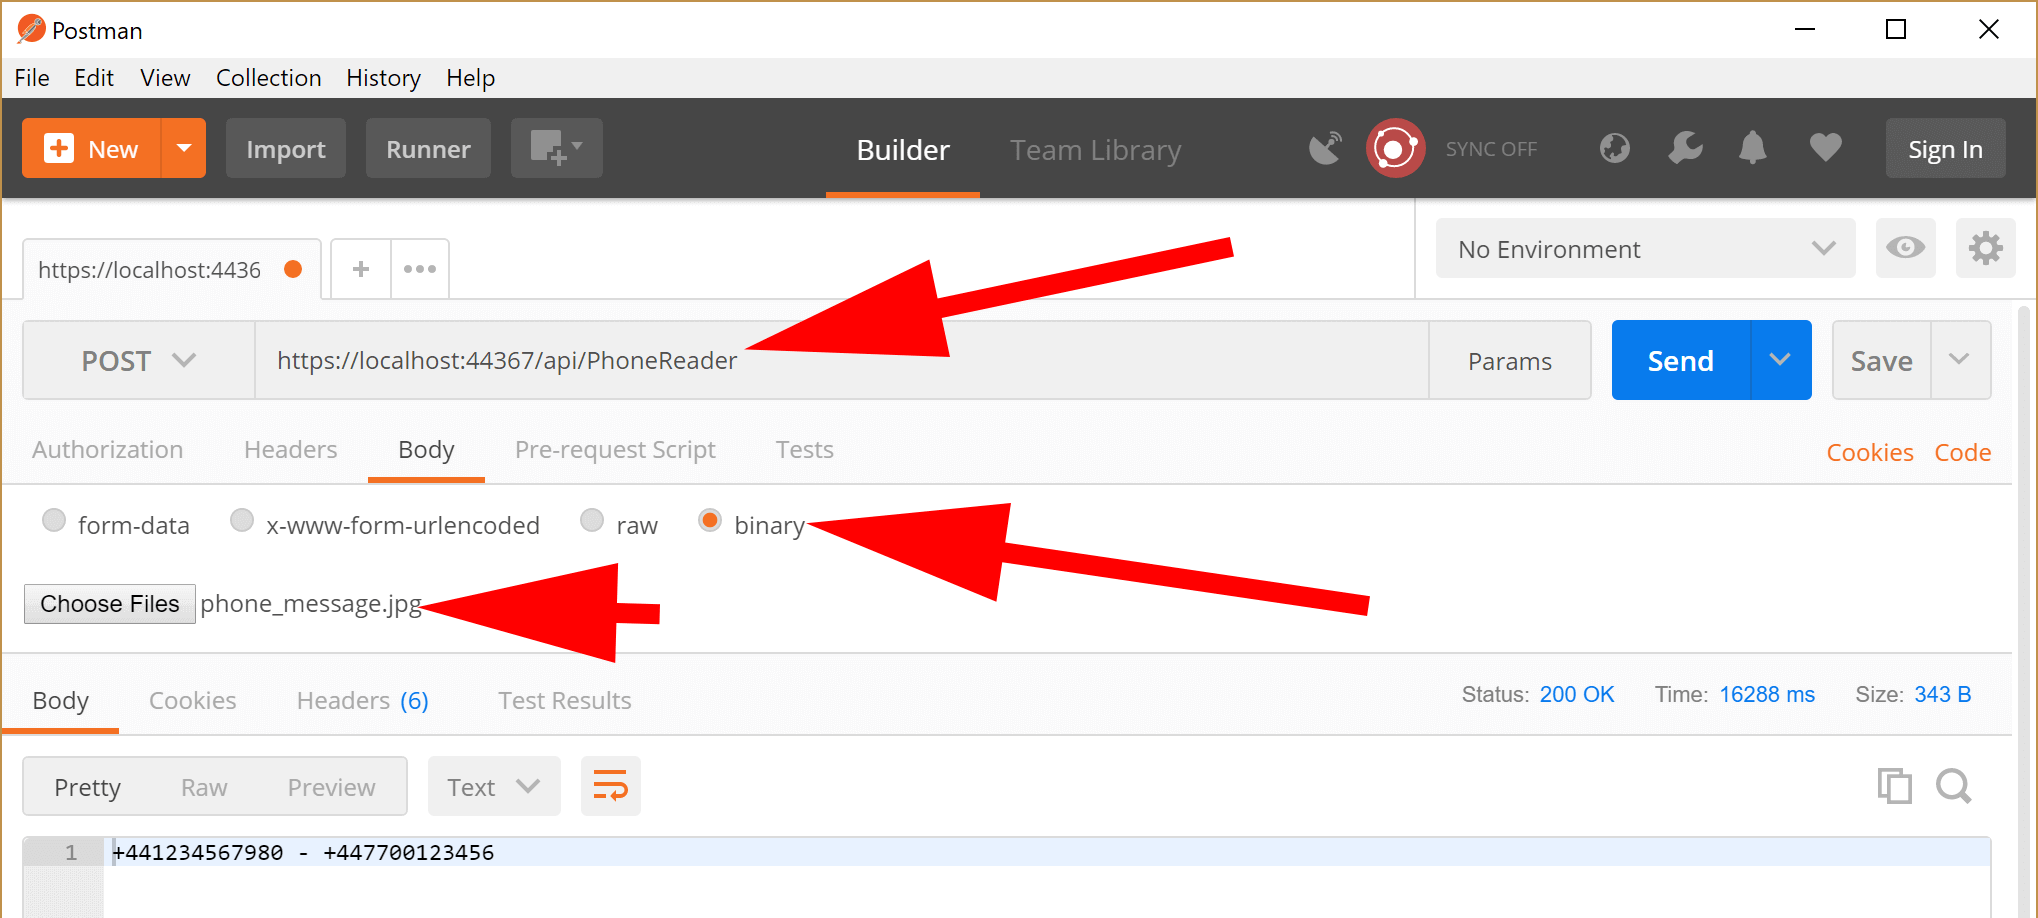
The screenshot above shows that our API correctly returns two phone numbers +441234567890 and +447700123456. These have been correctly extracted from the image and subsequently verified as real telephone numbers by the Twilio Api lookup.
Integrate With Azure Computer Vision
Next, let’s start looking at the code by examining the service class responsible for communicating with the Azure Text Recognition API. In your code editor, open up this file:-
....\PhoneExtractVerify.Api\Services\AzureComputerVisionHelperService.cs
- AzureComputerVisionHelperService Constructor of the class is concerned with the IoC injection of configuration settings.
public class AzureComputerVisionHelperService : IAzureComputerVisionHelperService
{
  private AzureComputerVisionCredentials _azureComputerVisionCredentials;

  public AzureComputerVisionHelperService(IOptions<AzureComputerVisionCredentials> azureComputerVisionCredentialsConfiguration)
  {
      _azureComputerVisionCredentials = azureComputerVisionCredentialsConfiguration.Value ?? throw new ArgumentException(nameof(azureComputerVisionCredentialsConfiguration));
  }
Reading Printed Text
The AzureComputerVisionHelperService ExtractPrintedText(…) method performs the work of talking to the Azure API for recognising printed text in an image.
The complete documentation for how to use this API can be found at Microsoft Computer Vision Quickstart (For Printed Text).
We provide credentials to use the service in the API request header.
We supply the image (as a byte array) as content.
The method asynchronously returns the JSON response from the API call.
We’ll talk about that JSON response in a moment.
Below is the code that talks to the image-recognition API:
public async Task<string> ExtractPrintedText(Byte[] imageBytes)
{
  try
  {
      HttpClient client = new HttpClient();

      client.DefaultRequestHeaders.Add("Ocp-Apim-Subscription-Key", _azureComputerVisionCredentials.SubscriptionKey);

      HttpResponseMessage response;

      using (ByteArrayContent content = new ByteArrayContent(imageBytes))
      {
          content.Headers.ContentType = new MediaTypeHeaderValue("application/octet-stream");
          response = await client.PostAsync(_azureComputerVisionCredentials.UriBase, content);
      }

      return await response.Content.ReadAsStringAsync();
  }
  catch (Exception e)
  {
      Console.WriteLine(e.Message);
      return "";
  }
}
Reading Handwritten Text
The AzureComputerVisionHelperService ReadHandwrittenText(…) method performs the work of talking to the Azure API for recognising handwritten text in an image.
The complete documentation for how to use this API can be found at Microsoft Computer Vision Quickstart (For Handwritten Text).
The code for talking to the “Handwriting Recognition” API has a fair bit more code than the equivalent “Typed Text” version. The principle reason is that the “Typed Text” version of the API returns data along with the API response. In contrast, the “Handwritten Version” of the API requires more processing effort by the service, which could take a relatively long time to return a result. As such, this API does not return an immediate result with the API request.
Instead, this API returns a dynamically generated URL as the response. This URL then needs to be polled repeatedly, until the service eventually provides you with a result.
We provide credentials to use the service in the API request header.
We supply the image (as a byte array) as content.
We check the initial API response for a valid response - if all is OK, we look at the response header as it will contain a URL value (in the code below, this is stored in the variable
operationLocation)We create a loop that iterates once every second, up to a maximum of 10 attempts. Each iteration will poll the
operationLocationfor a result. We assume that if there is no result after 10 seconds, that there has been a problem with the API service and log an error message to the console.If we receive a result during the poll, the json data is returned from the method.
Below is the code that talks to the image-recognition API (it is more or less cut & paste directly from the MS quickstart guide):-
public async Task<string> ReadHandwrittenText(Byte[] imageBytes)
{
  try
  {
      HttpClient client = new HttpClient();
      client.DefaultRequestHeaders.Add("Ocp-Apim-Subscription-Key", _azureComputerVisionCredentials.SubscriptionKey);
      string requestParameters = "mode=Handwritten";
      string uri = _azureComputerVisionCredentials.UriBase + "?" + requestParameters;

      HttpResponseMessage response;
      string operationLocation;

      using (ByteArrayContent content = new ByteArrayContent(imageBytes))
      {
          content.Headers.ContentType = new MediaTypeHeaderValue("application/octet-stream");
          response = await client.PostAsync(uri, content);
      }

      if (response.IsSuccessStatusCode)
      {
          operationLocation = response.Headers.GetValues("Operation-Location").FirstOrDefault();
      }
      else
      {
          string errorString = await response.Content.ReadAsStringAsync();
          Console.WriteLine($"ReadHandwrittenText : Response:{JToken.Parse(errorString).ToString()}");
          return string.Empty;
      }

      string contentString;
      int i = 0;
      do
      {
          System.Threading.Thread.Sleep(1000);
          response = await client.GetAsync(operationLocation);
          contentString = await response.Content.ReadAsStringAsync();
          ++i;
      }
      while (i < 10 && contentString.IndexOf("\"status\":\"Succeeded\"") == -1);

      if (i == 10 && contentString.IndexOf("\"status\":\"Succeeded\"") == -1)
      {
          Console.WriteLine("ReadHandwrittenText : Timeout error.");
          return string.Empty;
      }

      return contentString;

  }
  catch (Exception e)
  {
      Console.WriteLine("\n" + e.Message);
      return string.Empty;
  }
}
Extracting words from the response
The AzureComputerVisionHelperService ExtractPrintedWords(…) method performs the work of extracting a collection of words from the JSON data returned from the API request.
The data returned by either of the text-recognition APIs is a relatively complex json string (partial example below). The string contains a great deal of information including the actual words, the location of those words within the image and how the words may be grouped together (as part of a sentence, etc).
In many scenarios, all of this information could be very useful - but for this project, we really don’t need anything other than a list of the actual words.
So, with this understanding, we can write a piece of code that simply iterates over the data structures, and discards pretty much everything other than the data nodes containing the actual words themselves.
The variable
listDistinctWordsis used to store a list of extracted words.We convert the JSON string into a C#
dynamicobject .Using a
dynamictype is not without issues (for example, you lose compile-time type-safety), but for our demonstration code, it is a convenient way to address the problem of mapping and working with the complex object that is provide in the JSON response.The JSON response has 3 basic structures :
regions,linesandwords. We need to iterate through each of these structures and return only theword.textvalue. The following is a short snippet of the json response, creating using the sample images provided earlier:
{
  "language": "en",
  "orientation": "Up",
  "textAngle": 0.0,
  "regions": [
      {
          "boundingBox": "81,229,1020,455",
          "lines": [
              {
                  "boundingBox": "84,229,989,53",
                  "words": [
                      {
                          "boundingBox": "84,231,72,51",
                          "text": "My"
                      },
                      {
                          "boundingBox": "182,240,106,32",
                          "text": "new"
                      },
                      {
                          "boundingBox": "314,229,162,53",
                          "text": "phone"
                      },
  ... (clipped for brevity)
- The method then simple returns a collection of words:-
public List<string> ExtractPrintedWords(string jsonResponse)
{
  List<string> listDistinctWords = new List<string>();

  dynamic jsonObj = Newtonsoft.Json.JsonConvert.DeserializeObject(jsonResponse);

  foreach (var region in jsonObj.regions)
  {
      foreach (var line in region.lines)
      {
          foreach (var word in line.words)
          {
              listDistinctWords.Add(Convert.ToString(word.text));
          }
      }
  }

  return listDistinctWords;
}
Integrate With Twilio Lookup
- Dependency on Twilio API Wrapper
The interaction with the Twilio API is simplified because it provides helper libraries that can easily be added to your project.
Using NuGet, add dependencies to these packages: Twilio and Twilio.AspNet.Core.
If you prefer, you can add these references directly to the following file:-
....\PhoneExtractVerify\src\PhoneExtractVerify.Api\PhoneExtractVerify.Api.csproj:
<ItemGroup>
  <PackageReference Include="Microsoft.AspNetCore.App" />
  <PackageReference Include="Microsoft.VisualStudio.Web.CodeGeneration.Design" Version="2.1.1" />
  <PackageReference Include="Twilio" Version="5.14.0" />
  <PackageReference Include="Twilio.AspNet.Core" Version="5.9.7" />
</ItemGroup>
The Twilio helper service
Next, we’ll look at the service class responsible for communicating with the Twilio API.
In your code editor, open up this file:-
....\src\PhoneExtractVerify.Api\Services\TwilioHelperService.cs
- TwilioHelperService Constructor
The constructor for this class is really straightforward, so let’s just quickly note:
we are injecting a populated model containing the credentials to be used with the Twilio API.
we are initialising an instance of the TwilioClient with the credentials.
namespace PhoneExtractVerify.Api.Services
{
  public class TwilioHelperService : ITwilioHelperService
  {
      private TwilioCredentials _twilioCredentials;

      public TwilioHelperService(IOptions<TwilioCredentials> account)
      {
          _twilioCredentials = account.Value ?? throw new ArgumentNullException(nameof(account));

          TwilioClient.Init(_twilioCredentials.AccountSid, _twilioCredentials.AuthToken );
      }
   ...
- TwilioHelperService VerifyWithTwilioAsync(…) method
This method is responsible for transmitting a single “candidate phone number” (a string) to the Twilio Lookup API.
Our interaction with the Twilio API has been simplified, because we’re using that Twilio API helper library.
The majority of the code in this class is testing the response to the API and performing logging to help us diagnose any problems that may arise.
private async Task<string> VerifyWithTwilioAsync(string numberToTest)
{
  try
  {
      var twilioPhoneNumberResource = await PhoneNumberResource.FetchAsync(
              pathPhoneNumber: new Twilio.Types.PhoneNumber(numberToTest)
          );

      if (twilioPhoneNumberResource == null || twilioPhoneNumberResource.PhoneNumber == null)
      {
          Console.WriteLine($"TwilioHelperService : Using number '{numberToTest}', Twilio Api response was null");
          return String.Empty;
      }

      Console.WriteLine($"TwilioHelperService : Using number '{numberToTest}', Twilio Api returned valid object:  National Format : '{twilioPhoneNumberResource.NationalFormat}' . Carrier : '{twilioPhoneNumberResource.Carrier}' . Phone Number :  {twilioPhoneNumberResource.PhoneNumber}");
      return twilioPhoneNumberResource.PhoneNumber.ToString();
  }
  catch (Exception ex)
  {
      Console.WriteLine($"TwilioHelperService : Exception : {ex.Message}");
      return String.Empty;
  }
}
- TwilioHelperService ProcessListCandidateNumbersAsync(…) method
This method is responsible for iterating a collection of “candidate phone numbers” and calling the previously discussed VerifyWithTwilioAsync method repeatedly.
Notice that this method wraps each separate API call in an asynchronous task and then awaits, using Task.WhenAll(...), for all of the API calls to complete - before progressing. This allows us to fire of a number of API calls in parallel, which makes more efficient use of time.
The resultant collection of strings contains a list of phone numbers that have been validated by the Twilio API. The method then returns the collection.
public async Task<List<string>> ProcessListCandidateNumbersAsync(List<string> listCandidatePhoneNumbers)
{
  List<string> listVerifiedNumbers = new List<string>();

  var listTasks = new List<Task<string>>();

  foreach (var candidatePhoneNumber in listCandidatePhoneNumbers)
  {
      var task = VerifyWithTwilioAsync(candidatePhoneNumber);
      listTasks.Add(task);
  }

  foreach (var taskResult in await Task.WhenAll(listTasks))
  {
      if (!string.IsNullOrEmpty(taskResult))
      {
          listVerifiedNumbers.Add(taskResult);
      }
  }

  return listVerifiedNumbers;
}

The Mediator Service
The mediator service is the glue of the project and is responsible for orchestrating the multiple steps we need to take.
In your code editor, open up this file:-
....\src\PhoneExtractVerify.Api\Services\MediatorService.cs
It could be very tempting to put the kind of code in this class directly into the WebAPI controller method. However, by locating this orchestration code into its own class, we greatly improve the separation-of-concerns and make our code much clearer. This means that the WebAPI is responsible only for things which it should be concerned with (e.g. validating input parameters and returning http responses).
- MediatorService Constructor
The constructor of the class MediatorService injects the components that we will be using:
namespace PhoneExtractVerify.Api.Services
{
  public class MediatorService : IMediatorService
  {
      private readonly IWordProcessingService _wordProcessingService;
      private readonly ITwilioHelperService _twilioHelperService;
      private readonly IAzureComputerVisionHelperService _azureComputerVisionHelperService;

      public MediatorService(IWordProcessingService wordProcessingService, ITwilioHelperService twilioHelperService, IAzureComputerVisionHelperService azureComputerVisionHelperService)
      {
          _wordProcessingService = wordProcessingService ?? throw new ArgumentNullException();
          _twilioHelperService = twilioHelperService ?? throw new ArgumentNullException();
          _azureComputerVisionHelperService = azureComputerVisionHelperService ?? throw new ArgumentNullException();
      }
   ...
- MediatorService ProcessPhoneNumber(…) method:
This method is responsible for calling all of the various activities needed to process data from an image and ultimately into a filtered list of words.:-
In this demo code, we’ve provided versions for either “printed” text or “handwritten” text. Depending on which one you want to use, you should comment/uncomment the appropriate code.
As a suggestion, you could modify the code, so you provide additional switching to select the appropriate usage (e.g. a Url parameter in the calling Api, etc)
- Calls the
RecognisePrintedTextmethod of the “Azure Computer Vision Helper” service, first providing an image (which will be provided by the WebAPIcontroller method) and storing the JSON response in the variablejsonresponse. - Calls either the
ExtractWordsFromPrintedResultorExtractWordsFromHandwrittenResultfrom the “Azure Computer Vision Helper” service - this processes the JSON object to return a simple list of words, which gets saved in the variablelistAllWords. - Calls the “Word Processing” service to extract a list of “candidate phone numbers” from the complete list of words returned from the image OCR. There are a number of chained methods in this activity, each performing a step in the overall processing. We’ll examine the “Word Processing Service” in detail later in this article, but for the moment, let’s just press onwards so that we get to see a result.
- Calls the “Twilio Helper” service to validate the candidate phone numbers.
The code listing looks like this:-
public async Task<List<string>> ProcessPhoneNumber(byte[] imageBytes)
{
  // Call the Azure Computer Vision service (for Printed Text) and extract words from response.
  string jsonResponse = await _azureComputerVisionHelperService.RecognisePrintedText(imageBytes);
  List<string> listAllWords = _azureComputerVisionHelperService.ExtractWordsFromPrintedResult(jsonResponse);

  // -or-  if you want to use a handwritten image, swap out the above lines for the following:

  // Call the Azure Computer Vision service (for Handwritten Text) and extract words from response.
      //string jsonResponse = await _azureComputerVisionHelperService.RecogniseHandwrittenText(imageBytes);
      //List<string> listAllWords = _azureComputerVisionHelperService.ExtractWordsFromHandwrittenResult(jsonResponse);


  List<string> listCandidatePhoneNumbers = _wordProcessingService
      .AddWords(listAllWords)
      .GetCandidatePhoneNumbers()
      .ExtractWordsWithNumbers()
      .ReformatAsUKInternational()
      .GetMinLengthNumbers()
      .ListProcessedWords;

  List<string> listVerifiedPhoneNumbers = await _twilioHelperService.ProcessListCandidateNumbersAsync(listCandidatePhoneNumbers);

  return listVerifiedPhoneNumbers;
}
The WebAPI Controller
The WebAPI class is our entry point to this project. It provides a tidy way to interact with our code using an HTTP endpoint.
In your code editor, open up this file:-
....\src\PhoneExtractVerify.Api\Controllers\PhoneReaderController.cs
- We inject the mediator class, which has responsibility to call the various processes that we need to run.
- The API method itself,
Post(), is responsible for:-- receiving an HTTP post containing an image.
- confirming whether the rest of our code has run successfully and returning an appropriate HTTP response.
[Route("api/[controller]")]
[ApiController]
public class PhoneReaderController : Controller
{
  private readonly IMediatorService _mediatorService;

  public PhoneReaderController(IMediatorService mediatorService)
  {
      _mediatorService = mediatorService ?? throw new ArgumentNullException();
  }


  [HttpPost]
  public async Task<ActionResult> Post()
  {
      // Read the image from the POSTed data stream, into a byte array
      byte[] imageBytes;
      using (var ms = new MemoryStream(2048))
      {
          await Request.Body.CopyToAsync(ms);
          imageBytes = ms.ToArray();
      }

      try
      {
          List<string> listVerifiedPhoneNumbers = await _mediatorService.ProcessPhoneNumber(imageBytes);
          return Ok(string.Join(" - ", listVerifiedPhoneNumbers));
      }
      catch
      {
          return StatusCode(500);
      }
  }
}
Processing Scanned Numbers Into E.164 Format
By now you have hopefully either run the project and seen a result, or at least have a good feel for the various moving parts.
This section addressed two key points:
We’re going to be using something called method chaining. You can read more about this in another of my articles here : C# Method Chaining. Very briefly, the idea behind this approach is that you can pass the output from one method, directly to another, using an easy-to-use syntax.
This article is going to touch on a specific-regional phone-number format. Because I’m based in the UK, my demonstration is going to explain how UK phone number formatting works and will include demo code that addresses this. You should view this as “a business logic problem” and adapt your own code to suit your localisation.
I’ve deliberately left the explanation of this “WordProcessing” service until later in this article, because I wanted you to learn about the overall program structure and the APIs first, without getting you overly bogged-down in detail which is more “business logic” orientated.
A Brief Introduction To UK Phone Number Formatting
In the UK, the phone number system has a few variations:
The basic phone number is a six-digit numeric-only number - e.g. 123456.
- You could telephone this “short” number and (assuming it is connected) you would get through to the geographically local landline (someone in your town or city).
You might be calling someone elsewhere in the country or on a mobile phone network. To achieve this, you need to include what we call the “area code” (or “prefix code”).
- An example landline number would now look like this: 01234 123456.
- Mobile (cellphone) numbers typically start with “07” rather than “01”, so a mobile number could be: 07700 123456.
In the UK, we also have the concept of non-geographic and premium numbers. These have a slightly shorter prefix - e.g. 0800 numbers are typically toll-free, 0845 are non-geographic but charged at local call rates. E.g. 0845 123456
The UK international dialling code is +44. If you are calling a UK number from abroad - or more relevantly to our scenario, wanting to use the international E.164 format - you must drop the leading zero from the national version of the number.
- This means that the national number 01234 123456 becomes +44 1234 123456 … or more correctly (without spaces) +441234123456.
- This means that the national number 01234 123456 becomes +44 1234 123456 … or more correctly (without spaces) +441234123456.
The above covers the basic number system. However, when you start to venture into printed media (such as adverts, posters or business cards etc), phone numbers can become more arcane as they rely on human interpretation to decode.
For example, it is very common in the UK to include parenthesis and spacing to make it easier for a human to read - for example “(01234) 567890”. To adapt this style of number into E.164 format, we would need to do a couple of things:
- We need to remove the non-numeric characters. In the example above, the parentheses and spaces needs to be removed.
- The leading zero is used when dialling domestically, but not internationally, so we also need to drop that.
- Assuming that we know for a fact that this number is from the UK (and truthfully, we are making a big assumption, as there is nothing in the example itself that tells us that this number is from the UK), we need to add the international dialling code. So we prefix with +44.
- We should end up with the number +441234567890
The WordProcessingService
The WordProcessingService class is responsible for processing a string. The class has various methods that refine the results. The overall goal of the service is to take a collection of any possible words that originate in a scanned image, and return a list of strings that could be a candidate phone number.
In your code editor, open up this file:-
....\src\PhoneExtractVerify.Api\Controllers\PhoneReaderController.cs
- WordProcessingService Class variables
The various methods in this class chain results together, so rather than passing values around to each method as an argument, we use private member variables that each method modifies.
The first couple of items are configuration items (such as international dialing prefix). Arguably this sort of thing could be extracted out into configuration, but given the relatively specific purpose of the code in this class, it’s doing no harm to leave it here.
We publicly expose ListProcessedWords as a collection of refined values.
namespace PhoneExtractVerify.Api.Services
{
  public class WordProcessingService : IWordProcessingService
  {
      private static string _countryPrefix = "+44";
      private static int _minWordLength = 10;
      private List<string> _listProcessedWords;


      public List<string> ListProcessedWords
      {
          get { return _listProcessedWords; }
      }
- WordProcessingService AddWords(…) method
Most of the methods in this class read and write from the private member variable
_listProcessedWords. We need a way to pass an initial value into the chain, which is the purpose thatAddWords(...)serves.
You can see an example of use, described earlier, in the MediatorService ProcessPhoneNumber(...) method, but to briefly recap, we call the AddWords(...) method first providing a collection of words as an argument and then append the other method calls.
Superficially, AddWords(...) does nothing more than take the argument and assigns it to the private member variable.
public WordProcessingService AddWords(List<string> listWords)
{
  _listProcessedWords = listWords;
  return this;
}
- WordProcessingService GetCandidatePhoneNumbers(…) method
The problem we are trying to solve with this method, is that when the Azure OCR service is run on an image, it returns a list of words that are separated by numbers.
It has no way of recognising that a number separated by spaces is actually intended to be a single phone number, so the result is that it returns multiple separate words. In other words, our phone number has become fragmented.
A single number fragment on its own is of no use to us, so we need a way to re-assemble those fragments back together.
The code in this method achieves this, by iterating over all the words in the collection in sequence. It works by making a note of whether the previous word it looked at in the sequence, was a number (or contains the “+” symbol). If the previous word and the current word both contain a number within the word, the code will combine the two into a new string and insert this new value into the collection.
The inclusion of the “+” symbol when checking for words containing digits, was something I added when testing. I noticed that some OCR passes separate the “+” as a distinct word - separated from the the international code - which caused problems.
This code will combine new words containing numbers together, until it encounters a word-only word, or reaches the end of the list.
The code trails on (and includes) the newly-created compound number, meaning we can build up longer strings of adjacent numbers
So, this is probably best explained by showing you an example. The following words are extracted from the Azure OCR process :
"call", "me", "on", "+44", "1234", "567", "890", "or"
Running the above list through our method, creates the following list as an output:
"call", "me", "on", "+44", "1234", "+441234", "567", "+441234567", "890", "+441234567890", "or"
In a later step, we’ll discard most of the unwanted number fragments, but the key thing is that we have reassembled the four separate numbers fragments (“+44”, “1234”, “567” and “890”) into a new word “+441234567890” - which will be useful to us.
Also worth noting, is that we need to be accepting of numbers that aren’t purely integers. For example the international dialling code fragment with typically contain a plus symbol (e.g. “+44”), so we need to allow this to be included.
public WordProcessingService GetCandidatePhoneNumbers()
{
  bool IsTrailingNumber = false;

  List<string> listCombinedNumberWords = new List<string>();

  foreach (var word in _listProcessedWords)
  {
      listCombinedNumberWords.Add(word);

      if (word.Any(char.IsDigit) || word.Contains("+"))
      {

          if (IsTrailingNumber)
              listCombinedNumberWords.Add($"{listCombinedNumberWords[listCombinedNumberWords.Count - 2]}{word}");

          IsTrailingNumber = true;
      }
      else
      {
          IsTrailingNumber = false;
      }
  }

  _listProcessedWords = listCombinedNumberWords;
  return this;
}
- WordProcessingService ExtractWordsWithNumbers(…) method
The purpose of this method is to discard words that do not contain a numeric digit.
To explain with an example, when filtered, the following list:
"call", "me", "on", "+44", "1234", "+441234", "567", "+441234567", "890", "+441234567890", "or"
… will be filtered to become this list:
"+44", "1234", "+441234", "567", "+441234567", "890", "+441234567890"
public WordProcessingService ExtractWordsWithNumbers()
{
  _listProcessedWords = _listProcessedWords.Where(word => word.Any(char.IsDigit)).ToList();
  return this;
}
- WordProcessingService GetMinLengthNumbers(…) method
The purpose of this method is to discard words that do not meet a value that we deem to be the minimum threshold in length.
The idea here, is that while we may not know whether a number is valid or not, we can be fairly certain that are too short to possibly be a E.164 code, can be discarded without further testing.
To explain with an example, when filtered, the following list:
"+44", "1234", "+441234", "567", "+441234567", "890", "+441234567890"
… will be filtered to become this list:
"+441234567", "+441234567890"
public WordProcessingService GetMinLengthNumbers()
{
      _listProcessedWords = _listProcessedWords.Where(w => w.Length >= _minWordLength).ToList();
  return this;
}
- WordProcessingService ReformatAsUKInternational(…) method
The purpose of this method is to ensure that any recombined phone number fragments correctly include an international dialling code.
Earlier in the article, we already established that determining which country code to apply would be difficult. For the purpose of this demo code, we will assume that we need to be applying a UK code.
The code inspects the number, performing a few checks:
- Non numeric characters are removed, with exception of the “+” symbol.
- The leading zero of the national area code is removed.
- If not already present, the international prefix is added.
public WordProcessingService ReformatAsUKInternational()
{
  List<string> listReformattedNumberWords = new List<string>();

  foreach (var word in _listProcessedWords)
  {
      string numbersOnlyWord = GetOnlyNumbers(word);

      if (word.Substring(0,1) == "+")
      {
          listReformattedNumberWords.Add($"+{numbersOnlyWord}");
          continue;
      }

      if (numbersOnlyWord.Substring(0, 1) == "0")
      {
          listReformattedNumberWords.Add($"{_countryPrefix}{numbersOnlyWord.Substring(1, numbersOnlyWord.Length-1)}");
          continue;
      }

      listReformattedNumberWords.Add($"{_countryPrefix}{numbersOnlyWord}");
  }

  _listProcessedWords = listReformattedNumberWords;

  return this;
}

Problems With OCR
I’ve already said that this is a hard problem to solve and that the solution presented in this article is far from robust. Similarly, however clever the OCR process is, it is far from foolproof.
To close this article, we’ll have a brief look at some of the problems that have been thrown up with our own test material:
- OCR incorrectly detecting lines of text
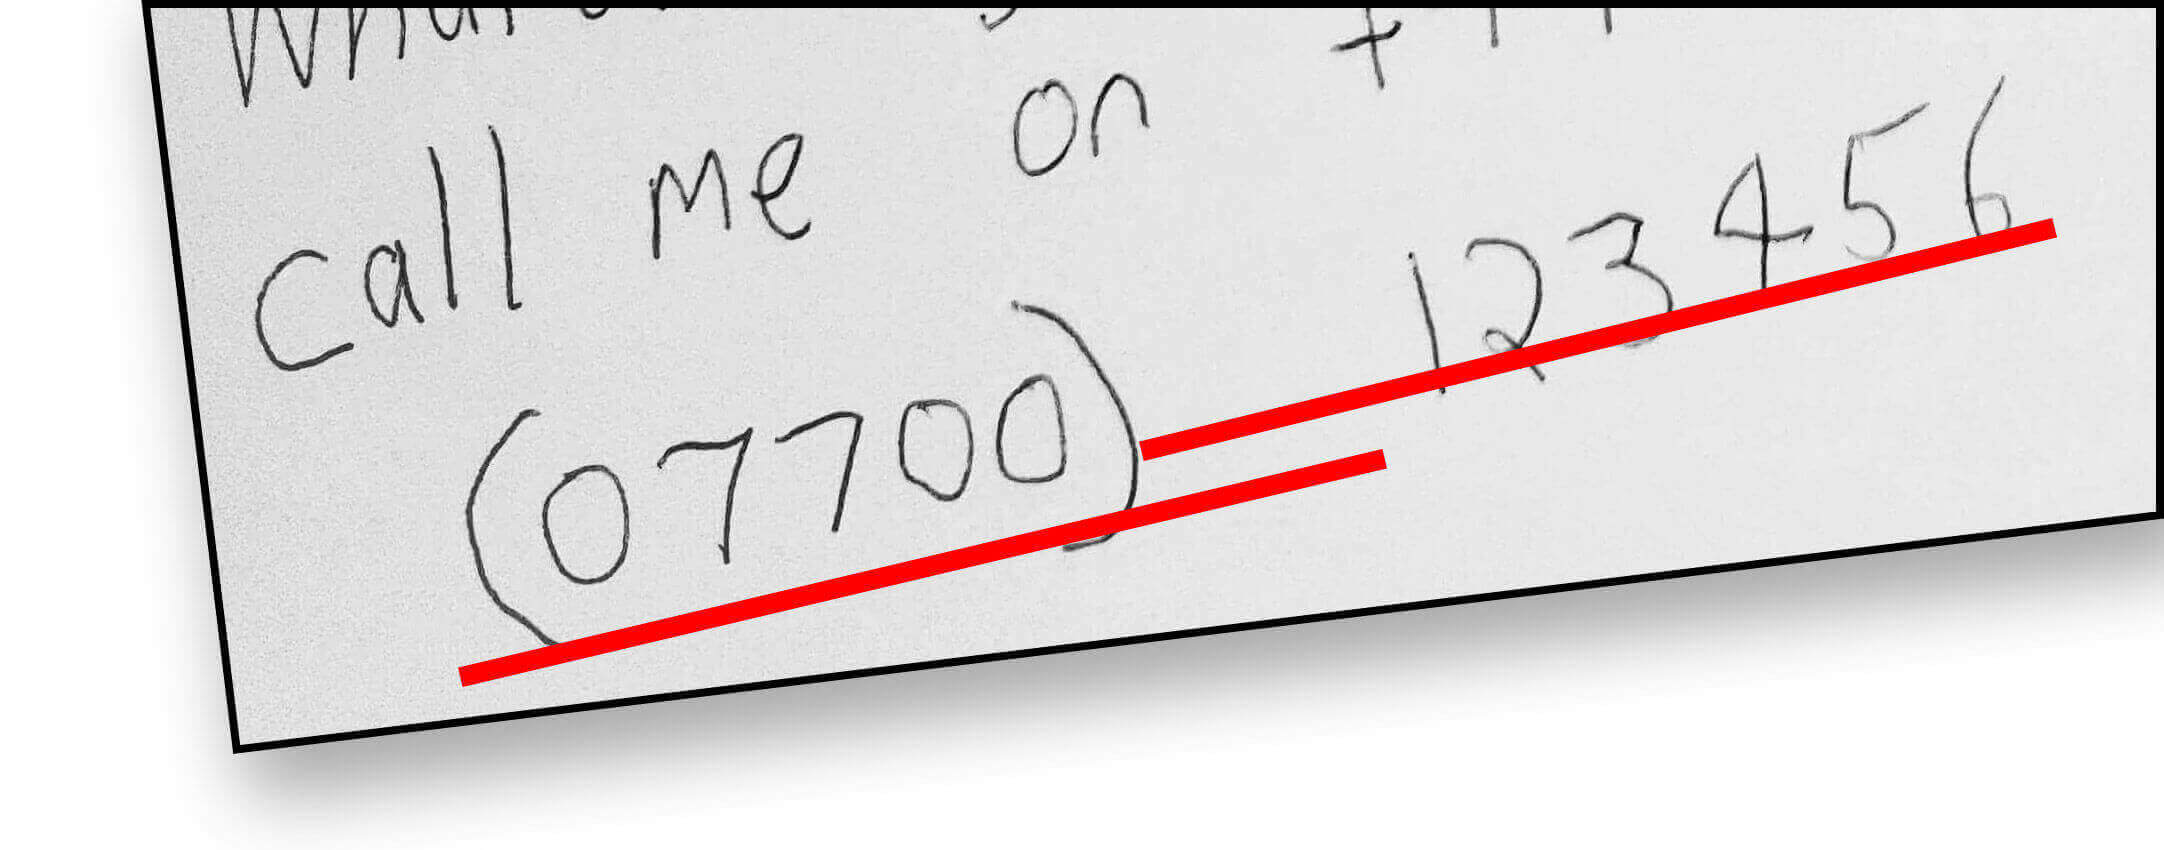
If you’ve followed along with the example, you may have already spotted that the phone number “(07700) 1234567” was not detected correctly in the handwritten-text version of the test.
The reason for this is not because the OCR process fails to recognise the words, nor is it because our own code here fails to re-assemble the word.
The problem is that the OCR process incorrectly identifies which line that the text should appear. In this example, the OCR incorrectly identifies the second word to appear sooner in the sequence of words (i.e. “123456” appears before “(07700)”), therefore causing our own process to attempt to assemble the phone number in the incorrect order:
In the following code block, I have extracted out the raw data as returned from the OCR API, as this shows you the fragmented nature of the process along with how the data can be returned out of the expected sequence. What is more reassuring though, is that we can see our loop for reassembling phone numbers seems to work fine, despite being broken up into many smaller words:
...
call
me
on
+
4
4
1234
567
890
or
123
45
6
(
0
7
700)
- OCR incorrectly identifying characters
The OCR process seems to work pretty well with printed text, but handwritten text is still a “big ask” to assume that results will be returned reliably. One must remember that a human reading a number can apply “the context” of what they see, not just the literal guess of “what they see”, as the computer does.
To demonstrate an example of a problem with the OCR process, we can see that the handwritten example contains a number zero marked with a cross-line (as you see shown in many fonts). When drawing the handwritten-text sample, I had deliberately added the cross-line, as I had hoped that this would have made the character easier for the OCR process to interpret, so as to avoid confusion with the “o” or uppercase “O”. As it turned out, this was not the case, as that “0” (zero) character was incorrectly recognised as a “$” (dollar character)
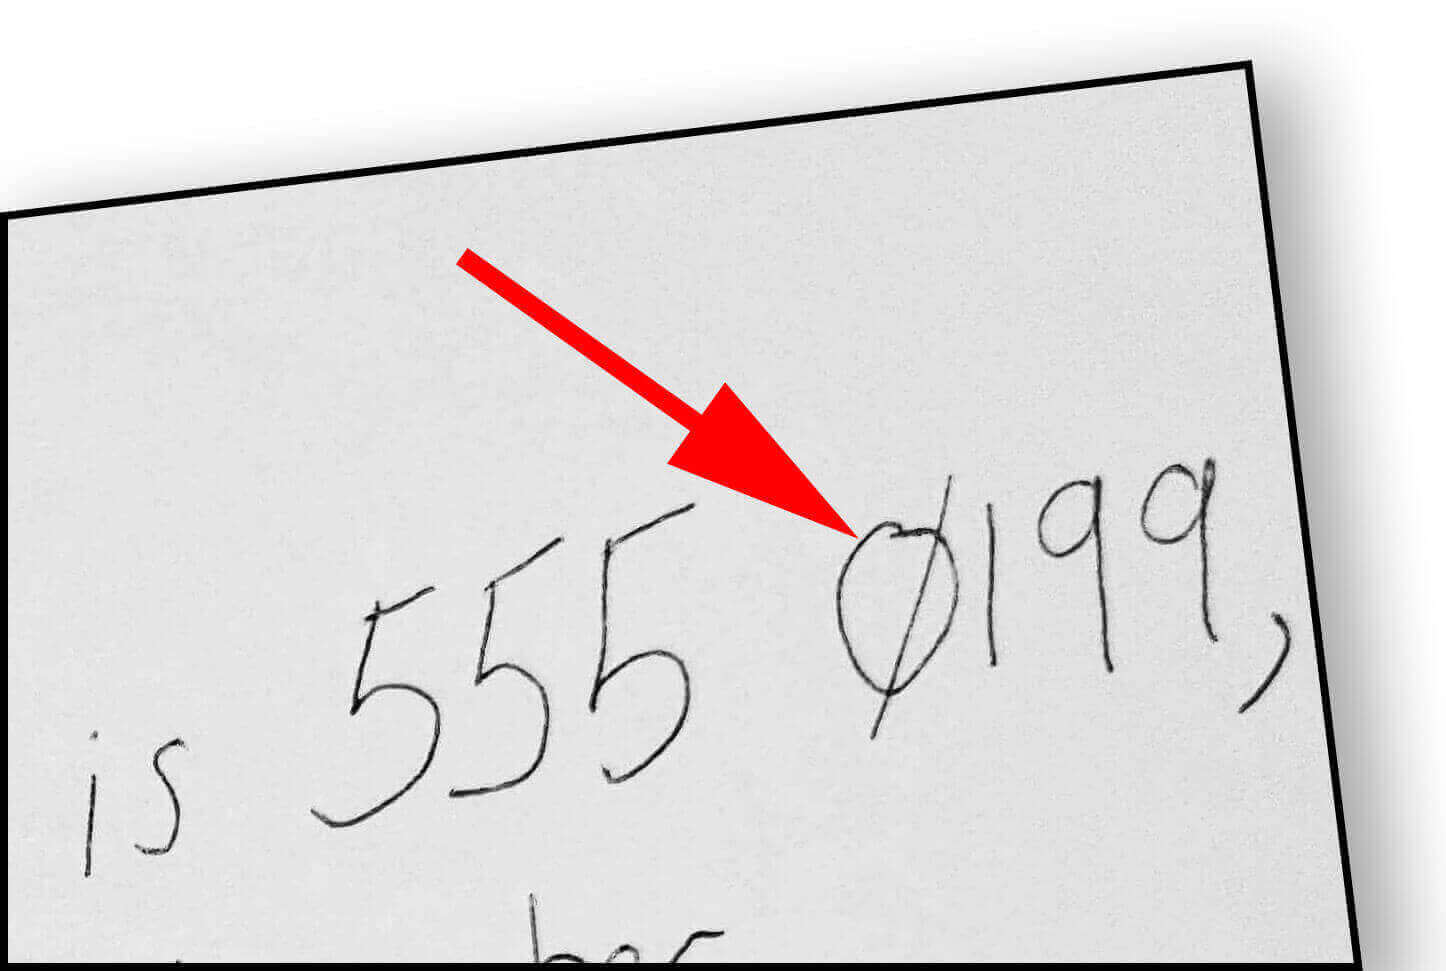
...
my
new
phone
number
is
535
$
199
please
...
Further Reading
- Azure Computer Vision QuickStart (linking to other documentation)
Disclosure
I always disclose my position, association or bias at the time of writing; No third party compensate me or otherwise endorse me for my promotion of their services. I have no bias to recommend Microsofts’ services. My partner Layla Porter is an employee at Twilio in the capacity of Developer Relations - this gives me bias to promote their services.